What Is Conda? Python Environment and Package Management
Conda is a command-line package and environment manager that creates, isolates, and switches between Python setups with different package and interpreter versions. Managing different projects and their requirements is challenging when Python coding involves many varying package versions and intricate setups. Conda solves this by letting you work with isolated environments from the command line. Do not confuse Conda with Anaconda, which is a scientific-computing distribution that bundles a set of packages including NumPy, SciPy, Jupyter notebooks, and Conda itself.
With the Conda package manager, you can create, list, remove, and update environments with different versions of Python and packages installed. This introductory post describes the process of creating and using Conda environments — a practical starting point if you have not used Conda yet. For complete reference material, read the official Conda documentation. Below is a concise review of the most useful Conda commands to start with.
Installing Conda on macOS, Windows, and Linux
Conda installs on Windows, macOS, and Linux platforms by following the official installation instructions. This post uses conda 4.11.0 on macOS. Beware that some commands differ if you use Conda versions below 4.6.
conda --version
Conda was installed with the Miniforge3-MacOSX-arm64 distribution downloaded from Miniforge Releases and run via the bash script:
/bin/bash Miniforge3-MacOSX-arm64.sh
Managing Conda Environments from the Command Line
Creating a Conda Environment with a Specific Python Version
The following command creates a new environment named env1, stored in the /envs directory under the path where Conda is installed. On this computer, created environments are saved in the /Users/elena/miniforge3/envs/ folder because Conda was installed together with Miniforge.
conda create --name env1
In one of my posts, I created a new Conda environment for managing a TensorFlow installation for deep learning experiments.
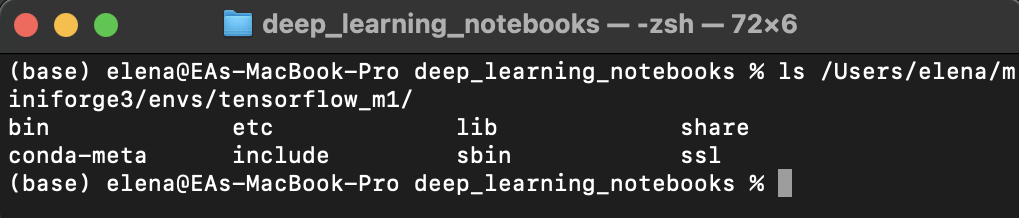
Figure 1. Conda environment tensorflow_m1 stored in /envs
Conda lets you specify the exact Python version installed into a new environment.
conda create --name tensorflow_m1 python=3.9
Alternatively, create an environment with a defined Python version and a required set of packages (optionally pinned to specific versions):
conda create --name myenv python=3.9 scipy=1.7.3 pandas=1.3.5
Activating a Conda Environment and Installing Packages
Next, activate the environment. Activation makes the named environment current, so you can work within it and install required packages.
# Activate the environment
conda activate tensorflow_m1

# Install matplotlib into the active environment
conda install matplotlib
The wget command is not installed by default on macOS, so this Conda command installs it:
conda install -c anaconda wget
Resolving “zsh:1: command not found: wget” After conda install
Verbatim error: zsh:1: command not found: wget
Cause: The conda install -c anaconda wget package does not reliably expose the wget binary on the macOS zsh shell PATH.
Fix: Install wget with Homebrew instead, then restart the shell:
brew install wget
Listing Conda Environments with conda env list
The conda env list command shows every created environment. The currently active environment, tensorflow_m1, is marked with an asterisk (*).
conda env list

Figure 2. List of Conda environments
Conda Environment Management: Summary
Conda is a package and environment manager that isolates project dependencies so each project runs against its own Python interpreter and package versions. This post is a starting point for using Conda: creating environments, activating them, installing packages, and listing environments from the command line.
Conda Environments FAQ
What is the difference between Conda and Anaconda?
Conda is a command-line package and environment manager, while Anaconda is a full scientific-computing distribution that bundles Conda together with pre-installed packages such as NumPy, SciPy, Jupyter notebooks, and pandas. You can run Conda without Anaconda by installing a minimal distribution like Miniconda or Miniforge.
How do I create a Conda environment with a specific Python version?
Run conda create --name myenv python=3.9. To pin packages at the same time, append them with versions: conda create --name myenv python=3.9 scipy=1.7.3 pandas=1.3.5. The environment is stored in the envs/ directory under your Conda installation path.
How do I list all Conda environments and see which one is active?
Run conda env list. The command prints every environment, and the currently active environment is marked with an asterisk (*).
How do I fix ‘zsh:1: command not found: wget’ inside a Conda environment?
The conda install -c anaconda wget package does not always expose the wget binary on macOS zsh. Install it with Homebrew instead: brew install wget. After installation, restart the shell so the new binary is on your PATH.
Did you like this post? Please let me know if you have any comments or suggestions.
Posts about development tools and Python codingReferences
Enjoyed this? Get more like it.
Weekly notes on AI tools, Python, and what I'm actually building — plus two free gifts: the 15-page Fantastic AI: The 2026 Toolkit and a Git Commands & Contribution Workflow Cheatsheet.
