
Git Collaboration on GitHub: Forks, Branches, and Pull Requests
GitHub collaboration is the practice of contributing to shared or third-party repositories using Git’s distributed workflow: you fork a repository (copy it to your own account), create a branch for your changes, then open a pull request so the maintainer can review and merge them. Small teams with write access can skip forking and collaborate directly on branches within a shared repository.
In my post “GIT in 10 minutes”, I have covered the basics of Git setup and a few workflow commands to get started with using Git (version control system). As promised, I will go into the topic of how to use Git for collaborative work. Mainly, I will focus on contributions to other repositories, for instance, open-source or projects of your colleagues and friends. Let’s go!
GitHub Collaboration Models: Forking vs Shared Repository
As explained in GitHub documentation, GitHub supports two ways of collaborative work:
- Forking. You create a repository fork, which essentially copies a repository to your own GitHub account. You do not need to have any permissions for the copied repository. The repository owner can accept your pull request and merge your changes into the original repository.
- Shared repository. In small teams, you can add project collaborators, who usually work on their own branches and push their contributions directly. Pull requests still let you review the code and comment on proposed changes before merging.
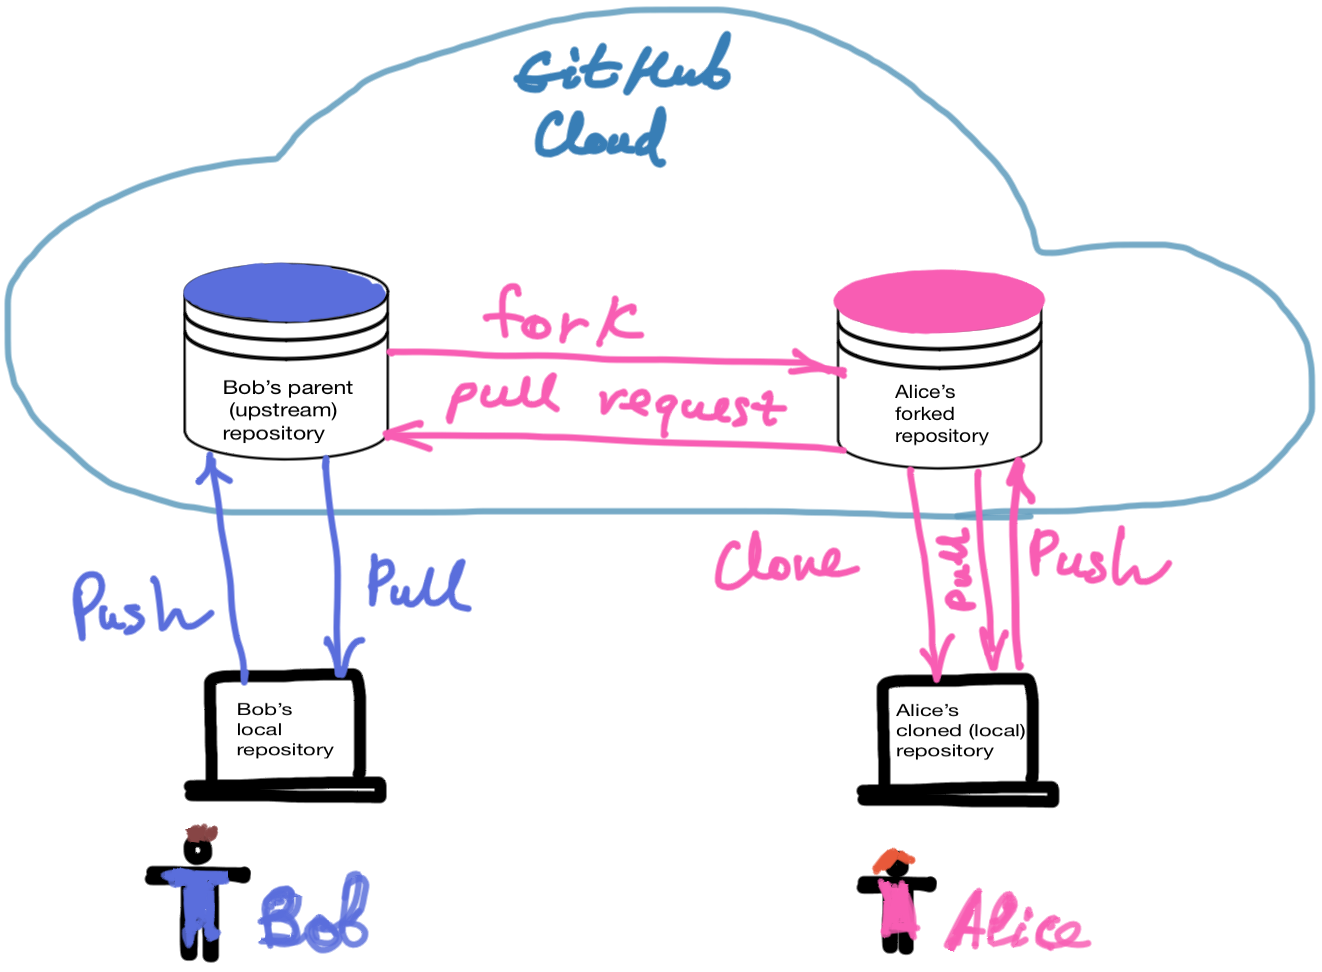
Forking and Pull Requests: Step-by-Step Git Workflow
With forks, you can make code changes without affecting the parent repository. Let’s call the parent repository upstream and your own (forked) repository origin. To add an upstream repository, run:
git remote add upstream git@github.com:<upstream_repo_user>/<upstream_repo>.git
To see all your remote repository links:
git remote -v
origin https:// < user_secret_tocken > @github.com/ <  your_user_name>/<  repository_name > (fetch)

origin https:// < user_secret_tocken > @github.com/ <  your_user_name>/<  repository_name >  (push)

upstream   git@github.com: < parent_project_maintainer > / <  repository_name > .git (fetch)

upstream   git@github.com: <  parent_project_maintainer > / <  repository_name > .git (push)
Notice there are two links for push and fetch operations. Git creates “origin” automatically the moment you clone your fork; “upstream” is the remote you add yourself, as shown above.
GitHub Collaboration with Forking
The overall process is as follows:
- Create a fork in GitHub by pressing the “Fork” button in the parent repository. You now have a complete copy of the parent repository under your own account — unless you tick “Copy the DEFAULT branch only” when creating the fork, which copies just the default branch instead of every branch. For instance, you can fork my public repository “deep_learning_notebooks” with some functions and experiments on deep learning.
- Clone the forked repository and further make your changes locally. To clone the repository, use the “git clone” command.
git clone https://<your_access_token>@github.com/<your_user_name>/<cloned_repo_name> - To change the code in the forked repository, create a branch for your changes or new features.
# to see all project branches git branch # create and checkout a branch git checkout -b <new_branch_name> - Check if there are changes in the upstream branch.
git remote update && git status git remote show upstream - Adding changes from upstream (swap
mainformasterif your repository still uses the old default branch name — GitHub switched new repositories tomainin October 2020)git checkout main git pull upstream main - Adding your changes and committing
git add . git commit -m "your comment" - Pushing changes to your fork
git push origin <new_branch_name> -
In your GitHub forked repository, create a pull request by pressing the Compare & pull request button.
- Optional: link your work to an issue. Add a closing keyword
plus the issue number to your commit message or pull request description — GitHub closes issue #7 automatically
once that pull request merges into the default branch.
git commit -m "fixed #7"
Syncing Your Fork with the Upstream Repository
While you work with others on GitHub, the upstream repository keeps moving: other contributors merge pull requests, fix bugs, add features. Your fork falls behind unless you sync it, and ideally your fork should carry all your collaborators’ changes before you branch off for your own work.
Sync your fork regularly, especially before opening a pull request — it minimises merge conflicts (see How to Resolve Merge Conflicts in Git).
GitHub’s documentation on syncing a fork covers the full picture. For a beginner, the easiest route is the web UI: select the Sync fork dropdown above the file list (GitHub renamed the old “Fetch upstream” button to make its purpose clearer) and click Update branch.
Once the sync succeeds, GitHub confirms it fast-forwarded your default branch from the upstream repo.
Pull that update down to your local copy with git pull.
Fixing “Updates were rejected because the tip of your current branch is behind”
Verbatim error: Updates were rejected because the tip of your current branch is behind its remote counterpart.
Cause: Your local branch is missing commits that exist on the remote (your fork fell behind after a sync or another push), so Git refuses a non-fast-forward push.
Fix: Pull and integrate the remote commits before pushing again with git pull origin <branch_name>, resolve any conflicts, then git push origin <branch_name>. See the dedicated walkthrough in Fix “Updates were rejected” push errors.
If you have a more intricate update process, I suggest reading GitHub’s documentation on “Syncing a fork”, plus this easy-to-read walkthrough with nice visuals.
Conclusion: GitHub Collaboration Workflow Summary
The fork-and-pull-request workflow is the standard model for contributing to repositories you do not own, while shared-repository branching suits trusted teams with write access. Keep this post as a quick reference, and dig into the links below when you need more depth than a whistle-stop tour can give you.
I will come back to shared-repository workflows in more detail in a future post. Thanks for reading!
GitHub Collaboration FAQ
What is the difference between forking and cloning a repository?
Forking creates a server-side copy of a repository under your own GitHub account, so you can contribute without write access to the original. Cloning downloads any repository (including your fork) to your local machine with git clone. A typical open-source contribution forks first, then clones the fork.
How do I keep my fork up to date with the upstream repository?
Add the original as a remote with git remote add upstream <url>, then run git checkout master and git pull upstream master to merge new changes. On GitHub’s web UI you can also use the “Fetch upstream” button. Sync regularly, especially before opening a pull request, to minimise merge conflicts.
How do I create a pull request on GitHub?
Push your feature branch to your fork with git push origin <branch_name>, then open the repository on GitHub and press the “Compare & pull request” button. Add a description, and the maintainer can review, comment, and merge your changes into the upstream repository.
When should I use a shared repository instead of a fork?
Use a shared repository when you are a trusted collaborator with push access on a small team — each member works on their own branch and opens pull requests for review. Use forking when you do not have write permissions, such as contributing to open-source projects you do not own.
References
1. About collaborative development models.
2. Lesson 1. Learn How To Use GitHub to Collaborate on Open Science Projects
3. How to Resolve Merge Conflicts in Git?
5. Lesson 3. Sync a GitHub Repo: How To Ensure Your GitHub Fork Is Up To Date
7. Creating a pull request from a fork
8. Linking a pull request to an issue
9. The default branch for newly-created repositories is now main
Did you like this post? Please let me know if you have any comments or suggestions.
Git posts that might be interesting for youEnjoyed this? Get more like it.
Weekly notes on AI tools, Python, and what I'm actually building — plus two free gifts: the 15-page Fantastic AI: The 2026 Toolkit and a Git Commands & Contribution Workflow Cheatsheet.
