
Introduction: Build a Flask Web App in Python
Flask is a lightweight Python web framework for building web applications and APIs using @app.route() endpoints and Jinja2 templates. Flask is the closest thing Python has to a magic trick: a few lines of code and you have a working web server. In this post I will show you how to build a small web application that serves random jokes from a text file — perfect for learning the core ideas without drowning in boilerplate.
We will cover:
- Installing Flask and setting up a virtual environment
- Routing URLs to Python functions
- Using Jinja2 templates to render HTML
- Serving static files (CSS, images)
- Handling form submissions
- Wiring it all together into a working Joker App
The full source code is in the GitHub repository flask-random-joke.
What Is Python Flask?
Flask is a lightweight WSGI web framework for Python. It gives you routing, a templating engine, and a development server — nothing more, nothing less. This minimalism is exactly why it is a great first framework: you understand every line you write.
Flask is built on two libraries: Werkzeug (the WSGI toolkit that handles HTTP requests and responses) and Jinja2 (the templating engine). Both are worth knowing a little about even if Flask abstracts them away.
Installing Flask
Global installation
Install Flask with pip:
pip install Flask
A global install places the package in your Python interpreter’s site-packages directory. Typical locations:
- Windows:
C:\Users\<Username>\AppData\Local\Programs\Python\Python<version>\Lib\site-packages - macOS/Linux:
/usr/local/lib/python<version>/site-packages
Global installs are convenient for quick experiments, but they quickly lead to dependency conflicts when different projects need different package versions. For anything beyond a quick prototype, use a virtual environment.
Virtual environments with venv
venv is Python’s built-in tool for creating isolated environments. Each environment has its own Python interpreter and its own site-packages — projects can no longer step on each other’s toes.
Create and activate a virtual environment:
# Create
python3 -m venv venv

# Activate — macOS/Linux
source venv/bin/activate

# Activate — Windows
venv\Scripts\activate
Your prompt will change to show (venv), confirming the environment is active. Now install Flask inside it:
pip install Flask
To leave the environment:
deactivate
venvhas been part of the Python standard library since Python 3.3 and is the recommended choice over the oldervirtualenvpackage. See the official venv docs for the full reference.
PyCharm IDE setup
If you use PyCharm (I do — it makes daily Python work much smoother), the IDE can manage your virtual environment for you:
- Create a virtual environment — open the built-in terminal and run
python3 -m venv venv. - Install Flask — with the
venvactive, runpip install Flask. - Configure the interpreter — go to
File→Settings(orPyCharm→Preferenceson macOS), thenProject→Python Interpreter. Click the gear icon →Add…, chooseExisting environment, and point it tovenv/bin/python(macOS/Linux) orvenv\Scripts\python.exe(Windows). - Start a Flask project — go to
File→New Project, set the type toFlask, and select the interpreter you just configured. PyCharm will scaffold a minimal “Hello World” app for you automatically.
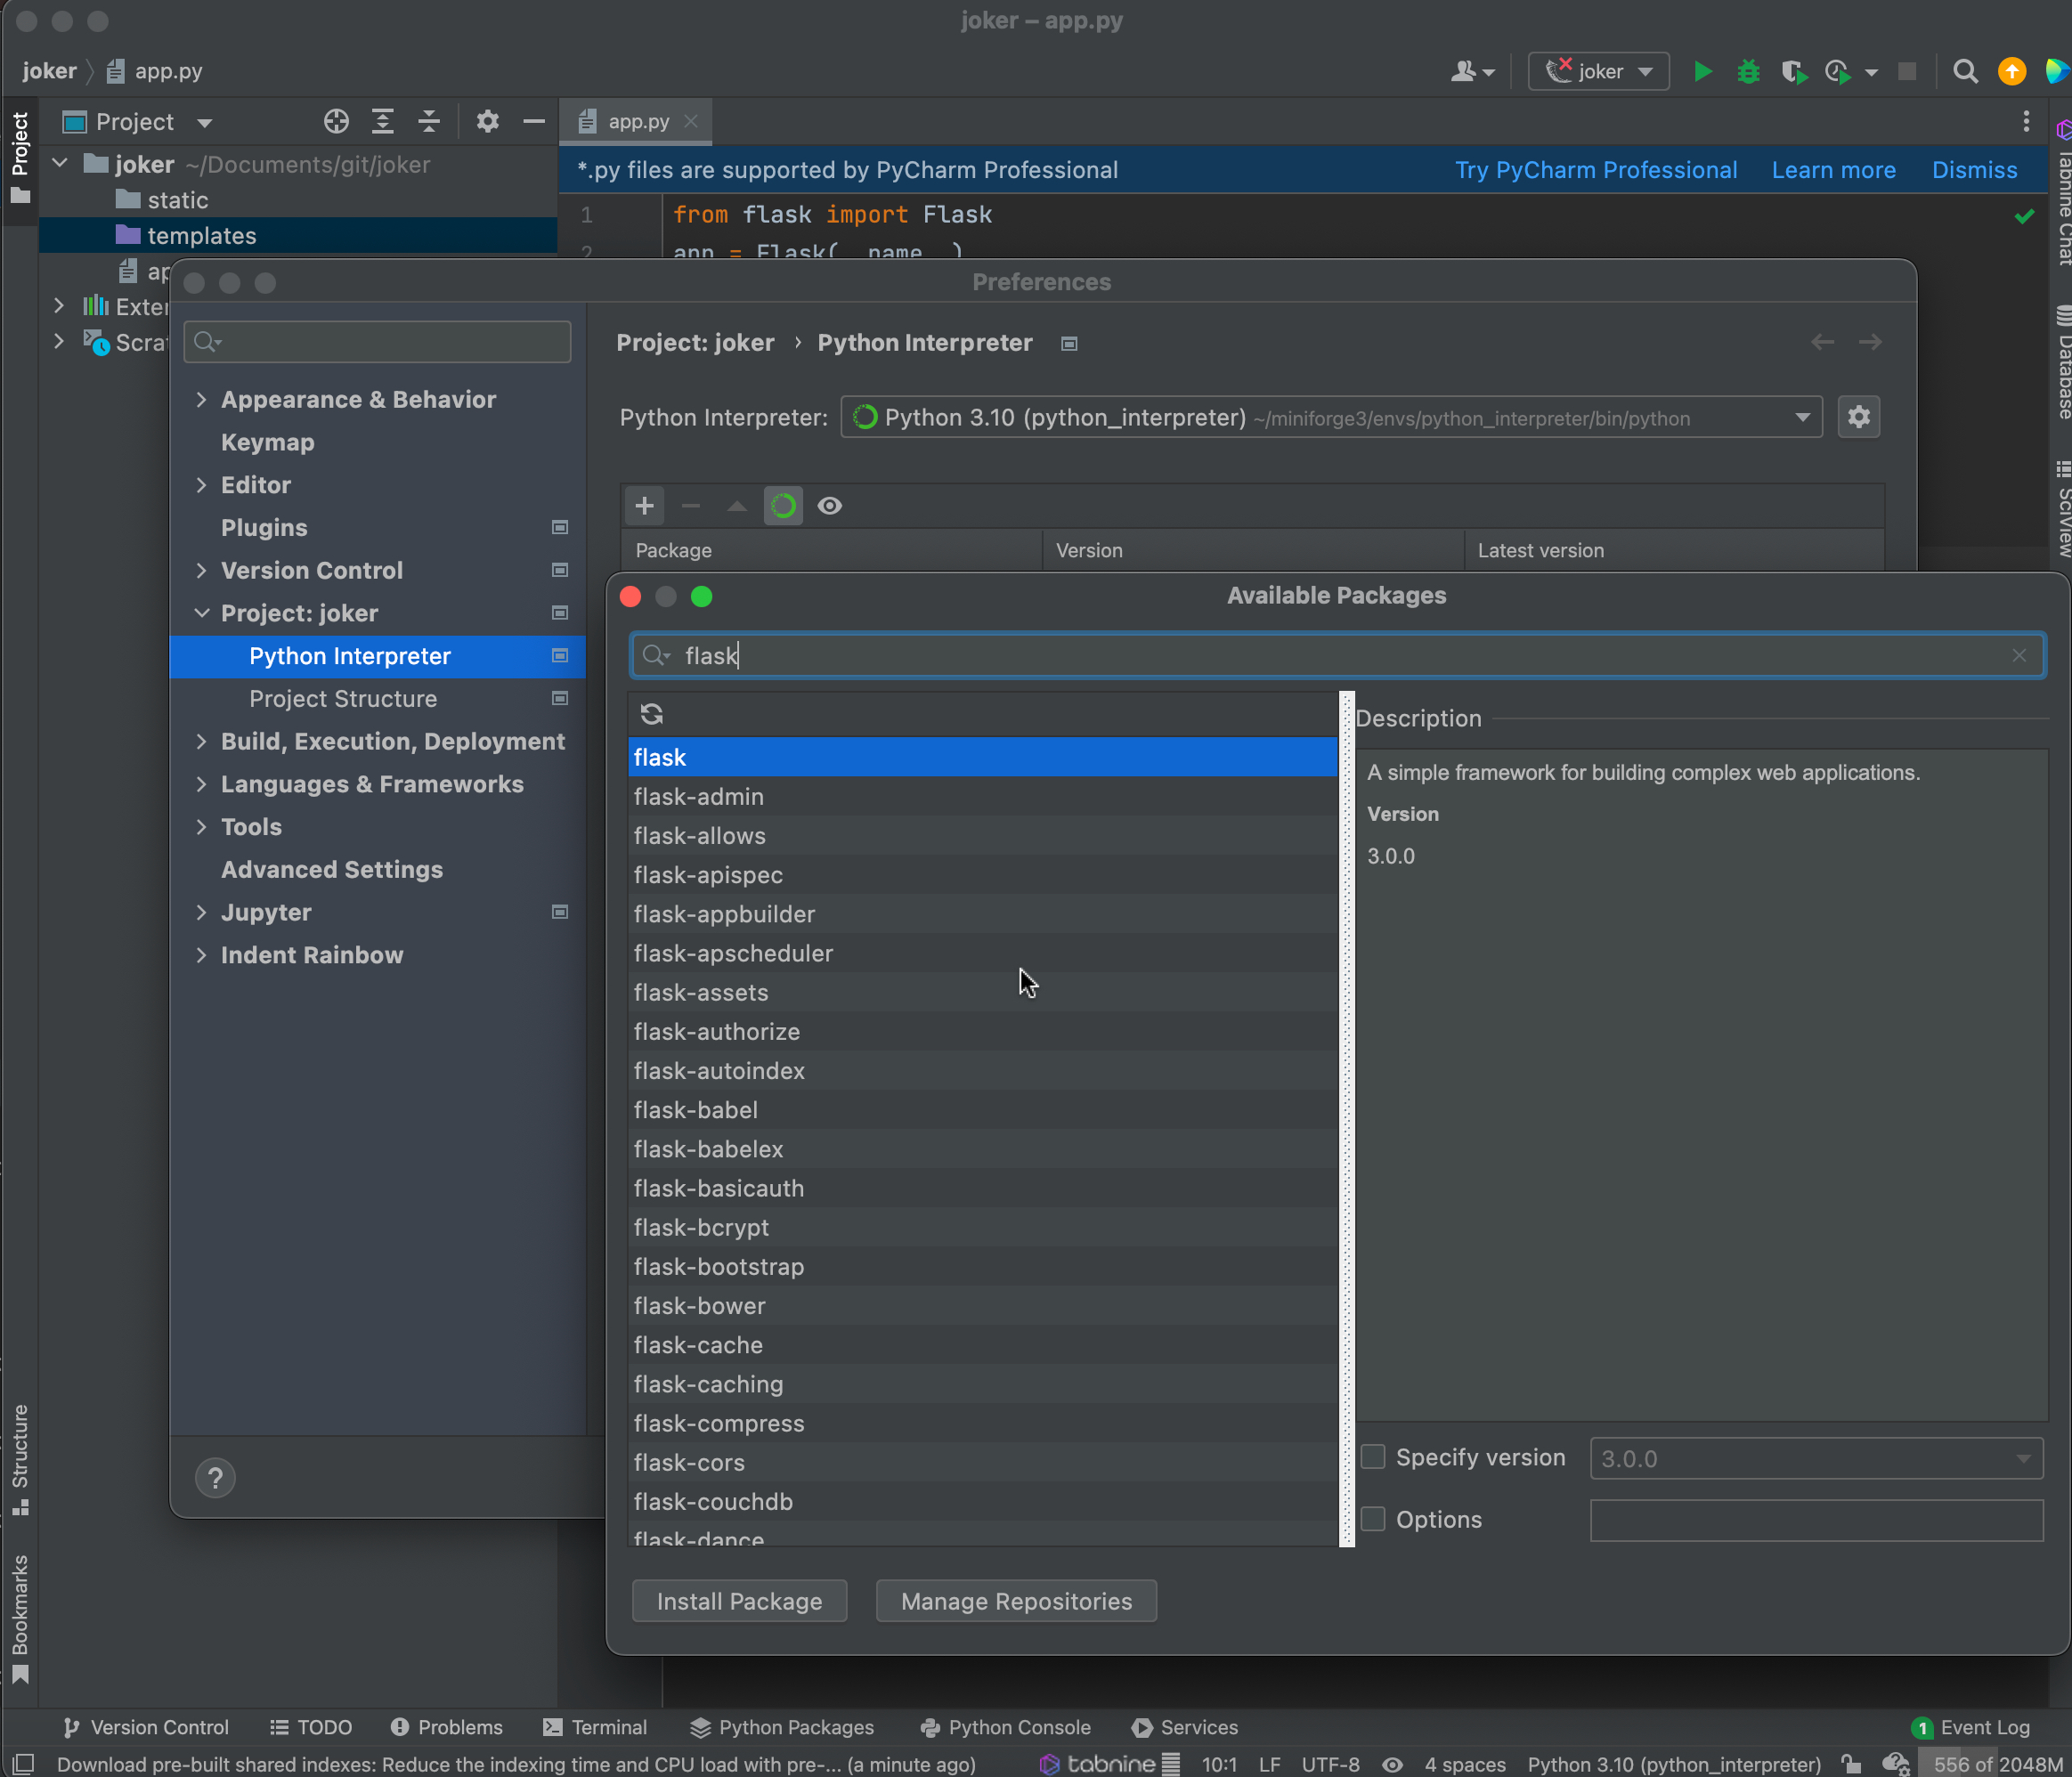
Interpreter Settings — adding a package in PyCharm
I also use the Tabnine plugin for rapid prototyping. It suggests completions as you type, which speeds up the parts of coding that are mostly muscle memory.
Building the Joker Flask App Step by Step
Let us build the app step by step, starting from the simplest possible Flask application and adding features one by one.
Step 1 — Hello World
from flask import Flask

app = Flask(__name__)

@app.route('/')
def hello_world():
    return 'Hello, World!'

if __name__ == '__main__':
    app.run(debug=True)
What is happening here:
Flask(__name__)creates the application object.__name__tells Flask where to look for templates and static files relative to this module.@app.route('/')is a decorator that maps the root URL/to thehello_worldfunction. Whenever someone visits/, Flask calls the function and returns its result as the HTTP response.app.run(debug=True)starts the development server with auto-reloading and an interactive debugger. Never usedebug=Truein production — it exposes a code-execution interface in the browser.
Run it:
python app.py
Visit http://127.0.0.1:5000/ to see “Hello, World!”.

Flask Hello World!
You will also see a warning in the terminal: “WARNING: This is a development server. Do not use it in a production deployment.” This is correct — Flask’s built-in server is single-threaded and not hardened for real traffic. For production, use a proper WSGI server such as Gunicorn:
gunicorn -w 4 -b 0.0.0.0:5000 app:app
The -w 4 flag starts 4 worker processes. Replace app:app with <module_name>:<flask_app_variable> to match your file name.
Step 2 — Adding More Routes
Add an /about route alongside the root:
from flask import Flask

app = Flask(__name__)

@app.route('/')
def hello_world():
    return 'Hello, World!'

@app.route('/about')
def about():
    return 'This is the about page.'

if __name__ == '__main__':
    app.run(debug=True)
Each @app.route() decorator registers a URL pattern. The function name (about) becomes the endpoint name, which you can reference later with url_for('about') to generate the URL programmatically — useful when URLs change.
Step 3 — URL Variables
Capture dynamic values directly from the URL:
from flask import Flask

app = Flask(__name__)

@app.route('/')
def hello_world():
    return 'Hello, World!'

@app.route('/about')
def about():
    return 'This is the about page.'

@app.route('/user/<username>')
def show_user_profile(username):
    return f'Hello, {username}!'

if __name__ == '__main__':
    app.run(debug=True)
The <username> part in the route pattern captures whatever appears in that position and passes it as a function argument. Visit http://127.0.0.1:5000/user/Elena to see it in action.
You can also type-convert URL variables: <int:user_id>, <float:price>, <path:subpath>. Flask will return a 404 automatically if the value does not match the converter.
Step 4 — Jinja2 Templates
Returning raw strings from route functions gets messy fast. Flask’s render_template() function loads an HTML file from the templates/ directory and fills in dynamic placeholders using the Jinja2 engine.
Create the folder structure:
/project
    /templates
        index.html
    app.py
templates/index.html:
<!DOCTYPE html>
<html lang="en">
<head>
    <meta charset="UTF-8">
    <meta name="viewport" content="width=device-width, initial-scale=1.0">
    <title>{{ title }}</title>
</head>
<body>
    <h1>{{ message }}</h1>
</body>
</html>
Jinja2 syntax at a glance:
| Syntax | Purpose |
|---|---|
{{ variable }} |
Output a value |
{% if condition %} |
Conditional block |
{% for item in list %} |
Loop |
{% block name %} |
Template inheritance block |
Update app.py to render the template:
from flask import Flask, render_template

app = Flask(__name__)

@app.route('/')
def hello_world():
    return render_template('index.html', title='Home', message='Hello, World!')

if __name__ == '__main__':
    app.run(debug=True)
render_template finds templates/index.html, replaces {{ title }} with 'Home' and {{ message }} with 'Hello, World!', and returns the resulting HTML string to the browser.
Step 5 — Static Files (CSS)
Static files — stylesheets, scripts, images — live in a folder called static/. Flask serves them automatically at /static/<filename>.
Add a stylesheet:
/project
    /static
        style.css
    /templates
        index.html
    app.py
static/style.css:
body {
    font-family: 'Arial', sans-serif;
    margin: 20px;
    background-color: #111;
    color: #eee;
}

h1 {
    color: forestgreen;
    text-align: center;
}

button {
    display: block;
    margin: 1em auto;
    padding: 0.5em 1.5em;
    background-color: forestgreen;
    color: white;
    border: none;
    border-radius: 4px;
    cursor: pointer;
    font-size: 1rem;
}

button:hover {
    background-color: #2e8b57;
}
Link it in index.html using Flask’s url_for() helper, which generates the correct URL regardless of where your app is mounted:
<head>
    <!-- other meta tags -->
    <link rel="stylesheet" href="{{ url_for('static', filename='style.css') }}">
</head>
Always use url_for('static', filename='...') rather than hard-coding /static/style.css. If your app moves to a subdirectory, the hard-coded path breaks; url_for does not.
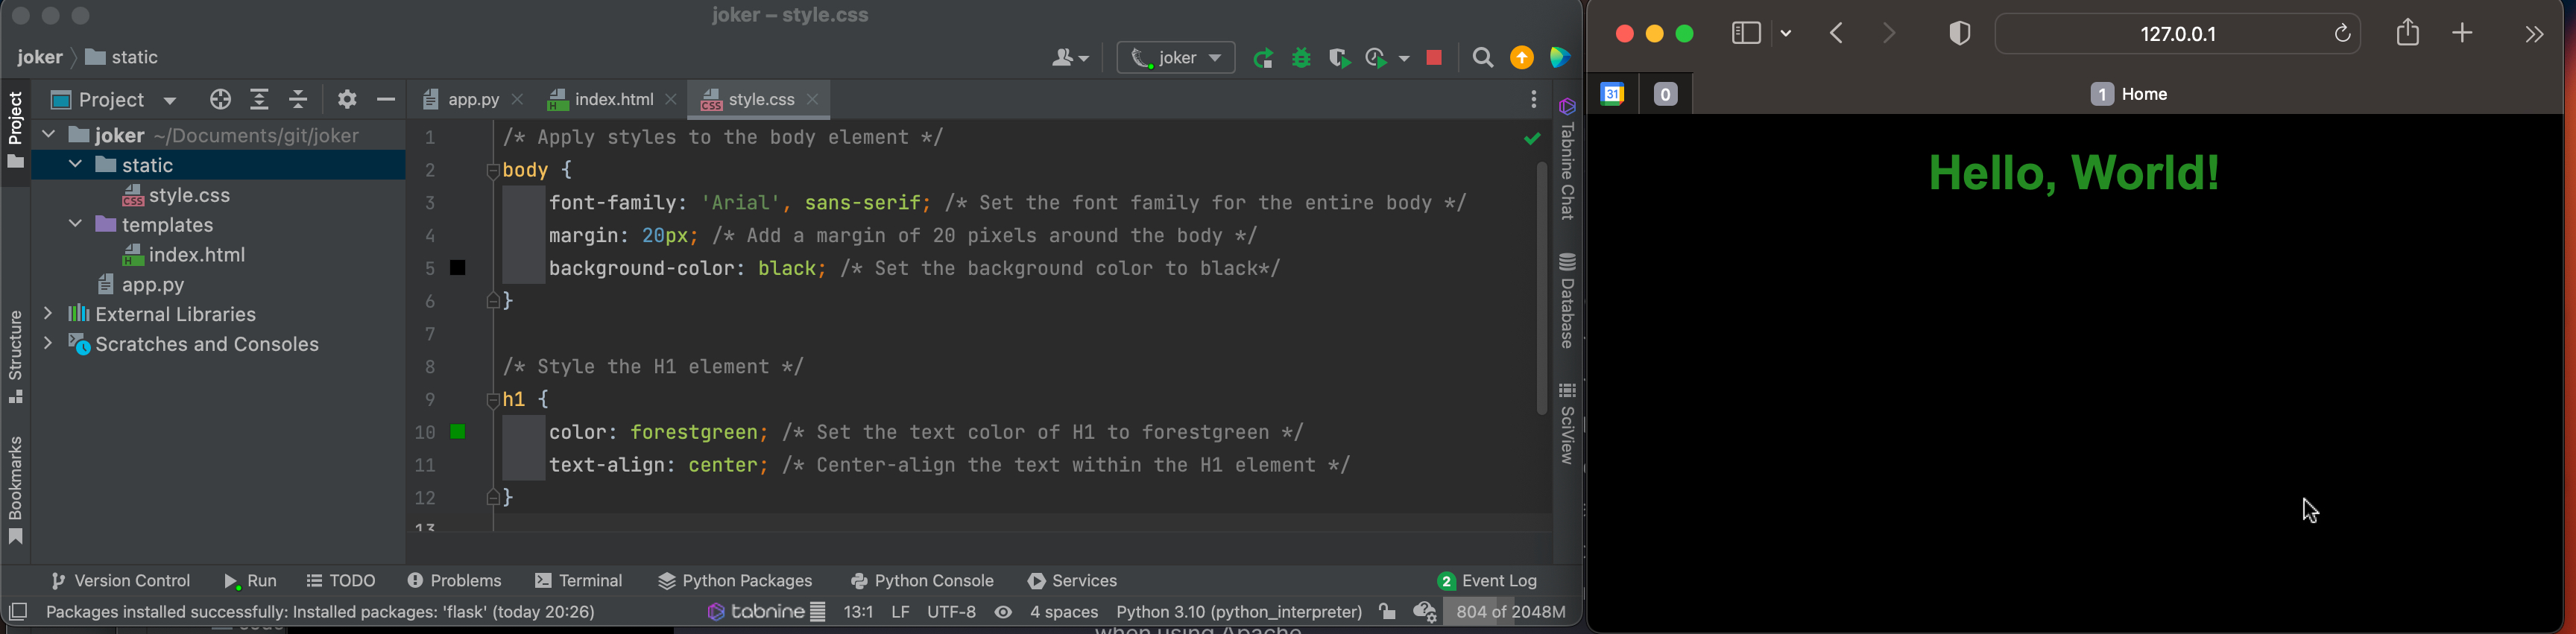
Joker App with a stylesheet applied
Step 6 — Handling Forms
Flask exposes incoming request data through the request object. A common beginner mistake — which we will reproduce on purpose — is forgetting to import it.
app.py (with the import error still lurking):
from flask import Flask, render_template  # request is missing here

app = Flask(__name__)

@app.route('/greeting', methods=['GET', 'POST'])
def greeting():
    if request.method == 'POST':           # NameError here!
        username = request.form['username']
        return f'Hello, {username}!'
    return render_template('greeting.html')

if __name__ == '__main__':
    app.run(debug=True)
templates/greeting.html:
<!DOCTYPE html>
<html lang="en">
<head>
    <meta charset="UTF-8">
    <meta name="viewport" content="width=device-width, initial-scale=1.0">
    <title>Greeting</title>
</head>
<body>
    <form method="post">
        <label for="username">Username:</label>
        <input type="text" id="username" name="username" required>
        <button type="submit">Say Hello</button>
    </form>
</body>
</html>
Submit the form and you get:
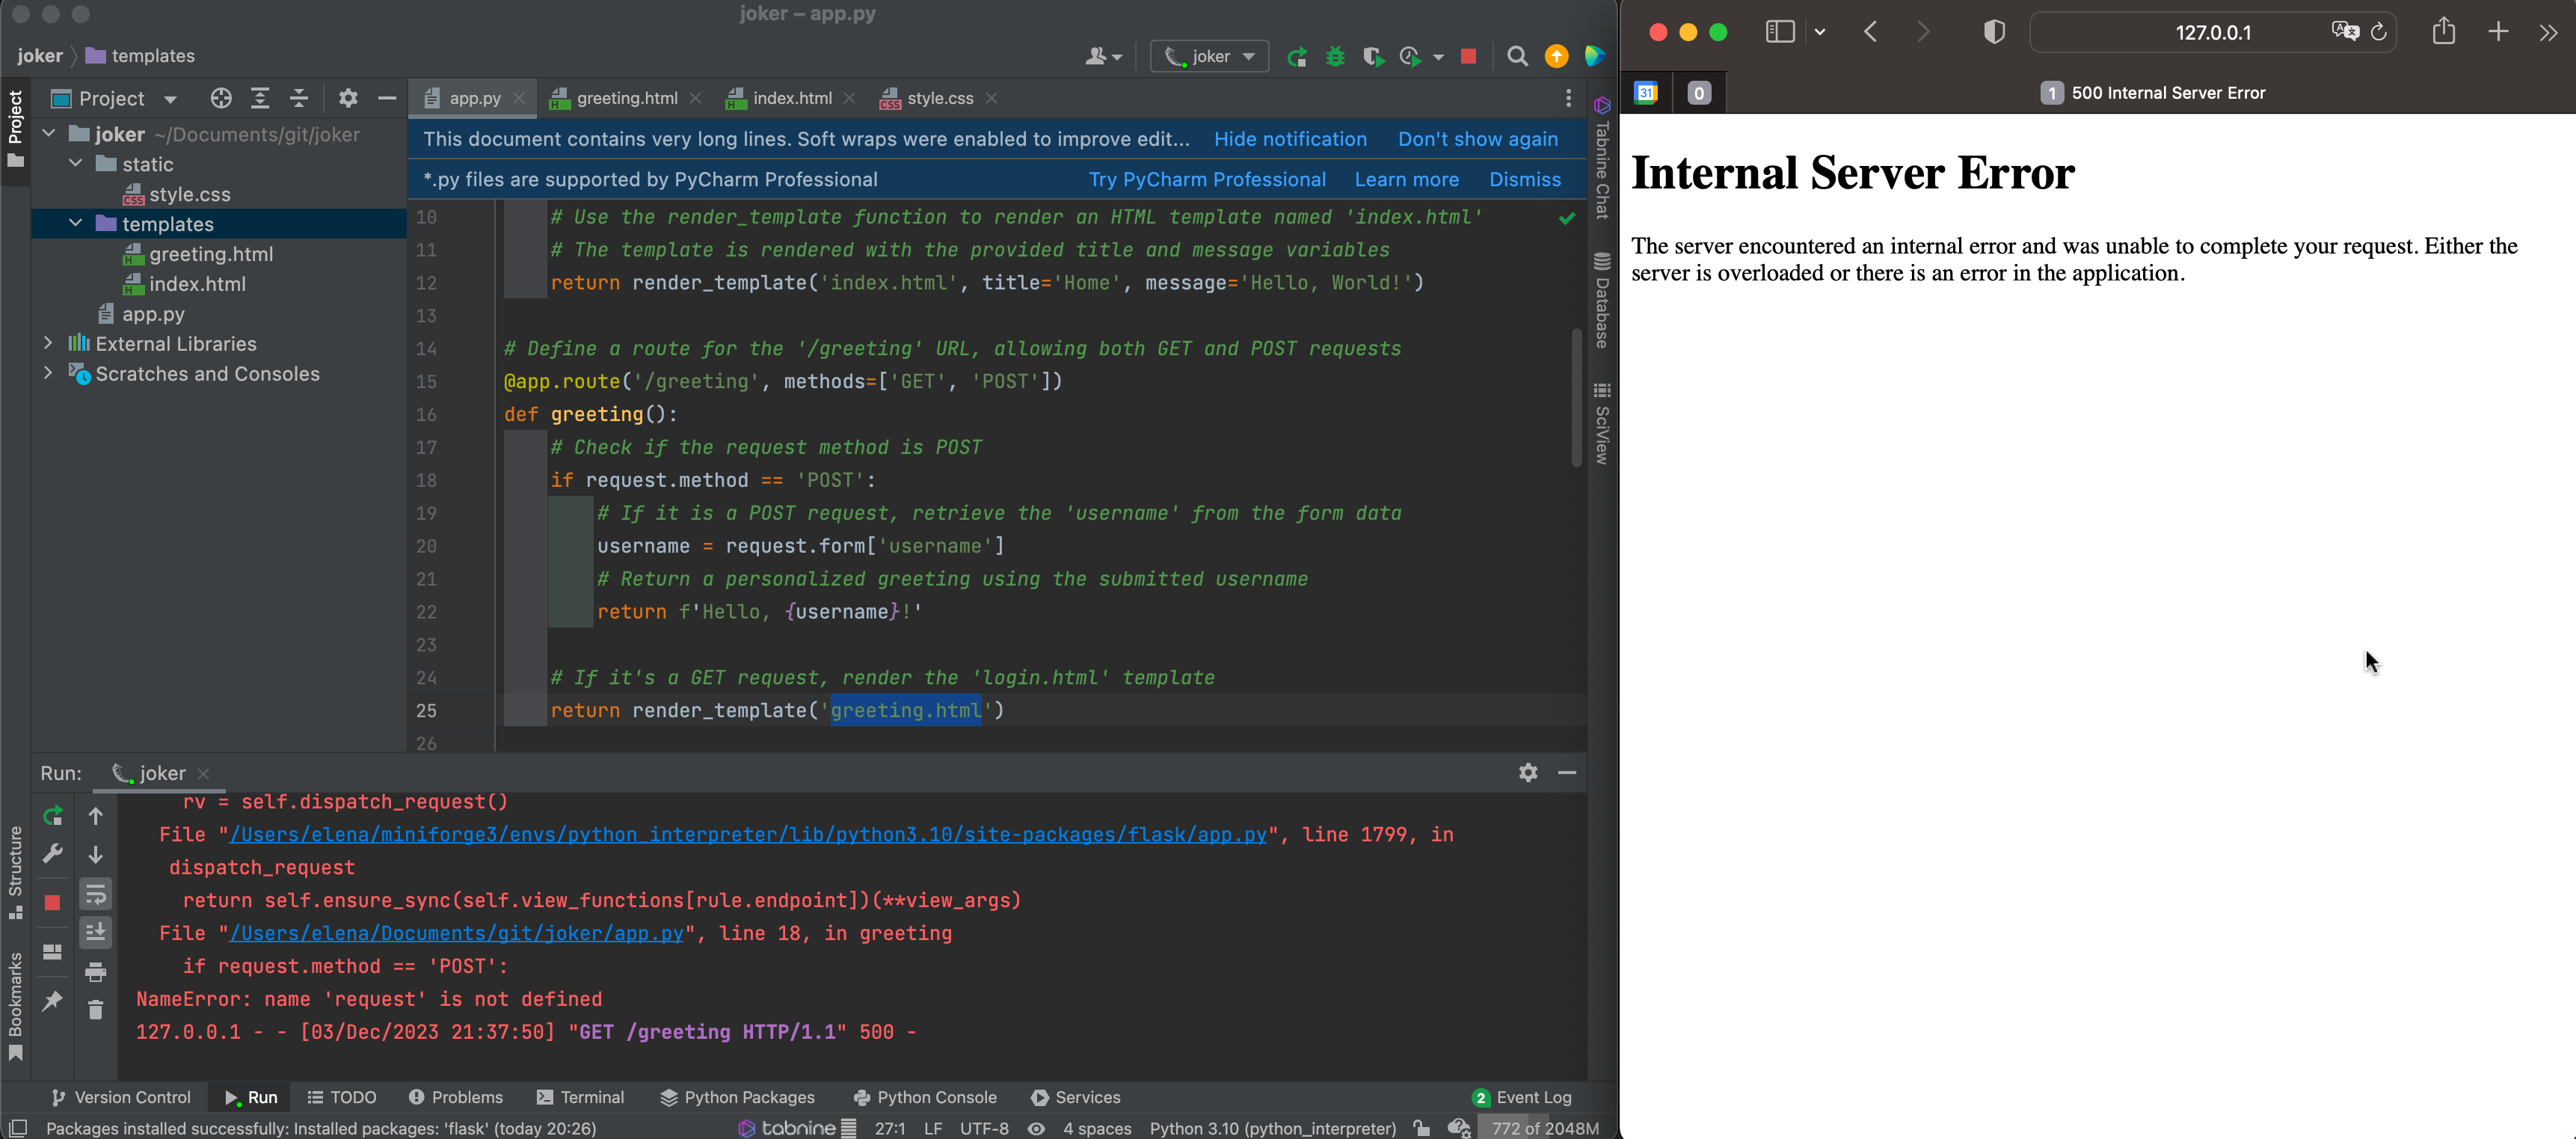
Internal Server Error — NameError: name 'request' is not defined
The error message is your friend: NameError: name 'request' is not defined. We forgot to import request. Fix it:
from flask import Flask, render_template, request # request added
The methods=['GET', 'POST'] argument on the route is important: by default Flask only accepts GET requests. If you try to POST to a route without declaring it, you get a 405 Method Not Allowed.
Step 7 — The Joke App
Now let us put it all together. Create a jokes.txt file — one joke per line — and wire up a route that picks one at random.
jokes.txt (a few examples to get started):
Why do programmers prefer dark mode? Because light attracts bugs.
A SQL query walks into a bar, walks up to two tables and asks: Can I join you?
Why do Python programmers wear glasses? Because they can't C.
There are 10 types of people in the world: those who understand binary, and those who don't.
Final app.py:
from flask import Flask, render_template, request
import random

app = Flask(__name__)


def get_random_joke():
    """Read all jokes from jokes.txt and return one at random."""
    with open('jokes.txt', 'r') as file:
        jokes = [line.strip() for line in file if line.strip()]
    return random.choice(jokes)


@app.route('/')
def hello_world():
    return render_template('index.html', title='Home', message='Hello, World!')


@app.route('/about')
def about():
    return 'This is the about page.'


@app.route('/user/<username>')
def show_user_profile(username):
    return f'Hello, {username}!'


@app.route('/greeting', methods=['GET', 'POST'])
def greeting():
    if request.method == 'POST':
        username = request.form['username']
        return f'Hello, {username}!'
    return render_template('greeting.html')


@app.route('/joke')
def random_joke():
    joke = get_random_joke()
    return render_template('joke.html', joke=joke)


if __name__ == '__main__':
    app.run(debug=True)
Two small improvements over the original:
line.strip()— strips trailing newlines and whitespace so jokes do not have\nhanging off the end when displayed.if line.strip()— skips blank lines injokes.txt, so an accidental empty line at the bottom of the file does not produce an empty joke.
templates/joke.html:
<!DOCTYPE html>
<html lang="en">
<head>
    <meta charset="UTF-8">
    <meta name="viewport" content="width=device-width, initial-scale=1.0">
    <title>Random Joke</title>
    <link rel="stylesheet" href="{{ url_for('static', filename='style.css') }}">
</head>
<body>
    <h1>{{ joke }}</h1>
    <form method="get" action="{{ url_for('random_joke') }}">
        <button type="submit">Get Another Joke</button>
    </form>
</body>
</html>
Visit http://127.0.0.1:5000/joke — you should see a fresh joke every time you click the button.
ChatGPT prompts I used
Even with prior Flask experience I reached for ChatGPT to speed things up — generating the jokes.txt content and drafting some CSS in particular. A few prompts that worked well:
Output 200 strings containing concise and funny Computer Science, Machine Learning, AI, and Python jokes
Rewrite joke.html and add a button to refresh the page and show another joke
Write a CSS style to centre this button and make it look clean
Add comments and explain the code I am going to paste next
Write the simplest style.css for this Flask app
ChatGPT is useful for scaffold work and boilerplate — but always read the output carefully. It occasionally hallucinates Flask APIs that do not exist, or writes code that works but misses edge cases (like the empty-line problem in jokes.txt).
Conclusion: Flask Routing, Templates, and Static Files
We built a working Flask web app from scratch: routing, templates, static files, forms, and a random joke generator. The project is small, but every concept here — @app.route, render_template, url_for, request.form — appears in production Flask apps at any scale.
The best way to keep learning is to extend this app. Some ideas: add a /add-joke page that lets you POST new jokes into the file, or store jokes in a SQLite database using Flask-SQLAlchemy. The full source is on GitHub — feel free to fork it and experiment.
Flask App FAQ
How do I run a Flask app?
Set FLASK_APP=app.py and run flask run, or run the file directly with python app.py when it ends in app.run(debug=True). The built-in development server is for local use only — serve production traffic with a WSGI server such as Gunicorn.
Why do I get “request is not defined” in Flask?
You used request without importing it. Import it from Flask alongside the other helpers: from flask import Flask, render_template, request. The request object is needed to read form and query data.
How do I render an HTML template in Flask?
Put the file in a templates/ folder and call render_template('index.html', title='Home', message='Hello'). Flask fills the Jinja2 placeholders such as {% raw %}{{ title }}{% endraw %} with the values you pass.
Where do CSS and image files go in a Flask app?
Place them in a folder named static/. Flask serves them automatically at the /static/<filename> URL, for example /static/style.css.
Did you like this post? Please let me know if you have any comments or suggestions.
Python posts that might be interesting for youRelated tools you may want to try next.
CustomGPT.AI is a very accurate Retrieval-Augmented Generation tool that provides accurate answers using the latest ChatGPT to tackle the AI hallucination problem.
References
Enjoyed this? Get more like it.
Weekly notes on AI tools, Python, and what I'm actually building — plus two free gifts: the 15-page Fantastic AI: The 2026 Toolkit and a Git Commands & Contribution Workflow Cheatsheet.
