
Introduction
Okay, confession time. For years – and I mean literally years – I’ve been doing everything manually for my blog. Research? I, clicking through hundreds of links. Writing? I, typing away at my keyboard until my fingers hurt. Publishing? You guessed it – me again, manually copying and pasting, plus a few Python scripts I cobbled together for Medium when I’m feeling particularly motivated.
Sure, I use AI chatbots like Claude and ChatGPT to help generate content or debug my code (who doesn’t these days?), but what about my actual workflow? Zero automation. Zilch. Nada.
I kept having this nagging thought: “Elena, shouldn’t you try one of those fancy automation tools everyone’s been raving about?” I mean, I see AI content everywhere now, and even Google is okay with AI-generated content as long as it provides actual value (at least that’s what Reddit tells us, and Reddit is never wrong, right? 😉).
The answer, my friends, turned out to be a resounding YES. Time to automate the boring stuff and have a life! This isn’t about replacing our creativity – heaven knows we need that human touch. It’s about eliminating all those mind-numbing, repetitive tasks that make us want to bang our heads against the wall, so we can focus on what matters: creating great content that helps people.
But here’s the reality check I wish someone had given me: Just like when you’re learning to code (remember your first Python script?), you absolutely cannot automate everything perfectly from day one. You’re going to struggle. Things will break. You’ll want to throw your laptop out the window. This pain? It’s actually good for you. It teaches you respect for the process and helps you understand what genuinely needs automation versus what’s better done by your own two hands.
Understanding Workflow Automation
Let me break this down in terms that won’t make your brain melt (because mine definitely did the first time I heard all this jargon):
What’s a Workflow?
Think of workflows as recipes, but instead of making cookies, you’re getting work done. It’s just the series of steps you follow to complete any task:
- Approving expenses: Check receipt → Verify amount → Approve or reject → Update spreadsheet → Send notification
- Onboarding someone new: Create accounts → Send welcome email → Schedule training → Add to team channels → Update HR database
- Responding to reader questions: Read question → Research answer → Write response → Check for accuracy → Hit send
- Research and publishing blog content: Find topics → Research details → Write draft → Edit → Create images → Publish → Share on social media
See? You’re already following workflows every single day. You just didn’t call them that.
What’s Automation?
This is the fun part. Automation means getting machines or software to do these steps instead of you. Imagine having a super-efficient assistant who never needs coffee breaks, never complains, and never forgets a step. The results are pretty impressive:
- Less time wasted: What used to take you an hour now takes 5 minutes
- Fewer mistakes: No more “Oops, I forgot to post on LinkedIn!”
- More consistency: Everything happens the same way, every single time
Why AI-Powered Automation is Different
Old-school automation was like those annoying phone trees – “Press 1 for sales, Press 2 for support…” Rigid, inflexible, and frustrating when your situation didn’t fit the predetermined boxes.
AI-powered automation? It’s like having a smart assistant who actually gets it:
- Learns from data and understands context: It knows that when you say “schedule a meeting,” you mean during business hours, not at 3 AM
- Makes intelligent decisions based on changing situations: If your usual meeting room is booked, it finds an alternative
- Adapts to new scenarios without you having to reprogram everything: Learns your preferences over time and adjusts accordingly
Modern Workflow Automation Can Handle All Sorts of Tasks:
- Content Research: Imagine waking up to find all the relevant news from your industry already gathered, summarized, and waiting in your inbox. No more spending two hours scrolling through RSS feeds!
- Data Processing: Takes that messy Excel file your client sent (you know, the one with merged cells and weird formatting) and transforms it into something actually usable
- Communication: Sends personalized “Happy Birthday” emails to your subscribers, complete with their name and a special discount code, without you lifting a finger
- File Management: Automatically organizes that disaster you call a Downloads folder, converting PDFs to Word docs, resizing images, and putting everything where it belongs
- Social Media: Posts your content across all platforms at the optimal time for engagement, monitors who’s talking about you, and even responds to simple questions
The Big Question That Kept Me Up at Night: Will automation actually help me spend more time at the gym or walking on my favorite beach? Or will I just fill that time with more work? (Spoiler alert: It’s actually the former, but only if you’re disciplined about it!)
Meet n8n
I’d been circling around n8n like a cat around a new toy for months, reading about it, watching YouTube videos, but never quite taking the plunge. For those who don’t know, n8n is this open-source workflow automation tool that connects apps like ChatGPT, Google Sheets, Slack, and literally hundreds of other services. Think of it as the Swiss Army knife of automation.
Here’s what made me finally fall in love with n8n:
✅ Visual workflow editor - You can literally see your entire process flow as cute little connected boxes. No more trying to debug 500 lines of Python wondering where things went wrong!
✅ Zero coding required - Okay, this is a tiny lie. You don’t NEED to code, but you CAN if you want to. It’s like having training wheels that you can take off whenever you’re ready.
✅ Fair-code licensing - It’s open source but with transparent, honest pricing. None of that “surprise! Now pay us $10,000” nonsense.
✅ Self-hosted option - Your data stays on YOUR computer. Super important if you’re paranoid about privacy like I am.
✅ Extensive integrations - Works with practically everything. Gmail? Check. Notion? Check. That obscure API your company uses? Probably check!
After years of debugging Python scripts at 2 AM wondering why my cron job didn’t run, this visual approach feels like breathing fresh air.
Feature Breakdown: Free vs Paid (The Real Deal)
Community Edition (Free)
The Community Edition gives you basic workflow automation with some limitations. It’s like the free sample at Costco – enough to get you hooked, but you’ll probably want more.
Enhanced Free Features (My Sweet Spot)
Here’s where it gets interesting. If you register with just an email (no credit card required!), you unlock some handy stuff:
- Git version control for workflow versioning: Save different versions of your workflows, because you WILL break things and need to go back
- Workflow history with 1 day retention: “What did I change yesterday that broke everything?” Now you can find out!
- Advanced debugging capabilities: See exactly where your workflow fails, with actual, useful error messages (revolutionary, I know)
- Enhanced logging features: Track what happened, when it happened, and why it probably didn’t work the first time
Paid Plans (The Commitment)
Funny how everything in the AI world costs exactly $20/month. It’s like there was a secret meeting where everyone agreed on this price point.
- Cloud version starting at $20/month: They host it, maintain it, update it. You just use it. Perfect if you value your sanity.
- Self-hosted enterprise with custom pricing: For big companies with big budgets and big requirements
- Transparent pricing with no hidden surprises: The price you see is the price you pay. No “contact sales for pricing” BS.
Step-by-Step Installation Guide
I’m going to walk you through three different ways to install n8n, because we all have different comfort levels with technology. Pick the one that doesn’t make you want to run away screaming.
Method 1: Desktop Application (For Complete Beginners)
Best for: People who break out in hives at the sight of a command line
Steps:
- Visit the download page: Go to n8n.io/download. It’s a nice, friendly page that won’t judge you.
- Download the app for your operating system: Big button, can’t miss it. Windows, Mac, or Linux – they’ve got you covered.
- Install and run like any regular application: Double-click, follow the wizard, click “Next” a bunch of times. You know the drill.
- Open your browser: Type
http://localhost:5678in your address bar. Yes, localhost is your computer talking to itself. No, it’s not weird.
Pros: No command line required, no terminal anxiety, your blood pressure stays normal Cons: Limited customisation options, but honestly, you probably don’t need them yet
Method 2: Docker Installation (For the Brave)
Best for: People who’ve heard of Docker and aren’t terrified of it
Basic Docker Setup (The Quick and Dirty):
# This single command does everything
docker run -it --rm \
    -p 5678:5678 \
    -v ~/.n8n:/home/node/.n8n \
    n8nio/n8n
Don’t panic! Let me explain what this gibberish means:
docker run: Hey Docker, run something-it: Make it interactive (you can see what’s happening)--rm: Clean up after yourself when done-p 5678:5678: Connect port 5678 on your computer to port 5678 in Docker-v ~/.n8n:/home/node/.n8n: Save your data so it doesn’t disappearn8nio/n8n: The actual n8n image to run
Production Docker Setup (For Serious Business):
Create a file called docker-compose.yml (yes, the extension matters):
version: '3.8'
services:
  n8n:
    image: n8nio/n8n
    ports:
      - "5678:5678"
    environment:
      - N8N_BASIC_AUTH_ACTIVE=true
      - N8N_BASIC_AUTH_USER=admin
      - N8N_BASIC_AUTH_PASSWORD=your_super_secure_password_here
    volumes:
      - ~/.n8n:/home/node/.n8n
    restart: unless-stopped
Then run this magical incantation:
docker-compose up -d
The -d means “detached” – it runs in the background so you can close your terminal without killing n8n.
Pros: Excellent isolation (nothing can mess with your system), easy updates (just pull the new image) Cons: Requires knowing what Docker is and why it exists
Method 3: npm Installation (My Personal Favorite)
Best for: Developers who want complete control and don’t mind getting their hands dirty
Prerequisites Check (The Boring But Necessary Stuff)
First, if you’re on a Mac, you need Xcode Command Line Tools. It’s Apple’s way of saying “okay, you can be a developer now”:
xcode-select --install
A window will pop up. Click “Install” and go make coffee. This takes a while.
Install Homebrew (Mac’s Package Manager)
Homebrew is like the App Store for command-line tools. Here’s how to get it:
/bin/bash -c "$(curl -fsSL https://raw.githubusercontent.com/Homebrew/install/HEAD/install.sh)"
Yes, you’re downloading a script from the internet and running it. Yes, it’s safe. Yes, millions of developers do this. No, your computer won’t explode.
Update Homebrew (because updates are good):
brew update
Install Node.js (The JavaScript Engine)
n8n is built with JavaScript, so we need Node.js to run it. Think of Node.js as the engine that makes JavaScript work outside of web browsers:
brew install node
Quick Explanation for Normal Humans: Node.js lets you run JavaScript on your computer instead of just in your browser. When you install Node, you also get NPM (Node Package Manager) – think of it as an app store for JavaScript packages.
Verify Installation (Make Sure Nothing Broke)
Check Node.js version:
node -v
You should see something like: v24.4.1 (or newer – numbers go up, that’s good)
Check NPM version:
npm -v
You should see something like: 11.4.2 (again, newer is fine)
Important Note That Took Me Hours to Figure Out: n8n requires Node.js version 18.10 or newer. If you see a version number like v16 or v14, you need to update. Check the system requirements if you’re unsure.
Install n8n Globally (The Moment of Truth)
npm install n8n -g
The -g option means “globally” – it installs the software everywhere on your computer, not just in one folder.
What happens during installation:
- Downloads and installs approximately 1,970 packages (yes, that’s a lot)
- Takes 1-2 minutes depending on your internet speed (or 10 minutes if you have my internet)
- Makes n8n available everywhere in your Terminal
- Might show some warnings – usually safe to ignore unless they’re red and screaming
Start n8n (Let’s Go!)
n8n
That’s it. Just three letters. Open your browser and navigate to:
http://localhost:5678
You should see the n8n interface. If you don’t, something went wrong, and it’s time to panic. Just kidding! Check if the port is already in use or if your firewall is being overprotective.
Check Installation Success (Trust But Verify)
Verify the installed version:
n8n -v
Expected output: 1.102.4 (or newer – they update frequently)
Unlock Additional Features (The Free Upgrade)
After installation, I registered for a free key to enable additional features. It’s like getting the DLC for free:

Register n8n for accessing more features for free
The registration process is painless – just provide an email address. No spam (I checked), just useful features like workflow history and better debugging tools.
Alternative Installation Options (For Special Cases)
Using npx (The Commitment-Phobe Option)
If you’re not ready to commit to a full installation:
npx n8n
This runs n8n without permanently installing it. It’s like a first date – no strings attached.
Using Tunnel for External Access (The Show-Off Option)
Want to let others access your n8n instance? Use this for development or testing:
n8n start --tunnel
This creates a temporary public URL. Great for demos, terrible for production. Don’t leave this running unless you want random people poking at your workflows.
Essential Data Storage Setup (Don’t Lose Your Work!)
The Problem with Default Settings
Here’s something the documentation doesn’t scream at you loudly enough: by default, n8n runs everything in memory. Know what that means? YOUR WORKFLOWS DISAPPEAR WHEN YOU RESTART THE APPLICATION.
I learned this the hard way. Spent 3 hours building the perfect workflow. The computer crashed. Everything gone. I may have cried a little.
Database Configuration Options (Save Your Sanity)
n8n supports multiple database backends through environment variables. Think of environment variables as settings you can change without touching the code.
Option 1: SQLite (The Default That Actually Works)
Best for: Solo users, small teams, people who just want things to work
SQLite is like a database in a single file. No server needed, no complicated setup. Here’s how to make sure your data persists:
export N8N_SQLITE_PATH=/path/to/your/database.sqlite
n8n
Replace /path/to/your/database.sqlite with where you want to save your database. I use /Users/elena/n8n/database.sqlite because I’m creative like that.
Pros:
- Simple setup – just specify a file path
- No additional software needed – it’s built into n8n
- Perfect for personal use – handles thousands of workflows easily
Cons:
- Not suitable for multiple users accessing simultaneously
- Can get slow with millions of workflow executions (but who has millions?)
Option 2: Postgres (The Professional Choice)
Postgres, also known as PostgreSQL is one of the best choices for production environments, teams, and people who like to over-engineer things :)
Postgres is a real database server. It’s what big companies use. Here’s the setup:
export DB_TYPE=postgresdb
export DB_POSTGRESDB_HOST=localhost
export DB_POSTGRESDB_PORT=5432
export DB_POSTGRESDB_DATABASE=n8n
export DB_POSTGRESDB_USER=n8n_user
export DB_POSTGRESDB_PASSWORD=your_super_secret_password
You’ll need to install Postgres first. That’s a whole other adventure I won’t get into here.
Option 3: MySQL/MariaDB (The “We Already Have This” Option)
Best for: Companies that already have MySQL running and don’t want another database
export DB_TYPE=mysqldb
export DB_MYSQLDB_HOST=localhost
export DB_MYSQLDB_PORT=3306
export DB_MYSQLDB_DATABASE=n8n
export DB_MYSQLDB_USER=n8n_user
export DB_MYSQLDB_PASSWORD=your_password_here
Similar to Postgres, but it’s MySQL. Some people have strong opinions about Postgres vs MySQL. I don’t. They both store data.
File Storage Configuration (Where Your Stuff Lives)
Configure where n8n stores files, logs, and other important stuff:
export N8N_USER_FOLDER=/path/to/n8n/data
export N8N_LOG_LEVEL=debug
export N8N_LOG_OUTPUT=file
What these mean in human language:
N8N_USER_FOLDER: Where n8n saves your files and credentialsN8N_LOG_LEVEL=debug: Show me everything that’s happening (useful when things break)N8N_LOG_OUTPUT=file: Save logs to a file instead of just showing them on screen
Security Configuration (Don’t Get Hacked)
n8n has tons of configuration options through environment variables. Here are the ones that actually matter for keeping your stuff safe:
Step 1: Enable Basic Authentication (The Bare Minimum)
export N8N_BASIC_AUTH_ACTIVE=true
export N8N_BASIC_AUTH_USER=your_username
export N8N_BASIC_AUTH_PASSWORD=your_super_secure_password_not_password123
This adds a login screen. Without this, anyone who finds your n8n instance can mess with your workflows. Don’t be that person.
Step 2: Security Configuration (For the Paranoid)
# Encryption key for sensitive data (make this random!)
export N8N_ENCRYPTION_KEY="your-32-character-encryption-key-here"

# Use secure cookies (prevents cookie theft)
export N8N_SECURE_COOKIE=true
export N8N_PROTOCOL=https

# CORS settings (controls who can access your n8n)
export N8N_CORS_ENABLE=true
export N8N_CORS_ORIGIN="https://yourdomain.com"
What this actually does:
- Encryption key: Scrambles your stored credentials so hackers can’t read them
- Secure cookies: Makes sure your login cookie can’t be stolen
- CORS settings: Controls which websites can talk to your n8n instance
Step 3: Performance Tuning (Make It Fast)
# Maximum payload size in MB (default: 16MB)
export N8N_PAYLOAD_SIZE_MAX=64

# Execution timeout in seconds (default: unlimited)
export N8N_EXECUTIONS_TIMEOUT=300

# How to run executions
export N8N_EXECUTIONS_PROCESS=main
Translation:
- Payload size: How big can uploaded files be? 64MB handles most things
- Execution timeout: Kill workflows that run longer than 5 minutes (300 seconds)
- Executions process: Run everything in the main process (there are other options for scaling)
For the complete list of configuration options (there are TONS), check the official environment variables documentation.
Building Your First AI Chatbot (The Fun Part!)
What We’re Actually Building
We’re not making another “Hello, how can I help you?” bot. We’re building something that:
- Receives input from users through webhooks, chat platforms, or smoke signals (okay, not smoke signals)
- Actually remembers what you talked about (unlike my goldfish)
- Processes requests using AI like OpenAI, Claude, or whatever fancy AI you prefer
- Responds intelligently with actual context, not just canned responses
- Connects to external services when needed – weather, calendars, databases, you name it
Prerequisites Setup (The Necessary Evil)
Option A: OpenAI Setup (The Popular Choice)
- Create an OpenAI API key: Go to platform.openai.com. You’ll need to create an account if you don’t have one.
- Add credits to your account: Minimum $5 for testing. Yes, it costs money. Good things aren’t always free.
- Configure the credential in n8n: Settings > Credentials > New Credential > OpenAI. Paste your key, save, done.
Option B: Alternative AI Providers (For the Adventurous)
- Anthropic Claude (API documentation): My personal favorite. Claude is like the thoughtful friend who actually listens.
- Hugging Face: For open-source models. Free-ish, but sometimes slow.
- Local LLMs using Ollama: Run AI on your own computer. Check out my post DeepSeek R1 with Ollama if you want to go down this rabbit hole.
- Google Gemini: Google’s AI. It’s… fine. It exists.
- Azure OpenAI: For enterprise setups where someone else pays the bills.
Step 1: Start with the Template (Don’t Reinvent the Wheel)
When you first open n8n, it shows you templates. Look for the chatbot template. It’s like a recipe that’s 80% done – you just need to add your secret sauce.
Step 2: Adding Chat Memory (The Game Changer)
Here’s the difference between a dumb bot and a smart one: memory. A basic chatbot treats every message like it’s the first time you’ve ever talked. A sophisticated one remembers your entire conversation.
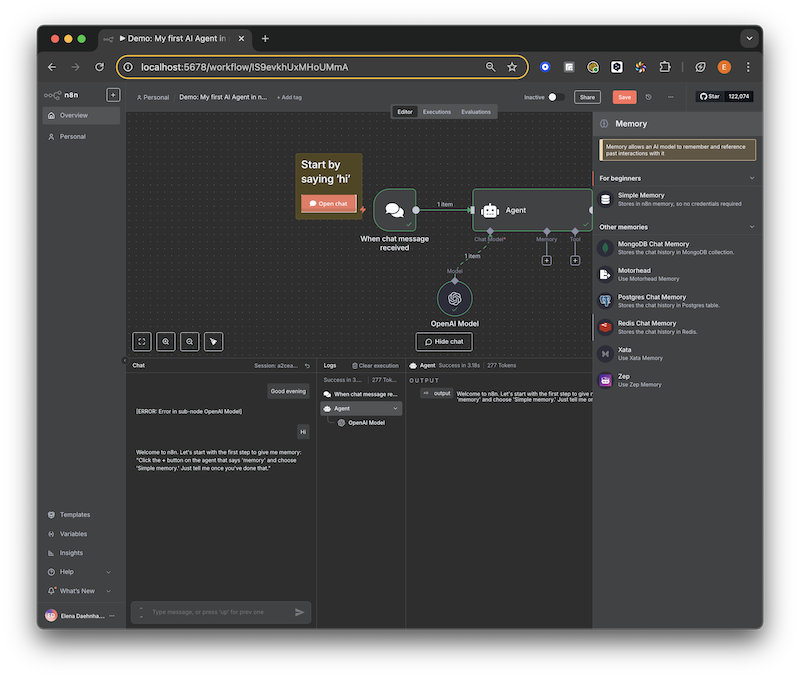
Adding chat memory to make your bot actually useful
Why Redis for Memory? (The Technical Bit)
I use Redis because it’s like the Flash of databases:
- Fast in-memory storage: Responses come back instantly, not after a coffee break
- Key-value structure: Perfect for storing “user123” → “their conversation history”
- TTL support (Time To Live): Automatically forgets old conversations (unlike your mother-in-law)
- Persistence options: Can save to disk so memories survive restarts
Redis Setup Options (Pick Your Poison)
Option 1: Free Redis Cloud Account (The Easy Way)
- Visit Redis Cloud
- Register for a free account (they give you 30MB free)
- Perfect for testing and small bots
- Takes 5 minutes to set up
Option 2: Self-hosted Redis (The Control Freak Way)
- Install Redis on your computer or server
- More control, more responsibility
- Better for production or if you’re paranoid about data
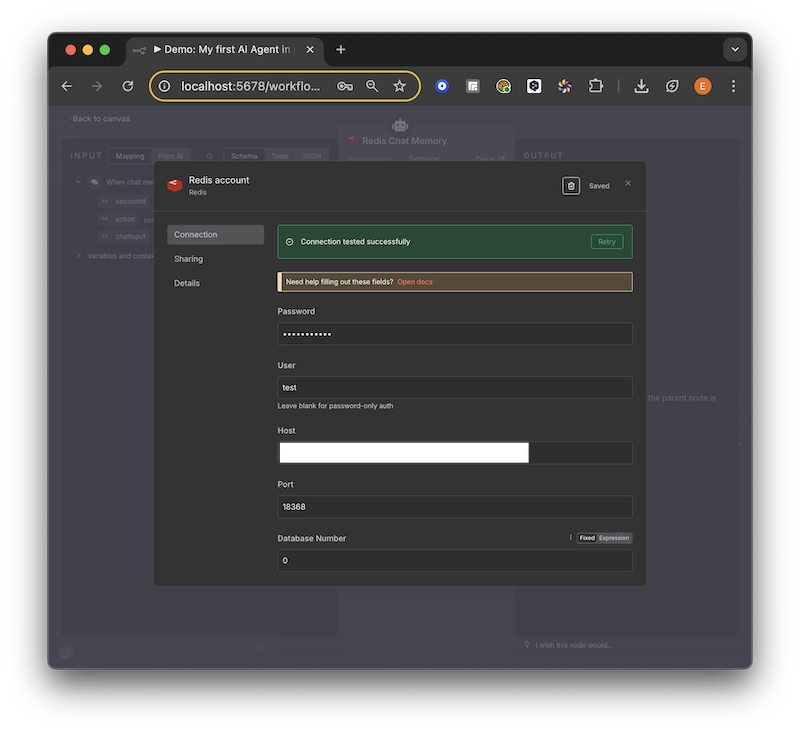
Connecting to Redis – easier than it looks
Step 3: Memory Implementation Workflow (How It Actually Works)
Here’s what happens when someone talks to your bot:
User says "Hi!" → Check who they are → Get their history → Add context → Send to AI → AI responds → Save everything → User sees response
The Detailed Dance:
- Retrieve Context: “Oh, it’s Bob! Let me check what we talked about last time…” fetches from Redis
- Process Input: “Bob’s asking about the weather, and last time he mentioned he’s in Seattle”
- AI Processing: “Hey Claude/GPT, Bob from Seattle wants weather info. Here’s our previous conversation…”
- Store Response: “Better save this conversation for next time” saves to Redis
- Return Response: “Hey Bob! Still raining in Seattle? Here’s your weather forecast…”
Step 4: Advanced Features (Making It Awesome)
Context Management (Keeping Conversations Sane)
- Conversation summaries: When chats get long, summarise older parts to save tokens (and money)
- Topic tracking: “We’re talking about pizza recipes, not quantum physics”
- User preferences storage: “Bob likes detailed explanations and dad jokes”
- Session management: Handle the same user on different devices without confusion
Multi-Channel Support (Be Everywhere)
n8n supports chatbots across tons of platforms:
- Webhooks: For custom integrations or when you’re building something weird
- Telegram: Native support, works great for personal bots
- Discord: Perfect for community bots
- Slack: For pretending to work while actually chatting with a bot
- WhatsApp: Via Twilio (costs money but reaches everyone)
- Web chat widgets: Embed in your website, look professional
Google Calendar Integration: The OAuth2 Adventure
Oh boy, OAuth2. If you’ve never dealt with OAuth2 before, imagine trying to get into an exclusive club where you need three different IDs, a secret handshake, and your friend to vouch for you.
That’s OAuth2. I’ll walk you through this step-by-step because Google’s documentation reads like robots wrote it for robots.
Step 1: Create Your Google Cloud Project (Enter the Maze)
- Go to Google Cloud Console
- Visit Google Cloud Console Project Create
- You’ll need a Google account (obviously)
- Enter a project name like “n8n-automation” or “my-awesome-bot” (Google doesn’t care, but you will in 6 months)
- Click “Create” and wait while Google does mysterious things
Step 2: Configure OAuth Consent Screen (The Paperwork)
- Navigate to OAuth Settings
- Click on APIs & Services > OAuth consent screen
- If you can’t find it, look harder. Google loves hiding things.
- Choose Your Audience
- Internal: Only for people in your Google Workspace organization (if you have one)
- External: For any Google account holder (choose this unless you’re in a company)
- Click your choice and prepare for more forms
- Fill Required Information
- App name: What users will see. Make it friendly, not “TestApp123”
- User support email: Where confused users will send their complaints
- Developer contact email: Where Google will send important stuff you’ll probably ignore
Step 3: Set Up Authorized Domains (The VIP List)
- Find Branding Section
- Scroll down to Authorised domains
- This tells Google which domains are allowed to use your app
- Add Your Domain
- Using n8n Cloud? Add
n8n.cloud - Self-hosting? Add your actual domain (like
mydomain.com) - Running locally? You might skip this for testing
- Using n8n Cloud? Add
- Save Configuration
- Click Save. Google will think about it for a moment.
Step 4: Enable Google Calendar API (Turn On the Magic)
- Access API Library
- Go to APIs & Services > Library
- It’s like the app store but for APIs
- Search and Enable
- Type “Google Calendar API” in the search box
- Click on it when it appears
- Hit that Enable button
- Wait for Google to do its thing
Step 5: Create OAuth2 Credentials (The Secret Keys)
- Create Credentials
- Navigate to APIs & Services > Credentials
- Click Create Credentials > OAuth 2.0 Client IDs
- Select Web application (not Android, not iOS, even if you’re confused)
- Add Redirect URIs (Super Important!)
- For local testing:
http://localhost:5678/rest/oauth2-credential/callback - For your domain:
https://yourdomain.com/rest/oauth2-credential/callback - These URLs tell Google where to send users after they log in
- Get these wrong and nothing works
- For local testing:
Step 6: Configure in n8n (Bringing It All Together)
- Copy Credentials
- Copy the Client ID (looks like random-numbers-and-letters.apps.googleusercontent.com)
- Copy the Client Secret (looks like more random characters)
- Don’t share these with anyone. Seriously.
- Setup in n8n
- In n8n, go to Settings > Credentials
- Click New and search for Google OAuth2 API
- Paste your Client ID and Client Secret
- Click the authorize button
- Log in with your Google account
- Accept the permissions (yes, it’s safe, you’re giving permission to yourself)
Google Calendar Workflow Examples (The Fun Stuff)
Now that we’ve survived OAuth2 setup, here’s what you can actually build:
Meeting Scheduler Bot (My Personal Favourite)
Someone messages "Schedule meeting Tuesday 3pm"
       ↓
Bot understands the request
       ↓
Checks if Tuesday 3pm is free
       ↓
Creates calendar event with meeting link
       ↓
Sends confirmation with calendar invite
Daily Schedule Digest
Schedule Trigger (daily at 8 AM)
       ↓
Fetch today's calendar events
       ↓
Format summary
       ↓
Send via email/Slack/SMS
Automatic Meeting Reminders
Schedule Trigger (every 15 minutes)
       ↓
Fetch upcoming meetings (next 30 minutes)
       ↓
Check if reminder sent
       ↓
Send personalized reminders
       ↓
Log reminder status
Exploring n8n Templates and Integration Ecosystem
The n8n template library contains hundreds of pre-built workflows. This is where the real magic happens - you can learn from others and adapt their solutions.
Popular Template Categories
Content Creation and Marketing
- Social Media Automation: Cross-post content to multiple platforms
- Email Marketing: Automated campaigns with personalization
- Content Curation: Aggregate content from RSS feeds, APIs, and websites
- SEO Monitoring: Track rankings, backlinks, and competitors
Data Processing and Analysis
- ETL Workflows: Extract, transform, and load data between systems
- Report Generation: Automated business intelligence reports
- Data Validation: Clean and verify data quality
- API Monitoring: Track service health and performance
Business Operations
- CRM Automation: Lead scoring, follow-ups, and data synchronization
- Invoice Processing: Automated billing and payment tracking
- Inventory Management: Stock level monitoring and reordering
- Customer Support: Ticket routing and response automation
Development and DevOps
- CI/CD Integration: Automated deployments and testing
- Monitoring and Alerting: System health checks and notifications
- Backup Automation: Scheduled data backups across services
- Security Scanning: Automated vulnerability assessments
Advanced Integration Patterns
Webhook Orchestration Pattern
External Service → Webhook → n8n Workflow → Multiple Actions
Error Handling and Retry Logic
Try Block:
  ├── API Call
  ├── Data Processing
  └── Success Action
Catch Block:
  ├── Log Error
  ├── Send Alert
  └── Retry with Backoff
Conditional Branching
Input Data → Condition Check → Branch A (Success Path)
                           └── Branch B (Alternative Path)
                           └── Branch C (Error Path)
Performance Optimization Tips
Batch Processing Strategy
- Group similar operations to reduce API calls
- Use bulk endpoints when available
- Implement queuing for high-volume workflows
Memory Management
- Stream large datasets instead of loading everything in memory
- Clean up temporary data between workflow steps
- Use pagination for large API responses
Monitoring and Debugging
- Enable execution logging for troubleshooting
- Set up monitoring alerts for failed workflows
- Use webhook testing tools for development
- Implement health checks for critical workflows
Security Best Practices
Credential Management
- Use environment variables for sensitive data
- Rotate API keys regularly
- Implement least-privilege access for integrations
- Audit credential usage periodically
Network Security
- Use HTTPS for all external communications
- Implement IP whitelisting where possible
- Set up VPN access for sensitive workflows
- Monitor traffic patterns for anomalies
Data Protection
- Encrypt sensitive data at rest and in transit
- Implement data retention policies
- Use secure communication channels
- Regular security assessments
My Real-World Blog Automation Workflow
Let me share the actual workflow I’ve implemented for my blog automation. This isn’t theoretical - it’s the real system I use daily.
Phase 1: Research and Content Gathering
The Automated Research Pipeline
RSS Feeds → Content Aggregation → AI Summarization → Research Database
     ↓
Google Alerts → Keyword Monitoring → Trending Topics → Content Ideas
     ↓
Social Media → Engagement Tracking → Popular Content → Inspiration Bank
What This Looks Like in Practice:
- Morning: My system automatically scans 50+ RSS feeds
- AI Processing: Claude or GPT-5 summarizes key points
- Storage: Everything goes into a searchable database
- Result: I wake up to a curated list of trending topics
Tools and Services Used
- RSS Sources: Hacker News, Reddit, GitHub trending, industry blogs
- AI Processing: Anthropic Claude for summarization
- Storage: Airtable for searchable content database
- Monitoring: Google Alerts for keyword tracking
Phase 2: Content Creation Pipeline
From Idea to Published Post
Content Idea → AI Research Assistant → Draft Generation → Human Review
     ↓
Grammar Check → SEO Optimization → Image Generation → Asset Preparation
     ↓
Preview Generation → Quality Check → Approval Workflow → Publishing Queue
My Personal Process:
- Idea Selection: I review curated topics each morning
- Research Automation: n8n triggers research workflows
- Draft Generation: AI creates initial outlines (I write the actual content)
- Quality Control: I review, test all code, and ensure accuracy
- Asset Creation: Automated image generation and optimization
- Publishing: Scheduled release with social media distribution
Key Automation Points
- Research gathering: 80% automated
- Asset preparation: 90% automated
- Social media posting: 100% automated
- SEO optimization: 70% automated
- Actual writing: 0% automated (I do this myself!)
Phase 3: Distribution and Engagement
Post-Publication Automation
Published Post → Social Media Posting → Newsletter Inclusion → Analytics Tracking
     ↓
Comment Monitoring → Response Automation → Engagement Metrics → Performance Analysis
Automated Activities:
- Cross-platform posting: Twitter, LinkedIn, Reddit
- Newsletter integration: Automatic inclusion in weekly digest
- Comment monitoring: Alerts for new comments requiring responses
- Analytics tracking: Performance metrics and trending analysis
- Engagement follow-up: Automated thank-you messages for shares
The Results: My Honest Assessment
This automation has reduced my content creation time by approximately 60% while maintaining quality. Here’s the breakdown:
Time Savings
- Research time: From 2 hours to 30 minutes
- Asset creation: From 1 hour to 10 minutes
- Publishing workflow: From 45 minutes to 5 minutes
- Social media distribution: From 30 minutes to 0 minutes
Quality Maintained
- All code is tested before publication
- Human review for every piece of content
- Personal voice preserved throughout the process
What I Learned
- Automate the repetitive, not the creative
- Quality control must remain human
- Start small and build incrementally
- Monitor and adjust regularly
- Backup plans are essential
My Honest Conclusion: Was It Worth It?
After months of using n8n for blog automation, here’s my candid assessment:
The Good
Time Freedom: I now spend 60% less time on repetitive tasks. This means more time for actual writing, research, and yes - more time at the gym and walking on my favorite beach.
Consistency: My publishing schedule is now rock-solid. Content goes out regularly without me having to remember every step.
Quality Improvements: Automated research gives me access to more sources than I could manually monitor. My content is better informed.
Reduced Stress: No more “Did I post to all platforms?” anxiety. It’s handled automatically.
The Challenges
Learning Curve: It took about 2 weeks to build my first working workflow. Don’t expect magic on day one.
Maintenance Required: Workflows break when APIs change. You need to monitor and maintain them.
Initial Time Investment: Setting up automation takes longer than doing things manually at first. It’s an investment in future efficiency.
Over-Automation Temptation: I had to resist automating everything. Some things are better done manually.
Key Lessons Learned
1. Start Simple
Begin with basic workflows and gradually add complexity. My first automation just posted to Twitter. Now I have a 15-step content pipeline.
2. Security First
Always implement proper authentication and encryption. I learned this the hard way when an unsecured webhook got hit by bots.
3. Monitor Performance
Track workflow execution and optimize bottlenecks. Things break, and you need to know immediately.
4. Document Everything
Maintain clear documentation for workflow maintenance. Future you will thank present you.
5. Leverage the Community
Use templates and community knowledge. No need to reinvent the wheel.
Conclusion
n8n has proven incredibly powerful for automating complex workflows without extensive coding knowledge. Whether you’re automating blog content creation, managing business processes, or building AI-powered applications, it provides the flexibility and power needed.
The investment in learning n8n has paid dividends in both time savings and creative opportunities. The automation handles the boring stuff, freeing me to focus on writing, research, and life outside of work.
Reality Check: Just like learning to code, you cannot expect to wake up one day as the best automation engineer. You will have some pain along the way. This pain will help you respect the process and understand what needs automation versus what’s better done manually.
But honestly? It’s worth it.
Just remember to eat well, exercise, and go out while your workflows are running. That’s the whole point. :)
Did you like this post? Please let me know if you have any comments or suggestions. I’d love to hear about your automation journey and what workflows you’re building!
References
Throughout this guide, I’ve referenced various documentation sources and tools. Here are all the links organised for easy access:
Official n8n Resources
- n8n Official Website
- n8n Documentation
- n8n Pricing
- n8n Download (Desktop Applications)
- n8n Templates and Workflows
- Community Edition Features
