Introduction
As you probably know, Python is a general-purpose programming language, and we can program everything. Web apps are a great topic to explore. To start with web development in Python, I suggest using the Flask framework. This framework is my favourite and very lightweight compared to other frameworks such as Djangio, which is also great for much bigger projects.
In this post, we will create a TODO web application using Python, the Flask framework, and SQLite for persistent data storage. You will quickly learn how to create dynamic web applications.
Did you know that Reddit uses Flask for its scalable web application, managing posts, comments, and user authentication? No wonder Flask integrates with databases and extensions to efficiently handle high volumes of user content.
Prerequisites
We will use Python 3 and your preferred text editor (VS Code, Sublime Text, etc.) or IDE. I use PyCharm for most of my coding and writing projects. However, you can also write in any text editor; it is your choice.
We will also use Pip package installer.
Setting up the Environment
To keep our Python installation clean, we can use virtual environments. If you are new to Venv or want to explore it, please read my previous post Python Virtual Environments.
First, we create a new folder for your project:
mkdir my_todo
cd my_todo
Second, we create a Virtual Environment (it is an optional but recommended step):
python3 -m venv .venv
Notice the dot in front of the environment folder. It is because it is hidden.
Finally, we activate the environment:
- Linux/macOS:
source .venv/bin/activate - Windows:
.venv\Scripts\activate
You will see that your .venv is active in the output line like this:
(.venv) (base) elena@the_best_comp my_todo_app %
Installation
Our TODO app will be a web app using the Flask library.
Flask is intentionally designed to be small and lightweight, providing only the essential components for building web applications. This “micro” nature translates to faster development, easier debugging, and improved performance, especially for smaller projects.
We install Flask with pip:
pip install Flask
Creating the Flask TODO App
TODO app
You can create and further improve any Flask form-based Python app using this setup and the whole process.
The TODO app is a straightforward web app that stores our tasks in a text file.
Tasks data storage
We will store our TODO tasks in the SQLite database, which comes pre-installed with Python.
SQLite requires no complex configuration or setup. You simply create a database file and start using it. SQLite is in the public domain, meaning it’s free to use for any purpose without licensing restrictions.
Our TODO-app data will be stored in the tasks table. We assign each task a number, priority, and completion status.
The data Database Schema for the tasks table consists of the following columns:
id(INTEGER, primary key, auto-incrementing)task(TEXT, not null)priority(INTEGER, not null)complete(BOOLEAN, not null, default 0)
Imports and Initialisation
Firstly, let’s create a file named app.py and add the following code:
from flask import Flask, render_template, request, redirect, url_for, g
import sqlite3

app = Flask(__name__)
DATABASE = 'todo.db'
Herein, we import necessary modules, including the Flask framework, SQLite3 database, and the g object.
We define the Flask app and initialise the DATABASE variable with the database file name.
In Flask, g is a special object unique to each request. It’s essentially a place to store data that needs to be accessible throughout a single request but not persistent across different requests.
We have also imported other useful Flask features, allowing us to create webpage templates, make web requests and redirects, and create a web link with the render_template, request, redirect, and url_for functions, respectively.
The app entry point
To run our application, we have to add the following:
if __name__ == '__main__':
    app.run(debug=True)
The if name == ‘main’ block serves as the entry point for the Flask application. It ensures that the Flask app only runs when executed directly as a script, not when imported as a module by another script.
Moreover, we run our app in debugging mode while developing it to get more information on how it runs. This way, we can get the errors and messages to debug the TODO app.
Creating database
We didn’t have any database files when we first started our app. We create the ‘tasks’ table if it does not exist yet:
def get_db():
    db = getattr(g, '_database', None)
    if db is None:
        db = g._database = sqlite3.connect(DATABASE)
        db.execute('''
            CREATE TABLE IF NOT EXISTS tasks (
                id INTEGER PRIMARY KEY AUTOINCREMENT,
                task TEXT NOT NULL,
                priority INTEGER NOT NULL,
                complete BOOLEAN NOT NULL CHECK (complete IN (0, 1))
            )
        ''')
    return db
The get_db() function creates a connection to the SQLite database if one doesn’t already exist, stores it in the g object, and returns it. Storing a database connection in g allows you to access it from different parts of your application without repeatedly opening and closing the connection.
We have to close the database connection when we close the application.
In Flask, @app.teardown_appcontext is a decorator that registers a function to be called when the application context ends.
@app.teardown_appcontext
def close_connection(exception):
    db = getattr(g, '_database', None)
    if db is not None:
        db.close()
Application routes
In Flask, a route is a mapping between a URL and a Python function that should be executed when that URL is accessed. The decorator @app.route(…) defines this mapping.
Index Route
Index Route displays the list of tasks. It calls get_db() to get the database connection. Next, it executes an SQL query to retrieve all tasks, including their IDs, content, priority, and completion status. We store the query results in a list of dictionaries.
@app.route('/')
def index():
    db = get_db()
    cur = db.execute('SELECT id, task, priority, complete FROM tasks')
    tasks = [{'id': row[0], 'task': row[1], 'priority': row[2], 'complete': bool(row[3])} for row in cur.fetchall()]
    return render_template('index.html', tasks=tasks)
Finally, we render the index.html template, passing the tasks list as context. The template will show the list of tasks and some buttons to manage the tasks. We will explore the template creation in the next section.
Add Route
The add route handles adding new tasks. It extracts the task and priority from the form data and inserts a new row into the tasks table with the provided values.
After committing the changes to the database, we redirect to the index page.
@app.route('/add', methods=['POST'])
def add():
    task = request.form['task']
    priority = int(request.form['priority'])  # Get priority from the form
    db = get_db()
    db.execute('INSERT INTO tasks (task, priority, complete) VALUES (?, ?, ?)', (task, priority, False))
    db.commit()
    return redirect(url_for('index'))
Complete Route
Complete route updates the completion status of a task.
Firstly, we get the database connection and the task ID from the URL.
Next, we execute an SQL query to update the complete column of the specified task.
Once again, after committing the changes to the database, we redirect to the index page to show all store tasks.
@app.route('/complete/<int:task_id>')
def complete(task_id):
    db = get_db()
    db.execute('UPDATE tasks SET complete = NOT complete WHERE id = ?', (task_id,))
    db.commit()
    return redirect(url_for('index'))
Delete Route
To delete a task, we get the database connection and use the task ID from the URL while executing an SQL query to delete the task with the specified ID.
Finally, we commit the changes to the database and do a redirect to the index page.
@app.route('/delete/<int:task_id>')
def delete(task_id):
    db = get_db()
    db.execute('DELETE FROM tasks WHERE id = ?', (task_id,))
    db.commit()
    return redirect(url_for('index'))
Edit Route
The edit route edits a task using its unique identifier captured from the URL. The function supports data retrieval and submission through the GET and POST methods.
The methods=['GET', 'POST'] parameter specifies that this route will handle both GET and POST HTTP requests:
* GET requests are typically used to retrieve data or display a form;
* POST requests are generally used when submitting data (for example, when updating a task).
When a user navigates to a URL like /edit/123, Flask calls the edit function with task_id set to 123.
Inside the function, you can handle the logic based on whether the request method is GET (e.g., display the current details of the task) or POST (e.g., process form data to update the task).
The URL Pattern is defined as follows:
'/edit/<int:task_id>'means the URL should start with/edit/followed by an integer value.- The part
<int:task_id>is a dynamic URL segment. Whatever integer is provided in that part of the URL will be passed as the argumenttask_idto theeditfunction.
@app.route('/edit/<int:task_id>', methods=['GET', 'POST'])
def edit(task_id):
    db = get_db()
    if request.method == 'POST':
        task = request.form['task']
        priority = int(request.form['priority'])  # Get priority from the form
        db.execute('UPDATE tasks SET task = ?, priority = ? WHERE id = ?', (task, priority, task_id))
        db.commit()
        return redirect(url_for('index'))
    else:
        cur = db.execute('SELECT task, priority FROM tasks WHERE id = ?', (task_id,))
        task_data = cur.fetchone()
        return render_template('edit.html', task=task_data[0], priority=task_data[1], task_id=task_id)
In short, if it is ‘POST’, we update the task with the new values from the form and redirect it to the index page.
If ‘GET’ is used, we retrieve the existing task data and render the edit.html template with the task and task ID.
Form submission with POST
Firstly, we check if the form has been submitted (i.e., the HTTP method is POST) using the if request.method == 'POST': clause.
Secondly, with task = request.form['task'] we retrieve the value of the ‘task’ input from the submitted form.
Next, priority = int(request.form['priority']) retrieves the value of the ‘priority’ input from the form and converts it to an integer.
Finally, we have to update our database with the submitted data using db.execute('UPDATE tasks SET task = ?, priority = ? WHERE id = ?', (task, priority, task_id)) with the new task description and priority, where task_id matches the specific task being edited.
We save the changes with db.commit().
After updating, the code redirects the user back to the main page (or index) using redirect(url_for('index')).
GET request to show a task
The else: part runs if the HTTP method is not POST (typically, it’s a GET request).
The code runs a SELECT query to fetch the current task description and priority from the database for the task with the specified task_id.
With cur.fetchone() we fetches the first (and only) row of the result, storing it in task_data.
The render_template('edit.html', ...) function call sends the data to the edit.html template so the user can see the current task details and update them if necessary.
In short, if the form is submitted (POST), the code updates the task in the database and redirects to the homepage. If it’s a GET request, it retrieves the current task details from the database and displays them in the edit form.
Templates
Flask templates are files—usually written in HTML—that define the structure and layout of the web pages in your Flask application. They often include special placeholders and logic (using the Jinja2 templating engine) that allow you to insert dynamic content. Using Jinja2 syntax (e.g., ‘ {{ variable }} ‘ and ‘ {% for item in list %} ‘), you can insert variables, control flow, and loops into your HTML.
As we saw in the routes code above, we use the render_template function to render a template file and any dynamic data you want to display.
Templates are typically stored in a folder named templates within your Flask project.
So, we start by creating a templates folder in your project directory and adding index.html and edit.html files inside it.
templates/index.html
This HTML code displays the TODO list with options to complete, delete, and edit each task and a form to add new tasks.
I have added CSS style into the templates/index.html to emphasise the task priority in different colours.
Let’s go through each of the Jinja2 patterns:
{% for task in tasks %}- Begins a loop that iterates over each item in the
taskslist.
- Begins a loop that iterates over each item in the
{% if task.complete %}- Checks whether the current task’s
completeattribute is true.
- Checks whether the current task’s
{{ task.task }}- Outputs the value of the
taskattribute of the current task object. This is how you display dynamic data in the template.
- Outputs the value of the
{% else %}- Provides an alternative block of code to execute if the
ifcondition (task.complete) is false.
- Provides an alternative block of code to execute if the
{% endif %}- Marks the end of the
ifconditional block.
- Marks the end of the
{% endfor %}- Marks the end of the
forloop block.
- Marks the end of the
Each of these patterns helps control the flow and output of your template, making it dynamic based on your application’s data.
<!DOCTYPE html>
<html>
<head>
    <title>TODO App</title>
    <style>
        .high { color: red; }
        .medium { color: orange; }
        .low { color: green; }
    </style>
</head>
<body>
    <h1>TODO List</h1>
    <ul>
        {% for task in tasks %}
            <li class="{{ 'high' if task.priority == 2 else 'medium' if task.priority == 1 else 'low' }}">
                {% if task.complete %}
                    <strike>{{ task.task }}</strike>
                {% else %}
                    {{ task.task }}
                {% endif %}
                <a href="/complete/{{ task.id }}">Complete</a>
                <a href="/delete/{{ task.id }}">Delete</a>
                <a href="/edit/{{ task.id }}">Edit</a>
            </li>
        {% endfor %}
    </ul>
    <form method="POST" action="/add">
        <input type="text" name="task" placeholder="Add task">
        <select name="priority">
            <option value="2">High</option>
            <option value="1">Medium</option>
            <option value="0">Low</option>
        </select>
        <button type="submit">Add</button>
    </form>
</body>
</html>
We have also used an HTML form <form method="POST" action="/add"> to add our task data using the POST method to the /add URL when submitted. If you don’t know yet or want to learn more about web forms, I suggest visiting w3schools html forms tutorial.
2.3 Create templates/edit.html
Create an edit.html file inside the templates folder:
<!DOCTYPE html>
<html>
<head>
    <title>Edit Task</title>
</head>
<body>
    <h1>Edit Task</h1>
    <form method="POST" action="/edit/{{ task_id }}">
        <input type="text" name="task" value="{{ task }}">
        <select name="priority">
            <option value="2" {% if priority == 2 %}selected{% endif %}>High</option>
            <option value="1" {% if priority == 1 %}selected{% endif %}>Medium</option>
            <option value="0" {% if priority == 0 %}selected{% endif %}>Low</option>
        </select>
        <button type="submit">Save</button>
    </form>
</body>
</html>
This HTML code displays a form to edit an existing task. The most important elements we can focus on here are:
-
Form Tag:
<form method="POST" action="/edit/{{ task_id }}">creates a form that will send its data via a POST request to a URL like/edit/123, where{{ task_id }}is dynamically replaced by the actual task ID. -
Input Field:
<input type="text" name="task" value="{{ task }}">creates a text input where users can see and edit the current task description. Thevalueattribute is filled with the current task value using the{{ task }}variable. -
Select Dropdown:
<select name="priority">begins a dropdown menu for selecting the task’s priority. -
Current task priority:
<option value="2" {% if priority == 2 %}selected{% endif %}>High</option>defines an option with the value2labeled “High”. The{% if priority == 2 %}selected{% endif %}Jinja2 statement checks if the current task’s priority is 2; if it is, theselectedattribute is added to this option, making it the default choice.
Running the App
Run your app from the terminal:
python app.py
Now open your browser and go to http://127.0.0.1:5000/. You should see your TODO app!
(.venv) (base) elena@the_best_comp my_todo_app % python app.py
 * Serving Flask app 'app'
 * Debug mode: on
WARNING: This is a development server. Do not use it in a production deployment. Use a production WSGI server instead.
 * Running on http://127.0.0.1:5000
Press CTRL+C to quit
 * Restarting with stat
 * Debugger is active!
No, you can open your favourite browser at http://127.0.0.1:5000, and you will see your TODO app running.
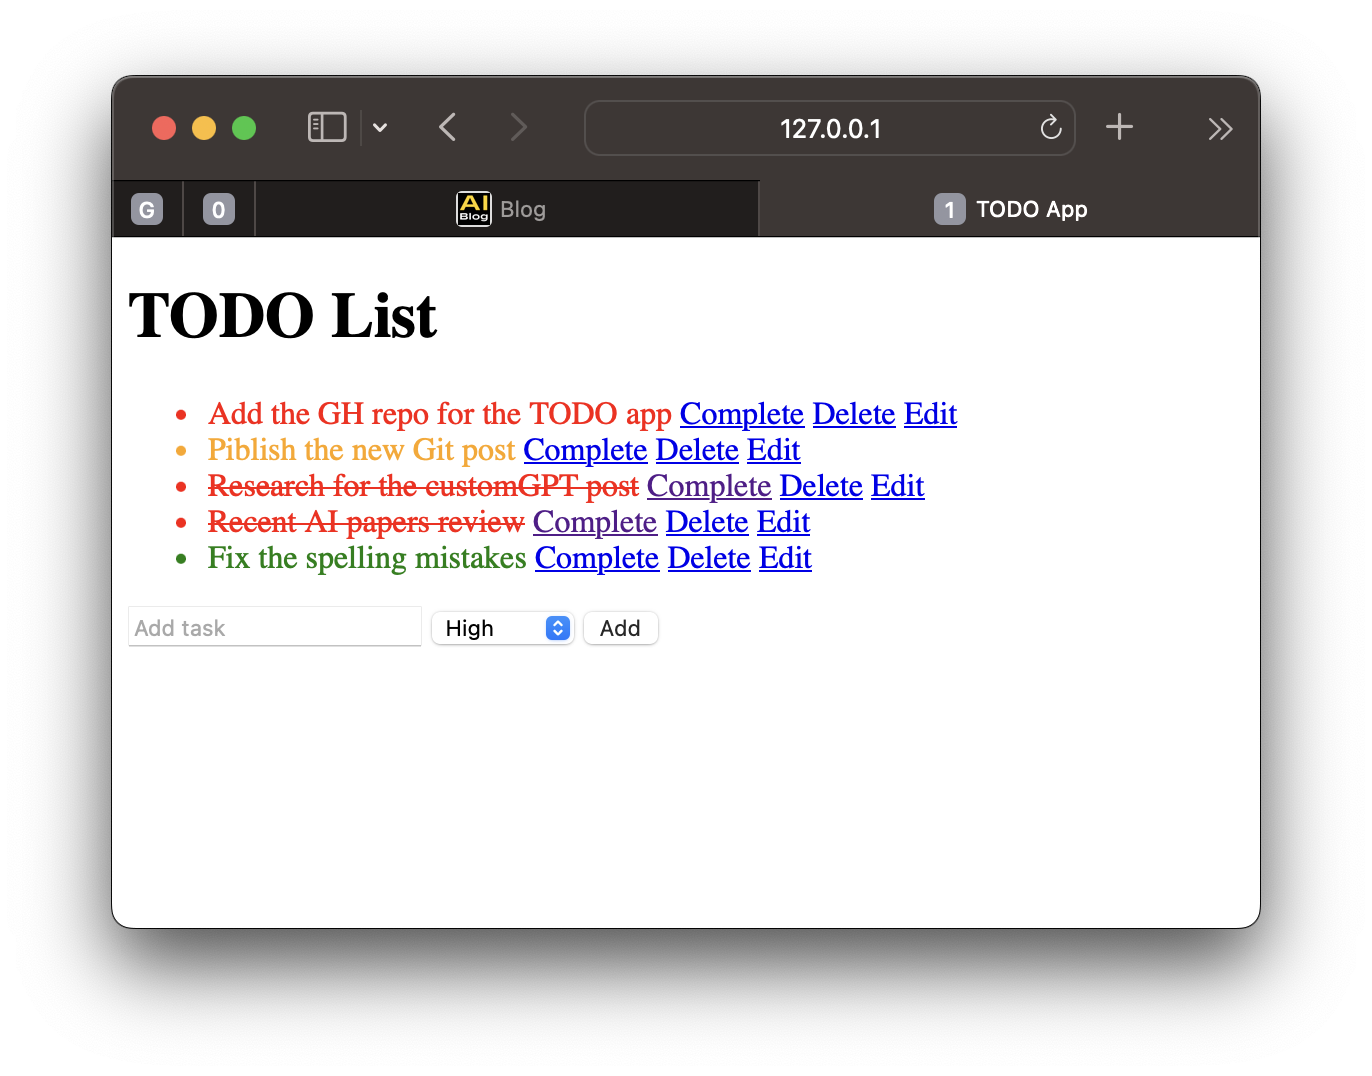
TODO app v1, it works!
I have placed all the code into this GitHub repository. Now, the app looks a bit better. See the differences between the commits, and you will find out what happened! Please let me know when you have any questions.
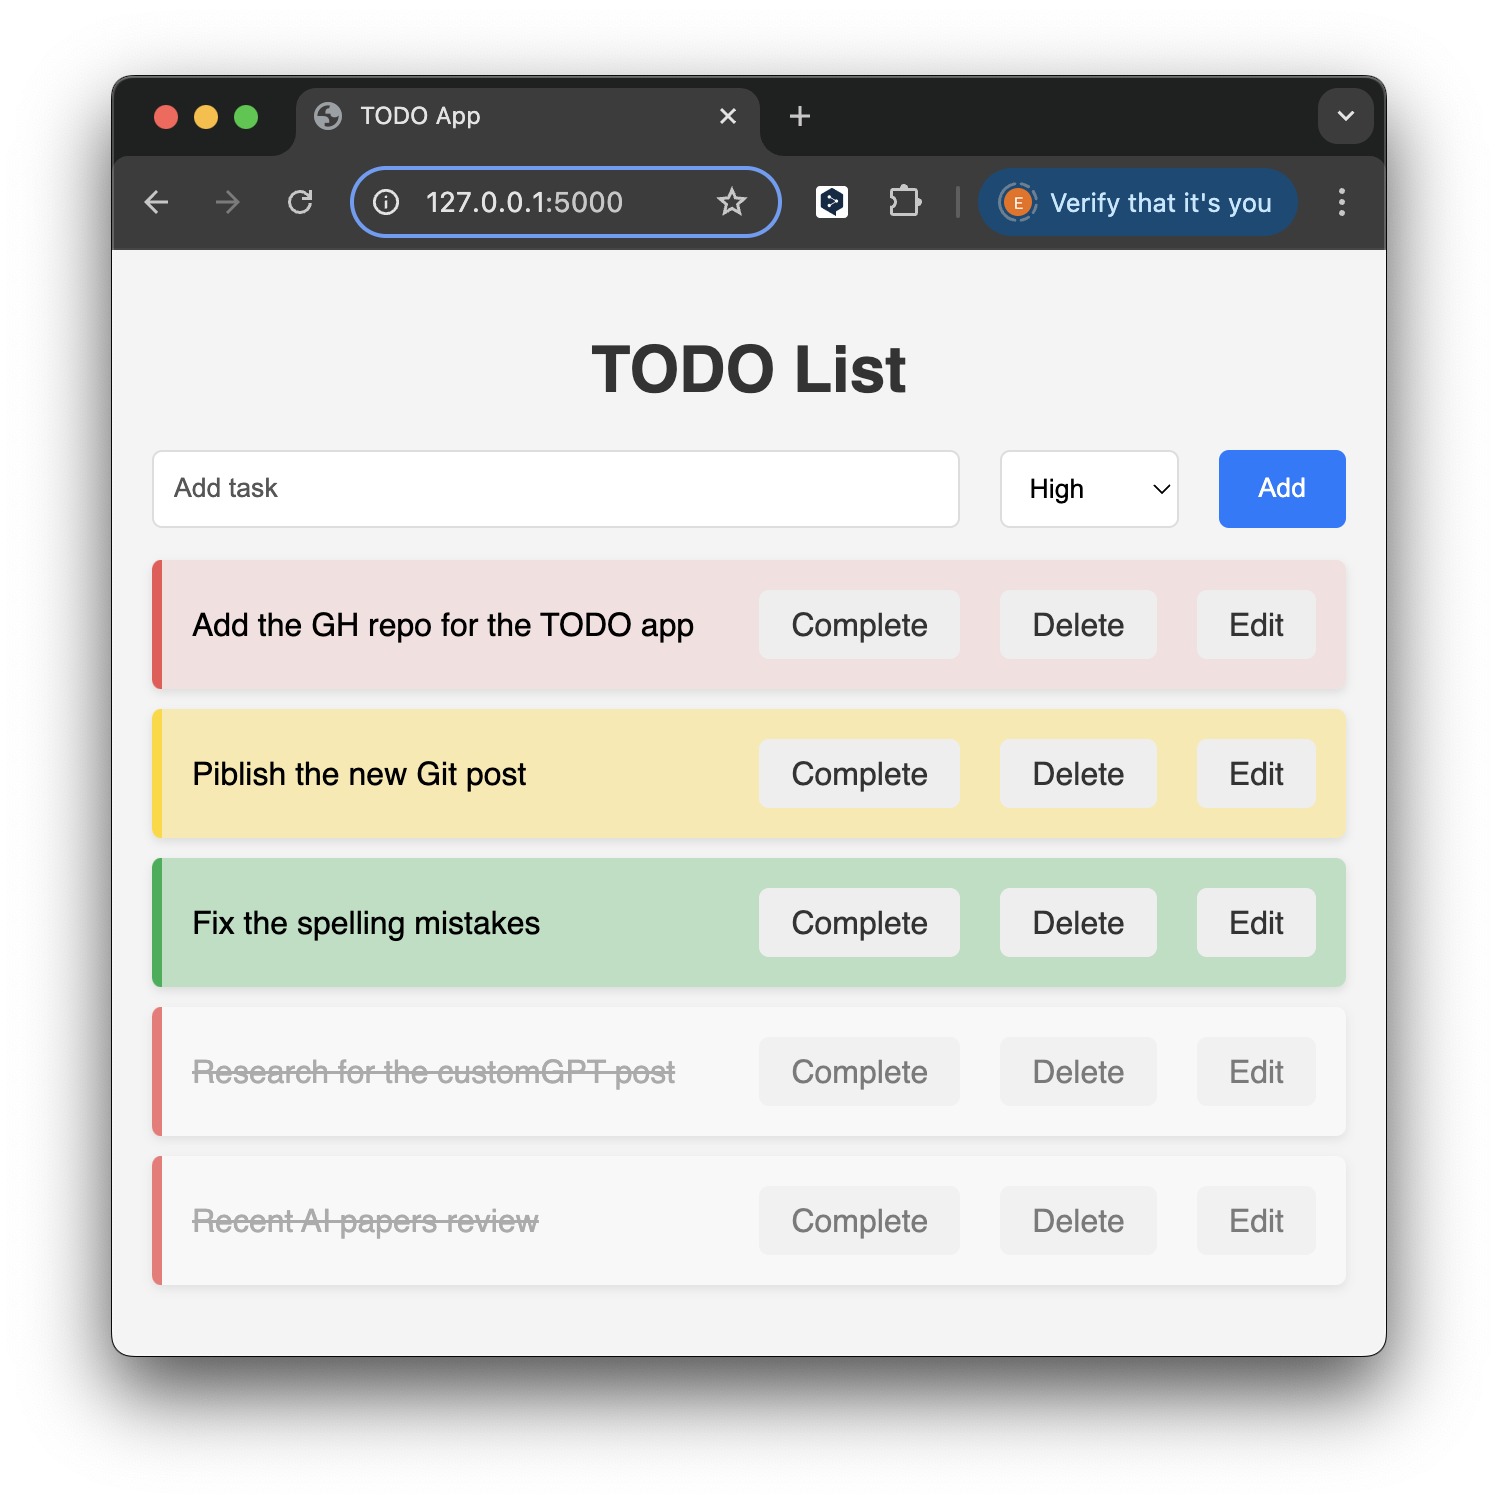
TODO app v2, it looks better!
In short, I have added a few Jinja filters to show the priority tasks on top and modified the CSS style, which was also moved to an external CSS file (check the static folder) to be used in the edit.html.
Further Improvements
This code provides a solid foundation for a basic TODO app with a simple user interface and SQLite as the backend.
To start improving the app, I suggest adding Error Handling. You should add error handling for database operations and form validation to ensure the app is robust and user-friendly.
You can quickly redesign this app to make it a multi-user scalable web app. To make your TODO app multi-user, you must implement user authentication and authorisation and modify the database schema to associate tasks with specific users.
As you learn more, you can enhance the app further by adding features like user authentication, search functionality, and improved UI.
Good luck! And please let me know if you have any comments. Thank you very much for reading.
Conclusion
This post demonstrated building a basic yet functional TODO app with Python, Flask, and SQLite, showcasing fundamental web development concepts. Expanding upon this foundation allows you to explore advanced features and create a more comprehensive task management tool.
I have placed all this code into the GitHub repository. Please note that the latest commit contains some interesting changes that improved this app. Check out the differences, and you will see how to effectively use Jinja filters to sort output in the desired order.
I have also added an external CSS file for use in both templates. Have fun downloading this repository; don’t forget to like it if you find it useful.
Did you like this post? Please let me know if you have any comments or suggestions.
Python posts that might be interesting for you