Introduction
On July 1st, we are moving to GA4, which is essential to ensure that our website analytics are processed without delay due to the transition. Herein I share my GA4 setup in Google Analytics. I hope that this post will save your time for setting up GA4.
What is Google Analytics?
Google Analytics is a web analytics service provided by Google. It allows website owners and marketers to track and analyze various aspects of their website’s performance and user behaviour. By implementing a small tracking code on web pages, Google Analytics collects data about visitors, their interactions, and their journey through the website.
Some key features of Google Analytics include:
- Website traffic analysis provides detailed information about the number of visitors to a website, their geographic location, the source of their traffic (search engines, social media, referral websites), and the devices they use.
- Audience analysis allows you to understand the characteristics of your website’s audience, including demographics (age, gender), interests, and behaviour patterns. This information helps in tailoring marketing strategies and creating targeted content.
- Behaviour tracking monitors user interactions on a website, such as page views, time spent on each page, bounce rates (percentage of visitors who leave after viewing only one page), and conversion rates (the percentage of visitors who complete a desired action, like making a purchase or filling out a form).
- Conversion tracking feature enables you to set up and track specific goals or actions on your website, such as completing a purchase, signing up for a newsletter, or downloading a file. It helps measure the effectiveness of marketing campaigns and identify areas for improvement.
- E-commerce tracking can be integrated with e-commerce platforms to provide detailed insights into sales performance, revenue, product popularity, and customer behaviour throughout the purchase process.
- Real-time monitoring offers real-time data, allowing you to see the number of active users on your website, their locations, and the pages they are currently viewing.
- Customization and reporting has a range of customization options, including the ability to create custom reports, set up goals and events, and apply filters to focus on specific data segments. Reports can be generated in various formats and scheduled for automatic delivery.
Google Analytics helps optimize websites, enhance user experience, and make data-driven decisions to achieve business goals.
My experience
I have used Google Analytics for years. It is helpful for me to observe web traffic statistics. The knowledge about user screen resolutions and devices is convenient for creating responsive websites. Also, I want to ensure that users are happy and like to see what content is the most popular.
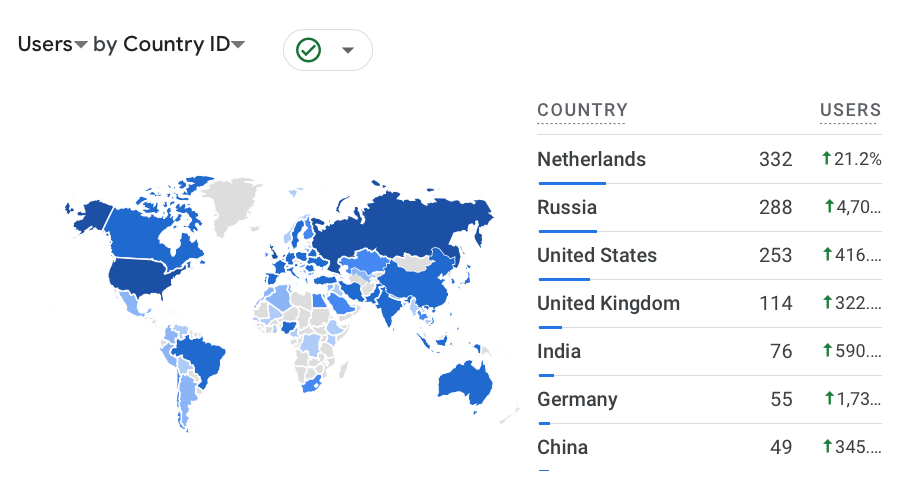
One of my favourite reports - Users by Country ID
Please note that my website complies with General Data Protection Regulation (EU GDPR) and gives my users the option that their data is not collected. I am privacy-conscious, as you might know from my publications. However, I know there is no absolute privacy on the Web, social media or in life.
So let’s be social and explore the GA4 features and setup. I share the steps I have performed for installing GA4 for this very blog. I like to be transparent and let you know what is happening behind the scenes :)
GA4 features
GA4, or Google Analytics 4, is the latest version of the Google Analytics platform. Google introduced it as the next generation of analytics to provide a more comprehensive and advanced understanding of user behaviour across multiple devices and platforms.
Compared to the previous version of Google Analytics (Universal Analytics), GA4 brings several notable changes and improvements:
- GA4 utilizes an event-based data model, where user interactions are treated as events. It allows for more flexible tracking of various actions and events on a website or app, enabling a more profound analysis of user behaviour beyond page views.
- GA4 is designed to track user interactions across different platforms, including websites, mobile apps, and offline data sources. It provides a more unified view of user behaviour, allowing businesses to understand how users engage with their brand across multiple touchpoints.
- GA4 offers improved data privacy features and complies with regulations such as the GDPR. It provides more options for data collection consent management and allows users to exercise control over their data.
- GA4 incorporates machine learning technologies to provide more powerful insights. It includes features like automated insights, predictive analytics, and churn probability modeling, which can help businesses identify trends, optimize marketing campaigns, and improve customer retention.
- GA4 introduces a simplified and more intuitive user interface. It offers preconfigured reports and data exploration tools, making it easier to access and interpret data. Additionally, it allows for easier integration with other Google products, such as Google Ads and Google BigQuery.
- GA4 places a stronger emphasis on understanding the entire customer journey and customer lifetime value. It introduces new metrics like Engagement Rate, User Lifetime Value, and Customer Acquisition insights, enabling businesses to gain a deeper understanding of their audience and make data-driven decisions to drive growth.
It’s important to note that GA4 is not just an upgrade to Universal Analytics but a distinct version with its own implementation and reporting differences. While Universal Analytics is still widely used, Google has encouraged users to adopt GA4 and has been actively investing in its development.
Setting up GA4
Let’s go through the process of installing the GA4 and some usage patterns explained at GA4: Set up Analytics for a website and/or app, wherein in stated that if you are new to the Google Analytics, you should firstly (you can also setup separate account for your business purposes):
- Create an Analytics Account if not created yet;
- Configure the data-sharing settings to control which data you share with Google;
- Create a new Google Analytics 4 property;
- Install GA4 code;
- Configure GA4 settings and additional tracking.
Create an Analytics Account
You don’t need this step when you have already used the Universal Analytics and have your analytics account created, and you can move to the next section to create a new GA4 property. When you already using UA (Universal Analytics) property, you will get a message like this:
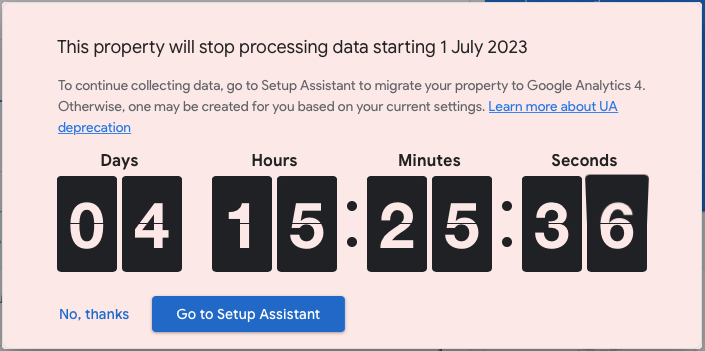
The time is ticking, and we should be quick. First, we go to analytics.google.com and log in.
Second, we access the “ADMIN” area by clicking on the gear icon in the bottom left corner.
Next, we will create your GA4 property explained in the next section.
When you are new to the Google Analytics, and to create your brand-new Google Analytics account, go to analytics.google.com and click “Start Measuring”.
You will be prompted to create a Google Analytics account. Simply give your account a name (this name you may use for several websites, and give it a general name such as your name), check you are happy with the Account Data Sharing Settings and then click “Next”.
Create a new GA4 property
To create a new GA4 property, we go to Google Analytics and sign in with a Google account, and click on “Admin” in the lower-left corner of the page.
In the Account column, click the dropdown menu and select “Create Property.”
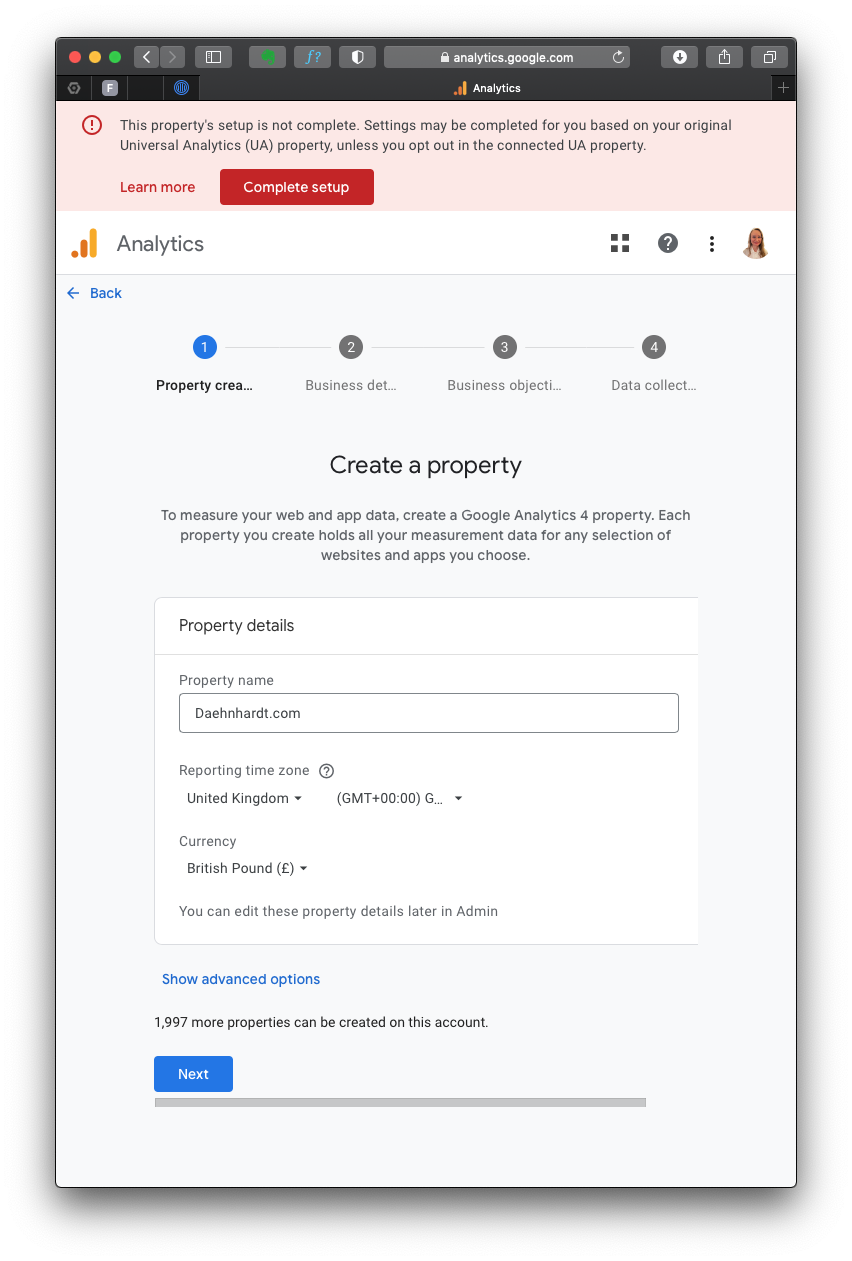
Fill in the required information, such as the Property name and Reporting Time Zone. For example:
- Property name: Your website GA4 name, which can be your website name;
- Reporting Time Zone: Select your preferred time zone;
- Currency displayed: Your currency preference.
After pressing “Next”, you will have to specify your Business details including:
- Industry category;
- Business size.
When choosing your business objectives, select what is applied the most to your business goals. For reports that are personalised to your business, select the topics most important to you.
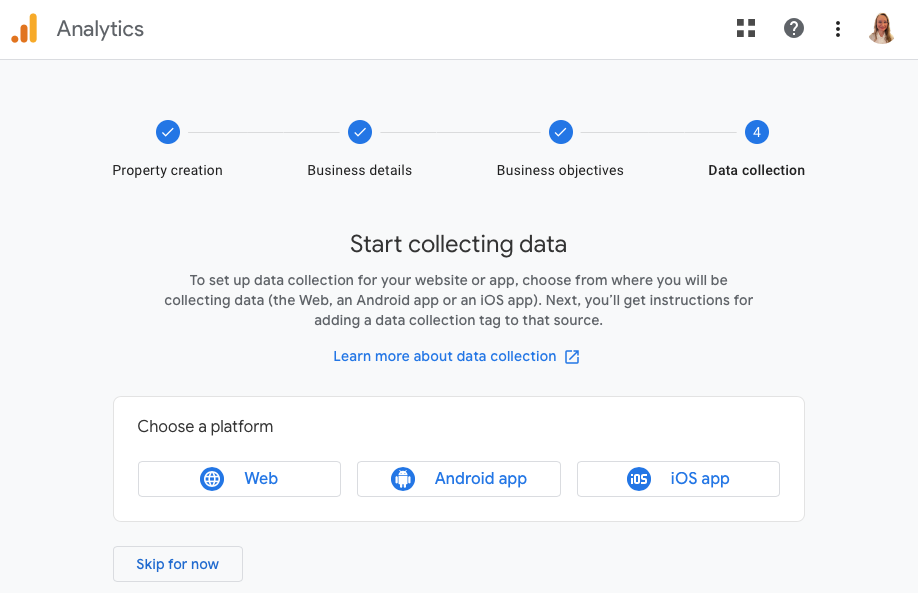
Since I use the GA4 property for my website analytics, I choose “Web” platform.
Data Streams
Now we will setup data stream wherein we enter our website’s URL and other required information.
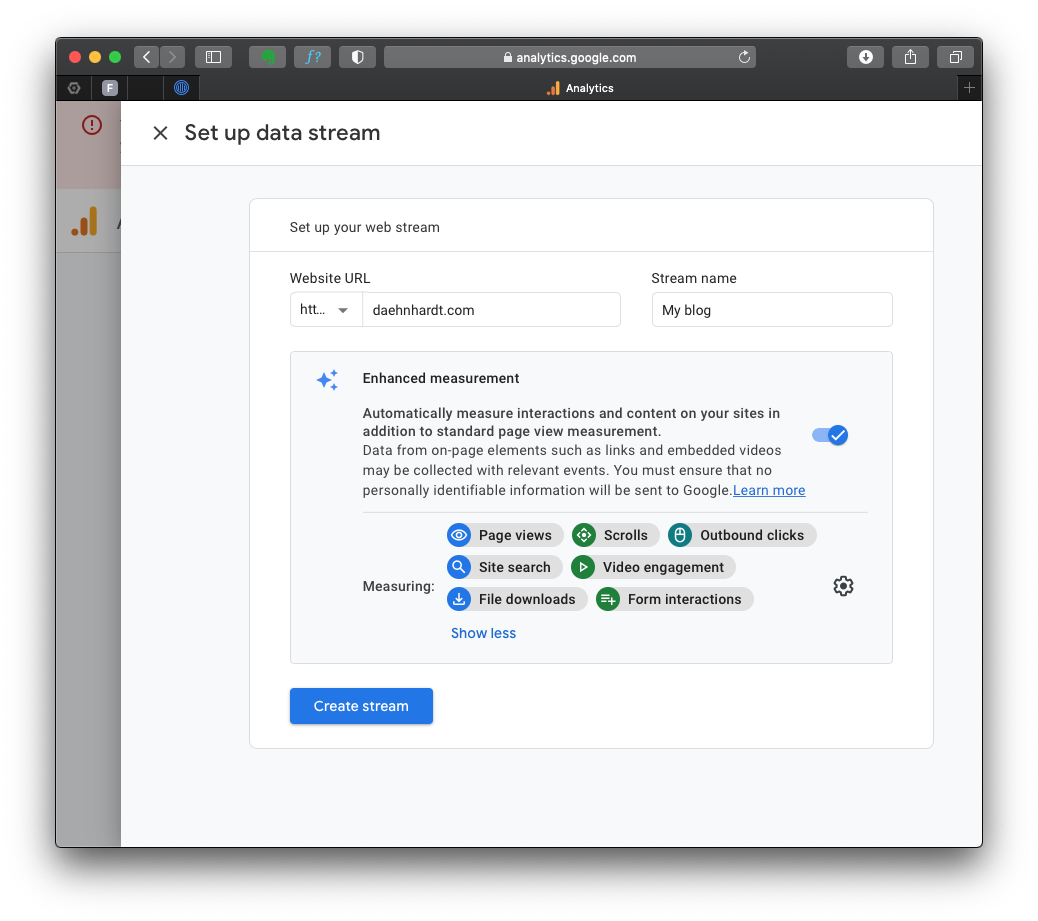
By default, the events with these names will be tracked:
- page_view: page views;
- scroll: page scrolls;
- click: outbound link clicks;
- view_search_results: site searches;
- video_start, video_progress, video_complete: video Engagement;
- file_download: file downloads;
- form_start and form_submit: form submissions;
You can enable or disable these events in the “Enhanced Measurement.”
Install GA4 Code
After creating the GA4 property, you’ll see a page with the Measurement ID (starts with “G-“). Copy this ID, as you’ll need it later.
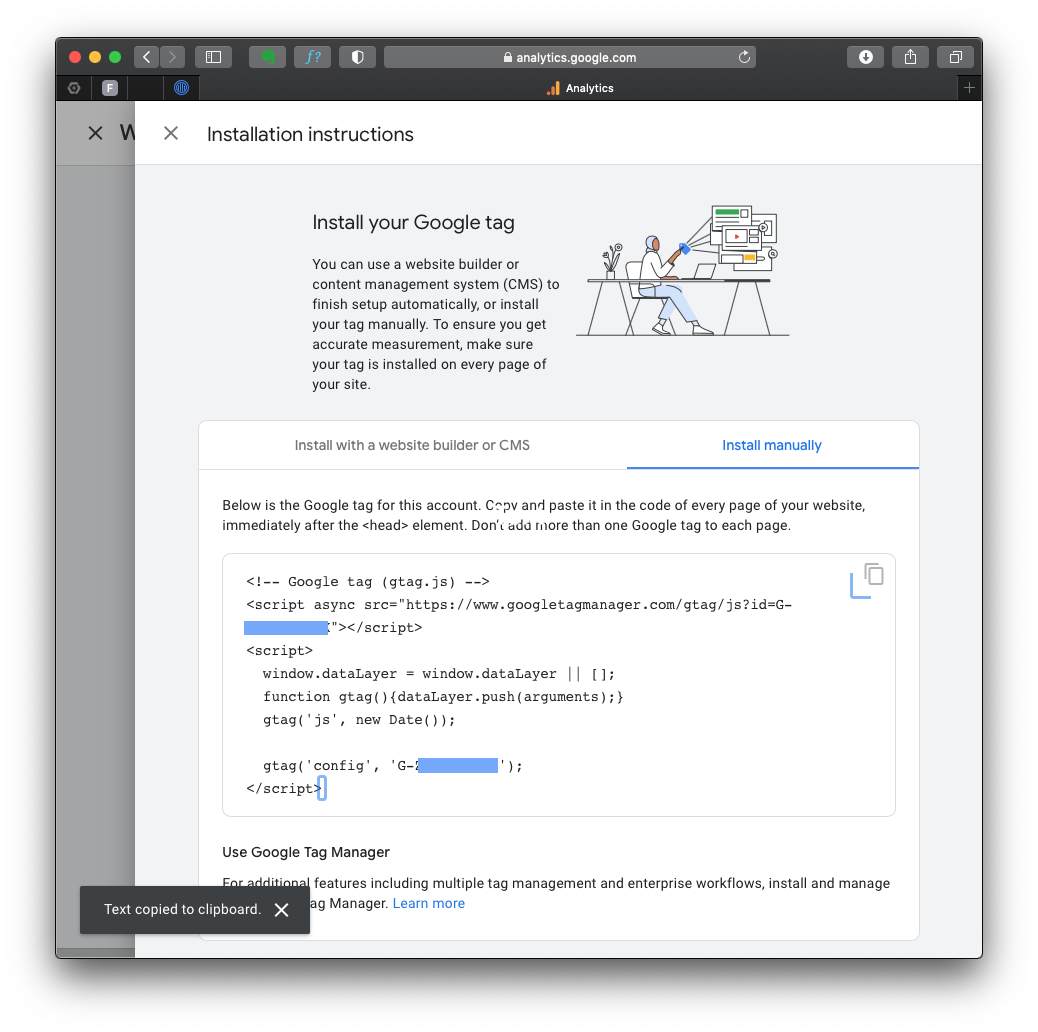
Should you lose your tag ID, you can always go back to this page, which is in the “Admin” area, in the “Data Streams” section.
Next, we do the following:
- add the GA4 configuration in the “Google Tag Manager”, wherein we create a new tag with the GA configuration.
- use the GA4 tracking code simply, without using the “Google Tag Manager”.
For simplicity, we will use the 2nd approach. I promise to write me in detail about the “Google Tag Manager” in one of my next posts :)
We can simply add the GA4 tag to the website page using the MEASUREMENT ID we have copied.
The complete GA4 code is in the “Stream details”, “Google Tag” section “View tag instructions”. Notice the green mark “Data Flowing”? That’s because I already have my tag on the HTML page, and it’s receiving data from you just now!
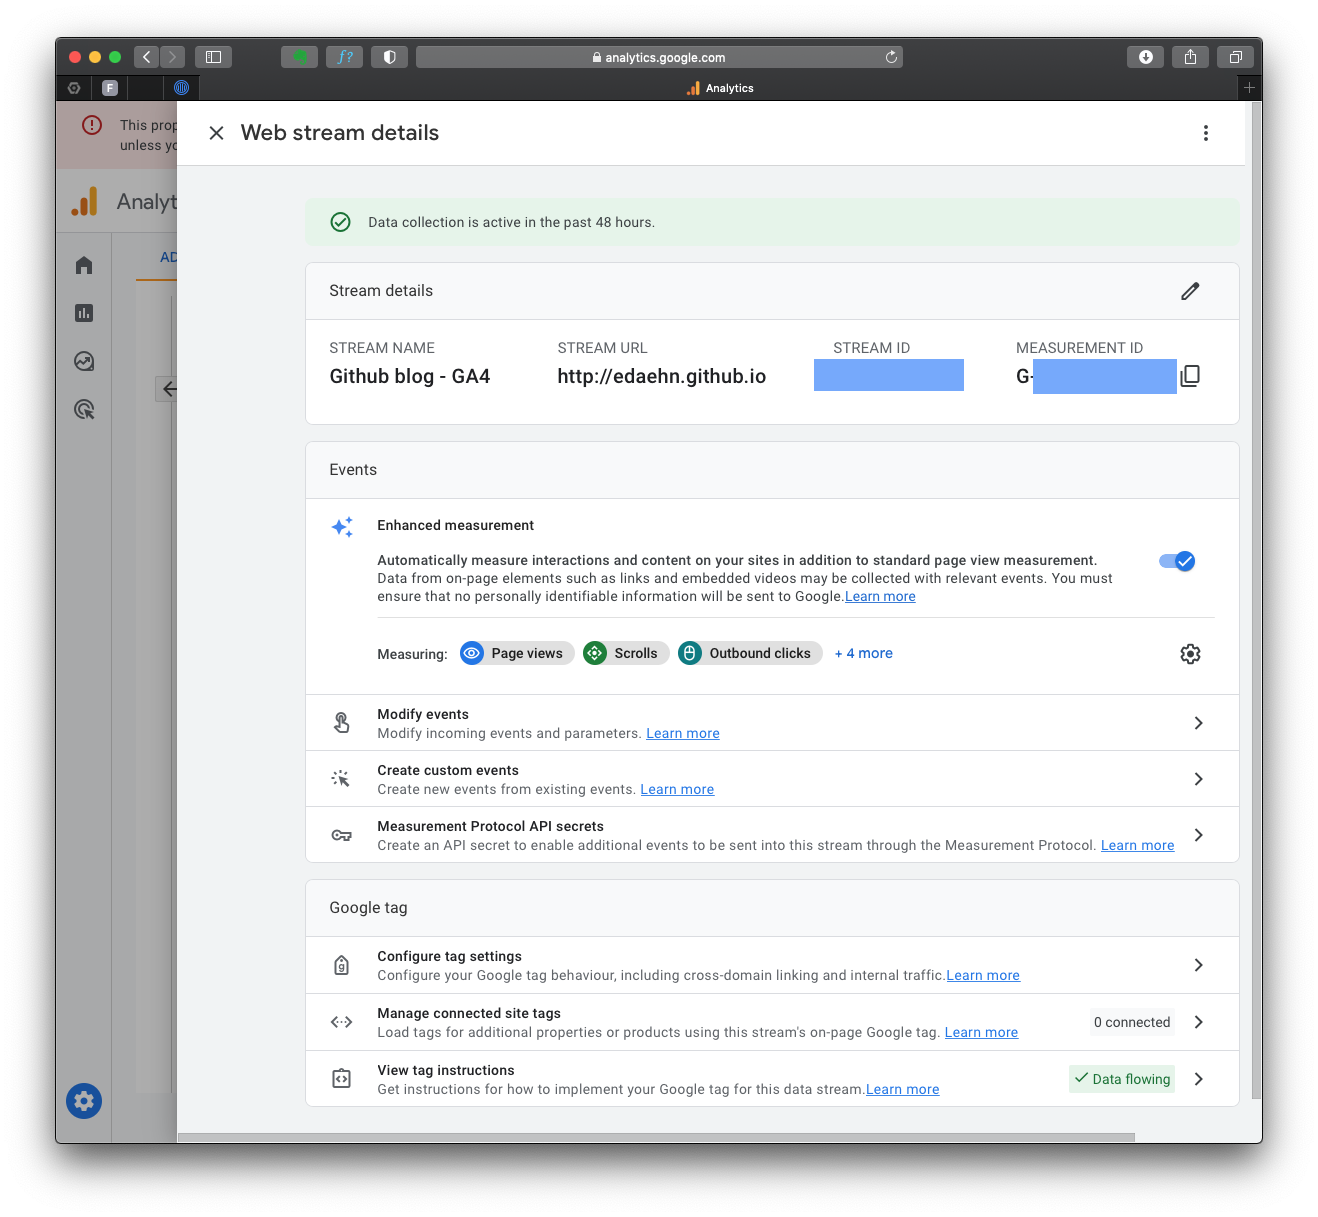
After you click on that section, you can choose the appropriate method to install the GA4 tracking code, depending on your website platform. For instance, if your website is built with HTML, open your website’s HTML page in a text editor. Locate the <head> section of your HTML code.
To start collection data, you should include the following code snippet immediately before the closing </head> tag:
<!-- Global site tag (gtag.js) - Google Analytics -->
<script async src="https://www.googletagmanager.com/gtag/js?id=GA_MEASUREMENT_ID"></script>
<script>
  window.dataLayer = window.dataLayer || [];
  function gtag(){dataLayer.push(arguments);}
  gtag('js', new Date());

  gtag('config', 'GA_MEASUREMENT_ID');
</script>
You must alter the GA_MEASUREMENT_ID with the Measurement ID you copied before, and of course, save the HTML file and upload it to your website’s server.
When required, complete instructions for website builders at GA4: Set up Analytics for a website and/or app.
Configure GA4 Settings
To Configure GA4 Settings you should do the following:
- In the Google Analytics admin area, click on “Data Streams” under the Property column.
- Select your web data stream (e.g., “My Website”).
- Under the “View tag instructions” section, click on “Tag Installation” and verify that the tag installation status is “Active.” The green button “Data flowing” confirms that the tracking code is successfully installed on your website.
- Review the options and settings available under the Data Streams section, such as Enhanced Measurement, Site Search, and Data Deletion. Configure them based on your preferences and requirements.
Set Up Additional Tracking
Use Google signals
If you like to collect additional data from signed-in to their Google Accounts users with turned-on personalisation, you can use Google signals. For this, in Setup Assistant, click Manage Google signals. Activating the Google signals requires that the Data Sharing Settings are enabled and users are informed about the data collection.
The Google signals enable Cross-Device reporting and more profound insights on your clients using Google data, such as enhanced Audience and Demographics reporting. You will have to review and accept the Google Measurement Controller-Controller Data Protection Terms, which apply to data that you share with Google under the GDPR.
Event tracking
To track specific events or actions on your website, you can set up custom events in GA4. Examples include button clicks, form submissions, or video interactions.
Tracking events in Google Analytics 4 (GA4) involves setting up custom event parameters and sending event data to your GA4 property.
Here’s an overview of how to track events with GA4 in simple four steps:
Step 1: Define Event Parameters
- In the Google Analytics admin area, click “Events” under the Property column.
- Click on “Create Event” to define a new event.
- Provide a name for the event (e.g., “Button Click”).
- Customize event parameters based on your specific tracking needs:
- Event Name: A unique identifier for the event.
- Event Category: A broad category that groups related events.
- Event Action: A specific action or type of interaction.
- Event Label (optional): Additional information or context for the event.
- Event Value (optional): A numeric value associated with the event.
Step 2: Implement Event Tracking Code
Identify the interaction or action you want to track on your website. Locate the appropriate element or code where the action occurs (e.g., a button click). Add the GA4 event tracking code to that element or code snippet. Here’s an example using JavaScript:
gtag('event', 'Button Click', {
  'event_category': 'User Engagement',
  'event_label': 'Homepage Banner',
});
Replace ‘Button Click’ with the desired Event Name and customize the ‘event_category’ and ‘event_label’ parameters as needed.
Save and publish the changes to your website.
Step 3: Test Event Tracking
To Test Event Tracking, we perform the action or interaction that we want to track (e.g., click the button). For this, we open our specific page where the event occurs, and use the Google Analytics DebugView or the Real-Time reports in GA4 to verify if the event data is being sent correctly.
The Google Chrome’s extension is handy for debugging events with the Google Analytics Debugger. This extension also debugs the Google Analytics code for any errors.
Additionally, you can check the “Events” under the “Engagement” section in your Google Analytics”, “Life cycle” drop down menu.
Step 4: Analyze Event Data in GA4 Reports
Access your GA4 property in the Google Analytics interface. Navigate to the “Events” section to view event data. Explore the available event reports, including Event Summary, Event Parameters, and Event User Properties. Customize the reports to gain insights into user behaviour, engagement, and the impact of specific events on your website. Note: It’s vital to ensure that the GA4 tracking code snippet is correctly installed on all relevant pages of your website before tracking events. Additionally, it may take some time for the data to populate in GA4 reports, so allow for a delay in data visibility after implementing event tracking.
Conversion tracking
To set up conversion tracking in Google Analytics 4 (GA4), you must define conversion events and implement the necessary tracking code. Here’s a step-by-step guide:
Step 1: Define Conversion Events
Click “Events” under the Property column in the Google Analytics admin area. Click “Create Event” to define a new event for conversion tracking. Provide a descriptive name for the conversion event (e.g., “Purchase Completed”). Customize the event parameters based on your conversion goals. These parameters can include event category, event action, event label, and event value.
Step 2: Implement Conversion Event Tracking Code
Identify the action or event that signifies a conversion on your website or app (e.g., completing a purchase, form submission). Locate the code or element associated with the conversion event. Add the GA4 event tracking code to that code snippet or element. Here’s an example using JavaScript:
gtag('event', 'purchase', {
  'transaction_id': '123456789',
  'value': '99.99',
  'currency': 'USD',
});
Customize the ‘purchase’ event name and include relevant parameters like ‘transaction_id’, ‘value’, and ‘currency’ based on your conversion event.
Step 3: Configure Conversion Reporting
In the Google Analytics admin area, click on “Conversions” under the Property column. Click on “Create Conversion Event” to define a new conversion event for reporting. Select the appropriate event from the list (the one you defined in Step 1). Customize the conversion event parameters, such as conversion name, value, and currency. Save the conversion event configuration.
Step 4: Test Conversion Tracking
Save and publish the changes to your website or app. Perform the action or interaction associated with the conversion event (e.g., complete a purchase, submit a form). Open your website or app and navigate to the relevant page where the conversion event occurs. Use the Google Analytics DebugView or check the Real-Time reports in GA4 to verify if the conversion event data is being sent correctly.
Step 5: Analyze Conversion Data in GA4 Reports
Access your GA4 property in the Google Analytics interface. Navigate to the “Conversions” section to view conversion-related reports. Explore the available reports, such as Conversion Summary, Top Conversion Paths, and Conversion Value. Customize the reports to gain insights into conversion performance, attribution, and the impact of specific events on your conversions. Remember to ensure that the GA4 tracking code snippet is correctly installed on all relevant pages of your website or app to track conversion events accurately. It may take some time for the conversion data to populate in GA4 reports, so allow for a delay in data visibility after implementing conversion tracking.
User ID feature
You can track individual users with Google Analytics 4 (GA4) using the User ID feature. The User ID allows you to associate a unique identifier with each user, enabling you to track their activities and behaviour across multiple sessions and devices. You can gain insights into their specific journeys, behaviour patterns, and engagement on your website or app by tracking individual users. Here’s how you can implement User ID tracking in GA4:
Generate and Assign User IDs
Create a unique identifier for each user in your system. This identifier can be an email address, customer ID, or any other unique identifier that you can use to identify individual users consistently. Set User ID: When a user logs in or provides their identifier, use the setUserId method in the GA4 tracking code to assign the User ID to that user. Here’s an example of how to set the User ID using the gtag.js library:
gtag('set', {'user_id': 'USER_ID_HERE'});
Enable User-ID Reporting
In the GA4 admin area, select your relevant data stream in the “Data Streams” section under the Property column. Click on “Edit” and enable the “User-ID” option. This enables GA4 to recognize and associate user activities with the assigned User IDs.
Track User Activities
Once the User ID is set, GA4 will attribute user activities to that specific User ID across different sessions and devices. This allows you to analyze user behaviour, conversion paths, and engagement at an individual level in GA4 reports.
Utilize User-ID Reports
GA4 provides User-ID-specific reports that allow you to analyze user behaviour and performance metrics for individual users. These reports include User Lifetime, User Retention, and Cohort Analysis, among others. Utilize these reports to gain insights into user-level interactions, conversion rates, and retention patterns.
It’s important to note that implementing User ID tracking requires compliance with privacy policies and regulations. Ensure you securely handle and store user identifiers and adhere to applicable data protection laws.
Additionally, User ID tracking is most effective for websites or apps with user authentication systems or where users are identifiable. If your website or app doesn’t have a user login or identification system, individual user tracking may be limited or not applicable. In such cases, you can still gain valuable insights using anonymous user tracking and analyzing aggregated data patterns.
Download the historic data
Unfortunately, it’s not possible to directly download historical data from the Universal Analytics (UA) version of Google Analytics to GA4. GA4 and UA are separate tracking systems with different data models and structures, so there isn’t a direct data migration path between them.
However, there are a few options you can consider to preserve your historical data before migrating to GA4:
Data Exports
In your existing UA account, you can export data using the data export features provided by Google Analytics. This allows you to download reports, dimensions, and metrics in formats like CSV, Excel, or Google Sheets. Remember that the exported data will be based on the UA tracking data and won’t automatically integrate into GA4.
Third-Party Tools
Some third-party analytics tools and services offer data migration capabilities. These tools can help you transfer your historical data from UA to GA4 or provide a way to store and access your historical data separately. Research and explore reliable third-party solutions that offer such migration services.
Data Warehousing
If you require long-term storage and analysis of your historical data, consider setting up a data warehousing solution. This involves exporting your UA data into a separate data warehouse or cloud storage system, such as Google BigQuery. From there, you can structure and query the data independently of GA4.
It’s essential to carefully plan and consider the impact of transitioning from UA to GA4, including the potential loss of historical data. Consult with a data specialist or analytics professional who can guide you through the migration process and advise on the best approach to preserve and leverage your historical data.
Fine-tuning GA4
To fine-tune Google Analytics 4 (GA4) and maximize its effectiveness for your specific needs, you can follow these steps:
-
Define Key Metrics and Goals: Identify the key metrics and goals that align with your business objectives. For example, to increase conversions, focus on metrics like conversion rate, average order value, and revenue. Understanding your goals will help you determine which data points and reports are most relevant for your analysis.
-
Custom Event Tracking: Implement custom event tracking to capture specific user interactions or actions important to your business. This involves defining custom events and adding tracking codes to capture those events. For example, you can track button clicks, video views, or form submissions. Customised event tracking lets you gain deeper insights into user behaviour and measure specific actions beyond default metrics.
-
Enhanced Measurement: Take advantage of GA4’s Enhanced Measurement feature, which provides automatic tracking for common user interactions without additional code. Enable Enhanced Measurement for relevant events such as outbound clicks, site search, scroll depth, and more. This helps capture important user actions without the need for manual event tracking.
-
Set Up Conversion Tracking: Configure conversion tracking to measure the success of your website or app in achieving specific goals. Define conversion events and track them using appropriate event parameters. For example, track completed purchases, form submissions, or newsletter sign-ups. Conversion tracking allows you to evaluate the performance of your marketing campaigns, user funnels, and customer journeys.
-
Custom Reports and Dashboards: Create custom reports and dashboards to focus on the metrics and visualisations that are most relevant to your business. GA4 offers flexible customisation options, allowing you to build reports based on your needs. You can create custom dimensions, segments, and visualisations to gain deeper insights and monitor the metrics that matter most to your business.
-
Experiment with Data Analysis Tools: Explore GA4’s data analysis tools, such as Exploration, Funnel Analysis, and Path Analysis. These tools provide advanced capabilities to analyse user behaviour, conversion funnels, and user journeys. Experiment with different analysis techniques and visualisations to uncover insights and optimise your website or app performance.
-
Ongoing Monitoring and Optimisation: Continuously monitor and analyze your GA4 data to identify trends, patterns, and areas for improvement. Regularly review your reports, track performance against goals, and make data-driven decisions to optimize your marketing strategies, user experience, and conversions. Stay informed about new features and updates in GA4 to leverage its full potential.
-
Remember that fine-tuning GA4 is an iterative process. Continuously review your data, experiment with different settings and configurations, and adapt as your business goals evolve. Stay updated with GA4 documentation, resources, and community forums to learn from best practices and stay informed about new features and capabilities.
GA4 usage
Best practices
Here are some advice and best practices for using Google Analytics 4 (GA4):
-
Understand Your Goals: Clearly define your business goals and what you want to achieve with GA4. Identify the key metrics and data points that align with your objectives. This will help you focus your tracking efforts and analyse the most relevant aspects of your website or app.
-
Plan Tracking Implementation: Take the time to plan and implement your tracking correctly. Define the events, parameters, and conversion goals you want to track. Ensure the tracking code is correctly implemented on all relevant pages or screens. Consider using a tag management system (e.g., Google Tag Manager) for easier management and deployment of tracking codes.
-
Leverage Enhanced Measurement and App + Web Property: GA4 introduces Enhanced Measurement and the App + Web property, which offer automatic tracking for common user interactions and streamlined data collection. Take advantage of these features to get a baseline of essential metrics without needing extensive custom tracking code.
-
Custom Event and Conversion Tracking: While Enhanced Measurement provides some level of automatic tracking, consider implementing custom event and conversion tracking to capture specific actions and goals unique to your business. Custom tracking allows you to gather more granular insights and measure the effectiveness of your marketing campaigns, user journeys, and key user interactions.
-
Explore Analysis Tools and Reports: Familiarise yourself with the analysis tools and reports available in GA4. Experiment with features like Exploration, Funnel Analysis, Path Analysis, and User Lifetime Value to gain valuable insights into user behaviour, conversion paths, and engagement. Customise reports and dashboards to focus on the metrics and visualisations most relevant to your goals.
-
Stay Up to Date: GA4 is still evolving, so stay informed about updates, new features, and best practices. Keep an eye on official Google Analytics documentation, blog posts, and community forums to learn about the latest developments. Stay connected with the GA4 user community to share insights, ask questions, and learn from others’ experiences.
-
Maintain Data Privacy and Compliance: Ensure you comply with privacy regulations and respect user data privacy. Follow best practices for data handling, storage, and security. Obtain proper user consent when required and clearly communicate your data collection and usage practices in your privacy policy.
-
Regularly Review and Optimise: Regularly review your GA4 data, reports, and performance against your goals. Analyse trends, identify areas for improvement and make data-driven decisions to optimise your marketing strategies, user experience, and conversions. Continuously refine your tracking setup and measurement to align with your evolving business needs.
Remember that GA4 is a powerful tool, but its effectiveness depends on how well you plan, implement, and utilise its features. Invest time in understanding GA4’s capabilities, experiment with different settings and configurations, and adapt to leverage its full potential for your business.
Notable features in GA4
The usefulness of features in Google Analytics 4 (GA4) can vary depending on your specific needs, goals, and the nature of your website or app. However, there are a few notable features in GA4 that many users find particularly useful:
-
Enhanced Measurement: GA4’s Enhanced Measurement feature automatically tracks everyday user interactions and events without requiring additional code implementation. This simplifies the tracking process and provides a baseline of essential metrics, such as pageviews, scrolls, outbound clicks, site searches, and more.
-
App + Web Property: GA4’s App + Web property allows you to consolidate tracking for websites and mobile apps in a single property. This unified approach provides a more holistic view of user behaviour across different platforms, enabling you to analyse user interactions seamlessly and gain a comprehensive understanding of user journeys.
-
Machine Learning Insights: GA4 leverages machine learning to provide insights and predictions about user behaviour and conversion opportunities. For example, it can identify user segments with a high likelihood of conversion or predict churn rates. These insights help you make data-driven decisions and optimise your marketing strategies.
-
BigQuery Integration: GA4 integrates with BigQuery, Google’s powerful cloud-based data warehouse. This integration allows you to export your GA4 data to BigQuery, enabling you to perform advanced analysis, build custom dashboards, and conduct complex data queries. It provides flexibility and scalability for in-depth data exploration and custom reporting.
-
Cross-Device Tracking: With GA4, you can track user interactions and behaviour across multiple devices and sessions. This cross-device tracking capability enables you to understand how users engage with your website or app across different platforms, providing valuable insights into the complete user journey.
It’s important to note that the usefulness of these features may vary depending on your specific business requirements. It’s recommended to explore the features available in GA4, experiment with them, and identify the ones that align best with your goals and provide the most valuable insights for your business.
Explore GA4 Reports
Return to the Google Analytics homepage and select your GA4 property from the Account and Property dropdown menus. Once you’re in the reporting interface, navigate through the various reports and sections to explore the data collected by GA4. Familiarise yourself with the report sections available, such as Audience, Acquisition, Behavior, and Conversions. Each section provides insights into your website’s performance and user behaviour.
Google Analytics 4 (GA4) offers various reports to analyse and gain insights into your website or app performance. While the importance of reports may vary depending on your specific goals and business needs, here are five crucial GA4 reports that can provide valuable insights:
User Acquisition Report
This report provides insights into how users acquire or discover your website or app. It includes metrics like traffic sources, user behaviour flow, acquisition channels, and engagement metrics. It helps you understand which marketing channels and campaigns drive the most traffic and engagement.
Engagement Report
This report focuses on user engagement with your website or app. It includes metrics like session duration, screen views, events, and user engagement rate. It helps you understand how users interact with your content, features, and actions within your website or app.
Retention Report
This report analyses user retention and loyalty over time. It tracks how often users return to your website or app after their initial visit or installation. It provides insights into user behaviour patterns, churn rates, and the effectiveness of your retention strategies.
Conversion Report
This report tracks and analyses conversions or specific actions that indicate desired user behaviour. It includes metrics like conversion events, conversion value, conversion rate, and attribution. It helps you understand the effectiveness of your marketing campaigns, funnels, and user journeys in driving conversions.
Monetization Report
This report is particularly relevant for e-commerce or revenue-generating websites or apps. It provides insights into revenue, transactions, average order value, and other monetisation metrics. It helps you understand your website or app’s financial performance and identify improvement areas.
These reports are just a starting point, and GA4 offers many more reports and customisation options to suit specific business needs. Exploring and experimenting with different reports based on your goals, industry, and user behavior is recommended to gain deeper insights and make data-driven decisions.
User paths and funnels
You can track user paths or journeys with Google Analytics 4 (GA4). GA4 offers several features and reports allowing you to analyse and understand how users navigate your website or app. Here are some ways to track user paths in GA4:
Path Analysis
GA4’s Path Analysis report provides insights into users’ most common paths on your website or app. It allows you to visualise and analyse the sequence of screens or pages users visit before reaching a particular destination or goal. You can identify popular paths, drop-off points, and opportunities for optimising user journeys.
Funnel Analysis
Funnel Analysis in GA4 helps you track users’ steps to complete a specific goal or conversion. You can define a series of events or screens as the steps in your funnel and analyse the conversion rates at each stage.
This helps you identify bottlenecks or areas where users are dropping off in the conversion process.
User Explorer
GA4’s User Explorer report allows you to analyse the behaviour and paths of individual users. You can view the activities, screens, events, and conversions a specific user performs. This helps you understand individual users’ unique paths and interactions and identify patterns or issues that may impact their experience.
Events and Event Parameters
Tracking specific events and their parameters allows you to gain insights into user paths based on their interactions. For example, tracking events like button clicks, form submissions, or product views and analysing the sequence of these events can reveal common user paths and behaviour.
Custom Dimensions and User Properties
You can define custom dimensions or user properties in GA4 to capture additional information about users or their interactions. You can segment and analyse user paths based on these attributes by including relevant information like user types, categories, or stages in the user journey.
Tracking user paths in GA4 provides valuable insights into how users navigate through your website or app, helping you identify areas for improvement, optimise user experiences, and enhance conversions. It allows you to analyse common paths, identify drop-off points, and understand the effectiveness of your content, features, and user flows. Utilise the available reports and analysis tools in GA4 to gain a deeper understanding of user paths and make data-driven decisions to improve your website or app.
Triggers
In Google Analytics 4 (GA4), triggers define conditions that activate certain events or actions. Triggers allow you to customise and control when specific events are sent to GA4 for tracking. Here’s how you can use triggers in GA4:
Event Triggers
Event triggers determine when an event is sent to GA4 based on specific conditions or actions on your website or app. For example, you can set up an event trigger to track when a user submits a form, clicks on a specific button, views a particular page, or performs any other desired action. Event triggers are typically used in conjunction with custom events that you define.
Conversion Triggers
Conversion triggers are specific types of event triggers designed to track conversion-related actions. You can set up conversion triggers to track actions such as completed purchases, form submissions, newsletter sign-ups, or any other key conversion event. Conversion triggers help you measure and analyse the success of your conversion goals.
User Triggers
User triggers activate when specific user-related conditions are met. User triggers allow you to track user-level events or actions during or over multiple sessions. For example, you can set up a user trigger to track when a user reaches a specific engagement threshold, such as spending a certain amount of time on your website or app or viewing a certain number of pages.
Custom Triggers
Custom triggers enable you to create personalised triggers based on your unique tracking requirements. You can define custom conditions or combinations of events, user properties, or other parameters to trigger specific actions or events.
Custom triggers offer flexibility in tailoring your tracking implementation to match your business needs. To set up triggers in GA4, you’ll typically use the Google Tag Manager (GTM) tool, allowing easy management and tracking code deployment. Within GTM, you can define triggers based on various conditions, such as clicks, form submissions, URLs, timers, and more.
Once you set up triggers in GTM, you can associate them with specific tags or events in GA4 to determine when they should be tracked. This gives you greater control over the data sent to GA4 and when.
By using triggers effectively, you can precisely track and capture the events most relevant to your business goals, enabling you to gather more specific and actionable data in GA4.
Alternatives
Several competitors to Google Analytics offer web analytics and tracking solutions. Some of the notable competitors in the web analytics market include:
-
Adobe Analytics is a comprehensive analytics platform that provides in-depth insights into user behaviour, segmentation, and conversion tracking. It offers advanced reporting, data visualisation, and integration with other Adobe Marketing Cloud products.
-
Matomo is an open-source web analytics platform that offers similar features to Google Analytics. It provides detailed visitor tracking, customisable dashboards, and privacy-focused analytics options.
-
Microsoft Clarity is a free analytics tool that provides session replay, heatmaps, and click tracking to understand user behaviour. It offers visual insights into user interactions and helps optimise website usability.
-
AT Internet is a digital analytics platform that offers a range of features, including audience measurement, conversion tracking, real-time analytics, and data visualization. It provides insights into website and app performance.
-
Mixpanel is an analytics and engagement platform that tracks user actions and events. It provides detailed event-based analytics, user segmentation, and tools for product analytics and user engagement.
-
Heap Analytics is an event-based analytics platform that automatically captures user interactions and allows retroactive analysis. It offers user funnel tracking, cohort analysis, and attribution modeling features.
-
Snowplow Analytics is an open-source event data platform that offers flexible event tracking, data collection, and data warehousing capabilities. It allows for customisation and provides granular data insights.
These are just a few examples of competitors to Google Analytics. Each platform has its own strengths, pricing models, and unique features. The choice of a web analytics tool depends on the specific requirements of your business, the level of customisation needed, the complexity of your tracking needs, and your budget. Evaluating multiple options and choosing the one that best aligns with your objectives and provides the features and insights you require is recommended.
Conclusion
All standard Universal Analytics properties will stop collecting data on July 1 st, 2023. In this post, I have described the essential steps for moving to GA4. Please let me know your GA4 experience or your suggestions about this post. Thanks!
Did you like this post? Please let me know if you have any comments or suggestions.
Posts about building websites and SEO that might be interesting for you
