Introduction: AI Face Swapping Explained
The superhero image on the front page of this blog — the one where I appear to be flying over great falls in a cape — is not a photograph. It is a face swap: my face, placed by an AI bot into a Midjourney-generated scene, in seconds.
Face-swapping replaces one person’s face in an image or video with another’s, using computer vision algorithms to detect, align, and blend facial features seamlessly. It has legitimate uses in film production, marketing, and creative projects — and obvious risks when misused.
In this post I cover three approaches, from easiest to most involved:
- Mobile apps and web tools — zero setup, good enough for fun
- InsightFace Bot on Discord + Midjourney — my favourite workflow for quality results
- Python with OpenCV — when you want to understand (or control) what is happening under the hood
I also include the research papers and GitHub repositories worth knowing, and a note on the ethical side of the technology.
Face Swap Tools and Apps
There are several ways to get started with face swapping:
-
Mobile Apps: many popular mobile apps allow you to do face swaps, like Face Swap Live, YouCam Perfect, and HelloFace. These apps are easy to use and often come with pre-loaded celebrity faces you can swap yours with.
-
Online Tools: many websites offer free face-swapping tools. These websites typically work by uploading your photos and letting the website’s AI do the face-swapping magic. Some popular options include Pica AI and Face Swapper.
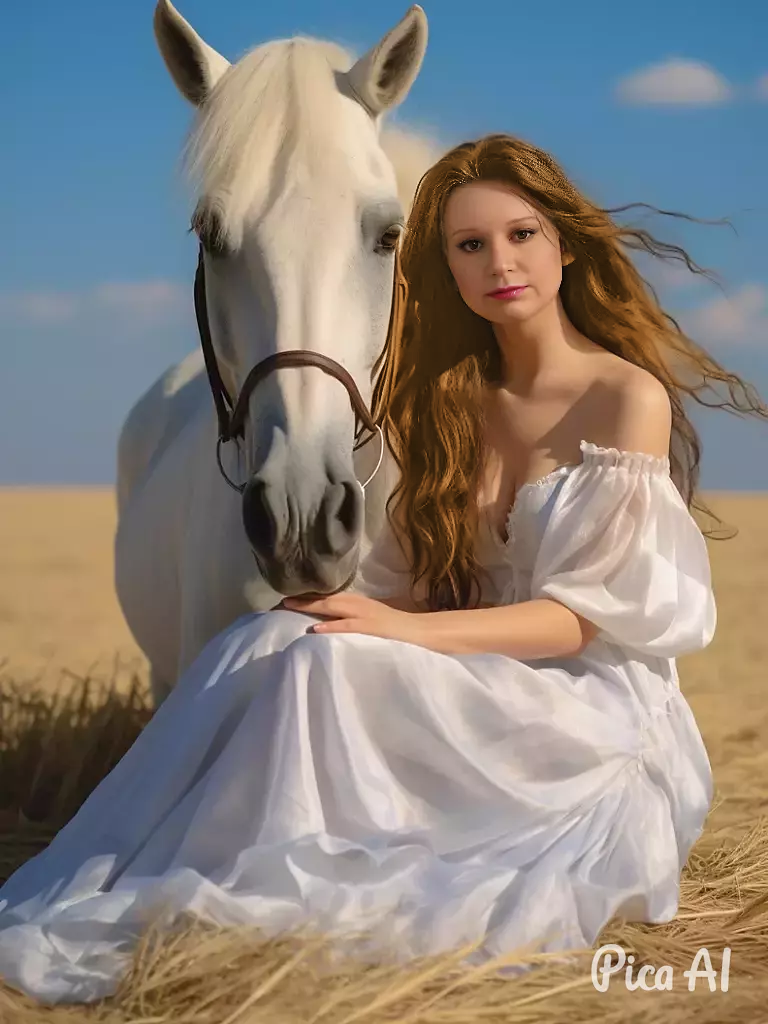
I have tried Pica AI web app, which is very effortless in creating face-swaps, and challenged it with my photo with glasses. Interestingly, Pica AI did not mind my glasses in the original image and produced quite a good result.
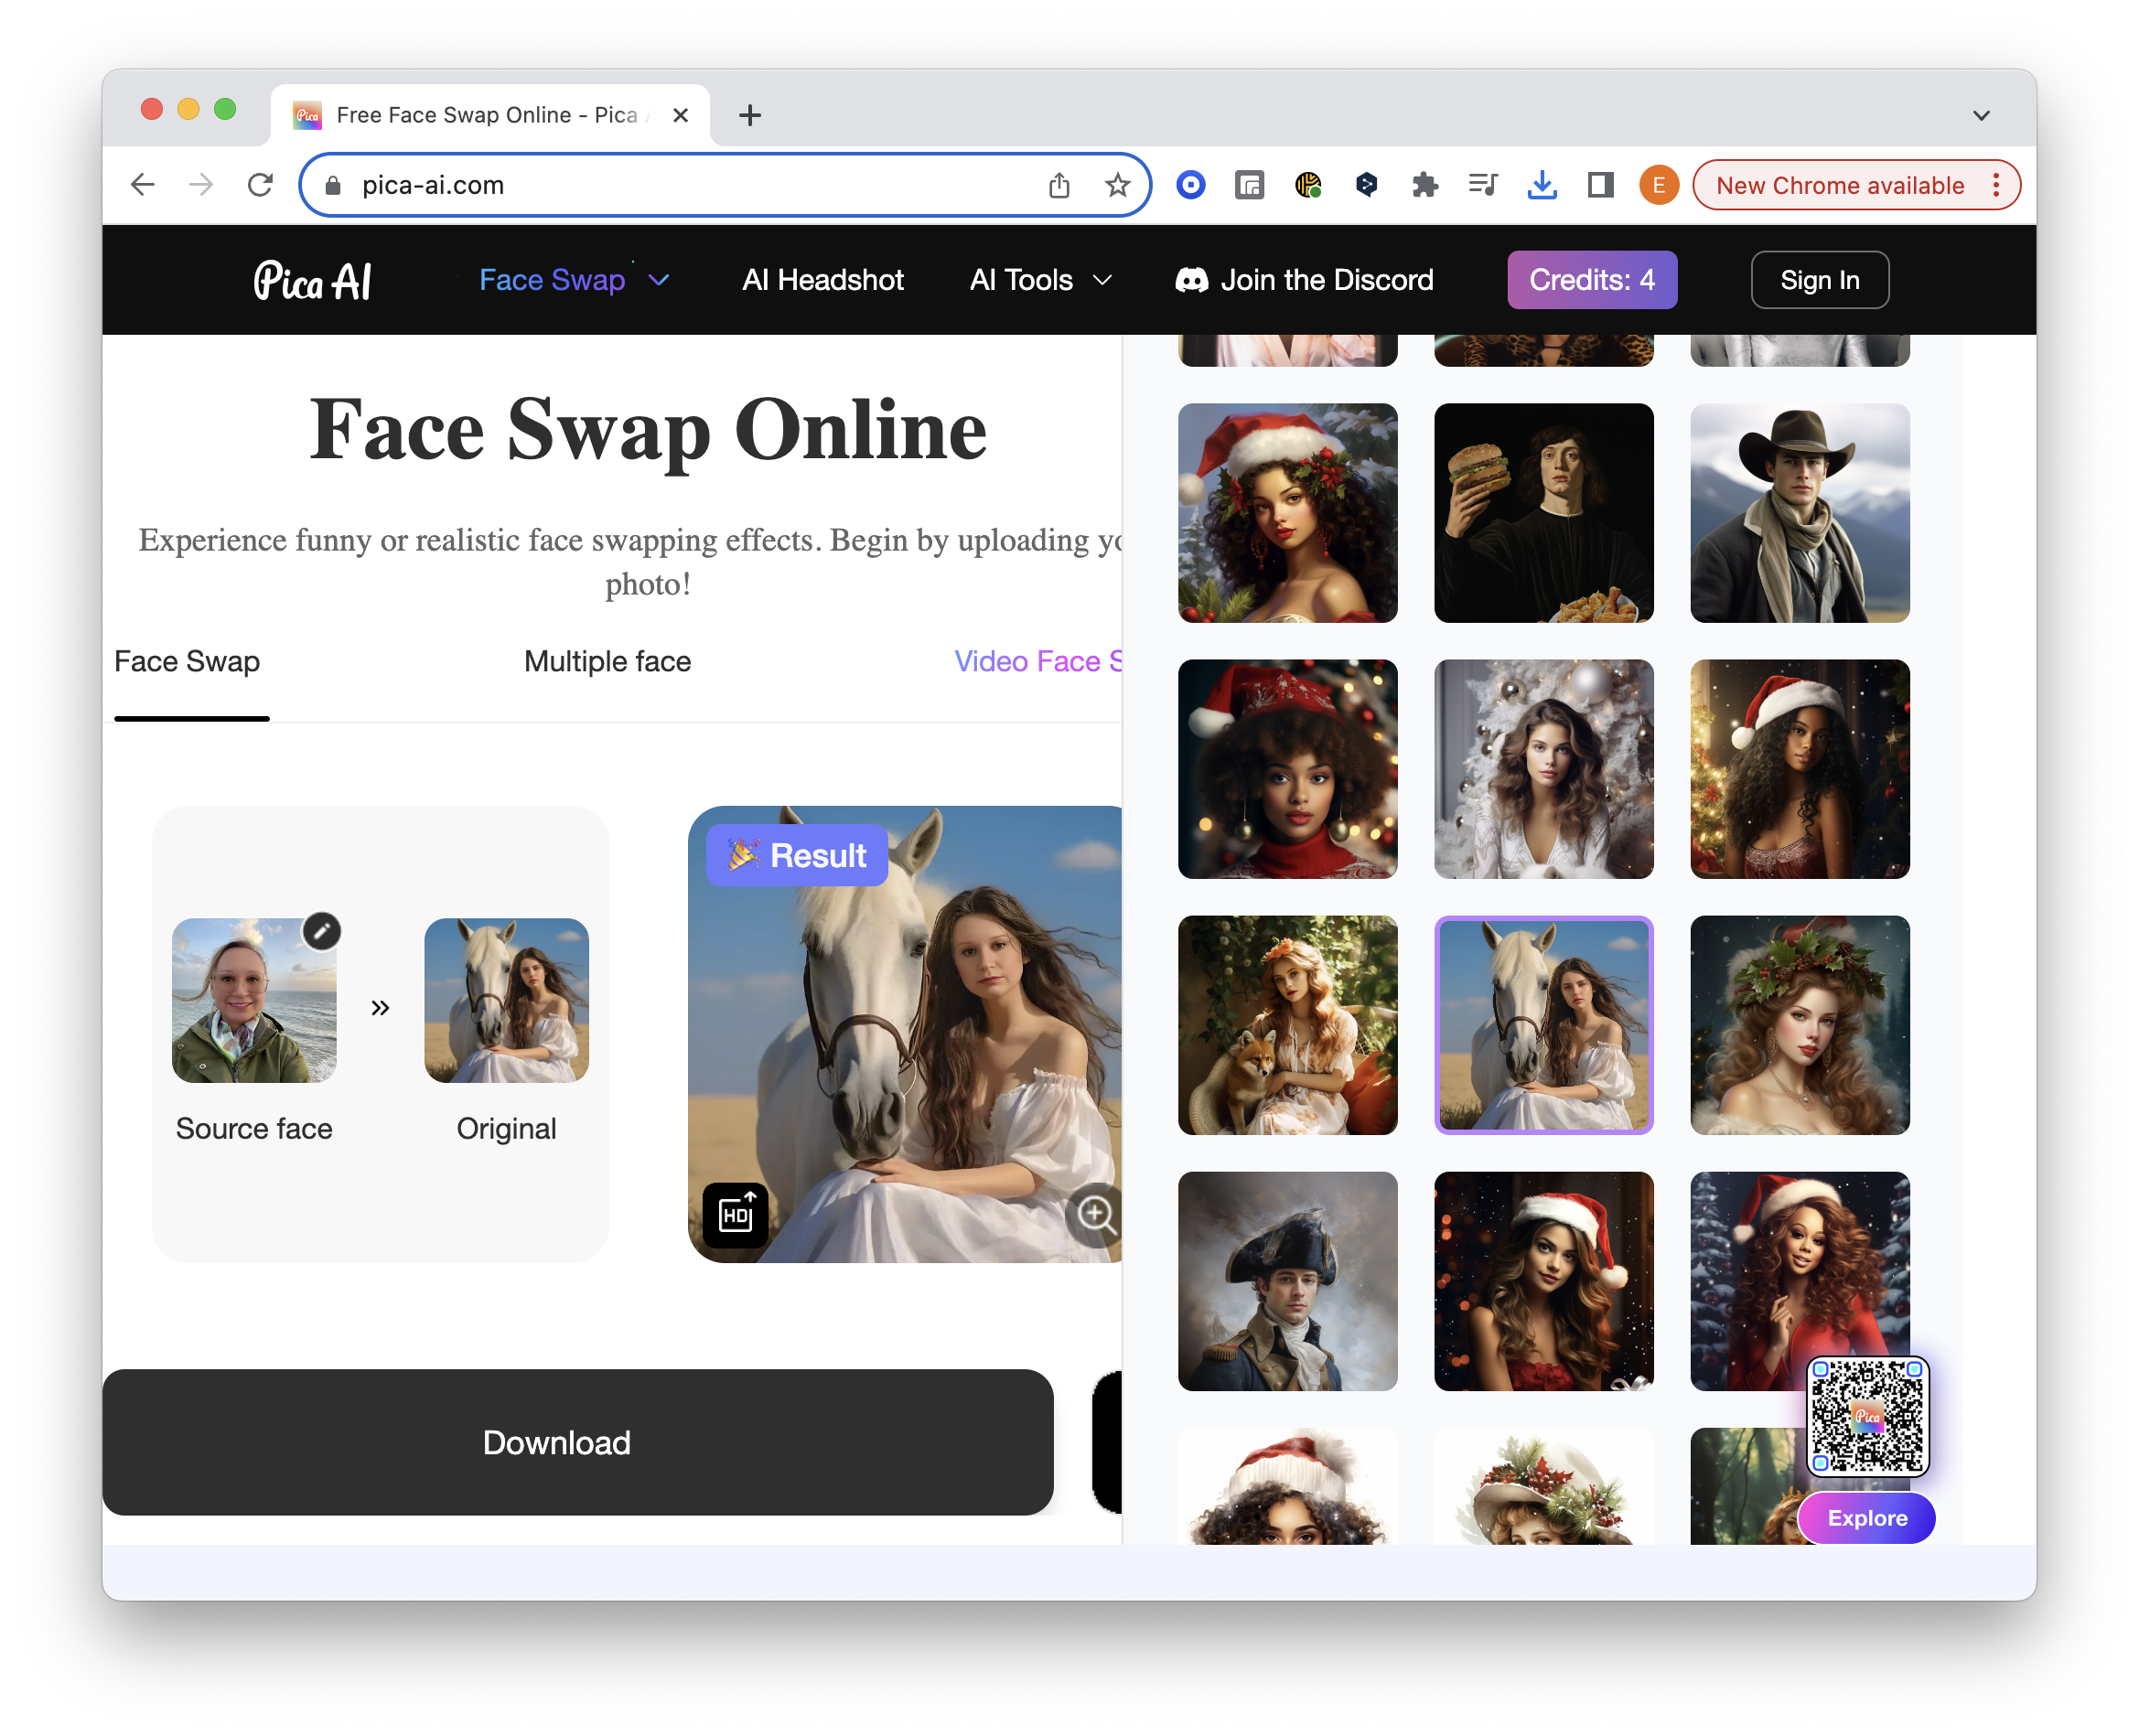
Pica AI, Web app: Me with a White Horse
I am thinking twice before cutting my hair (I have a scheduled appointment with my hairdresser). The messy bun looks nice :)
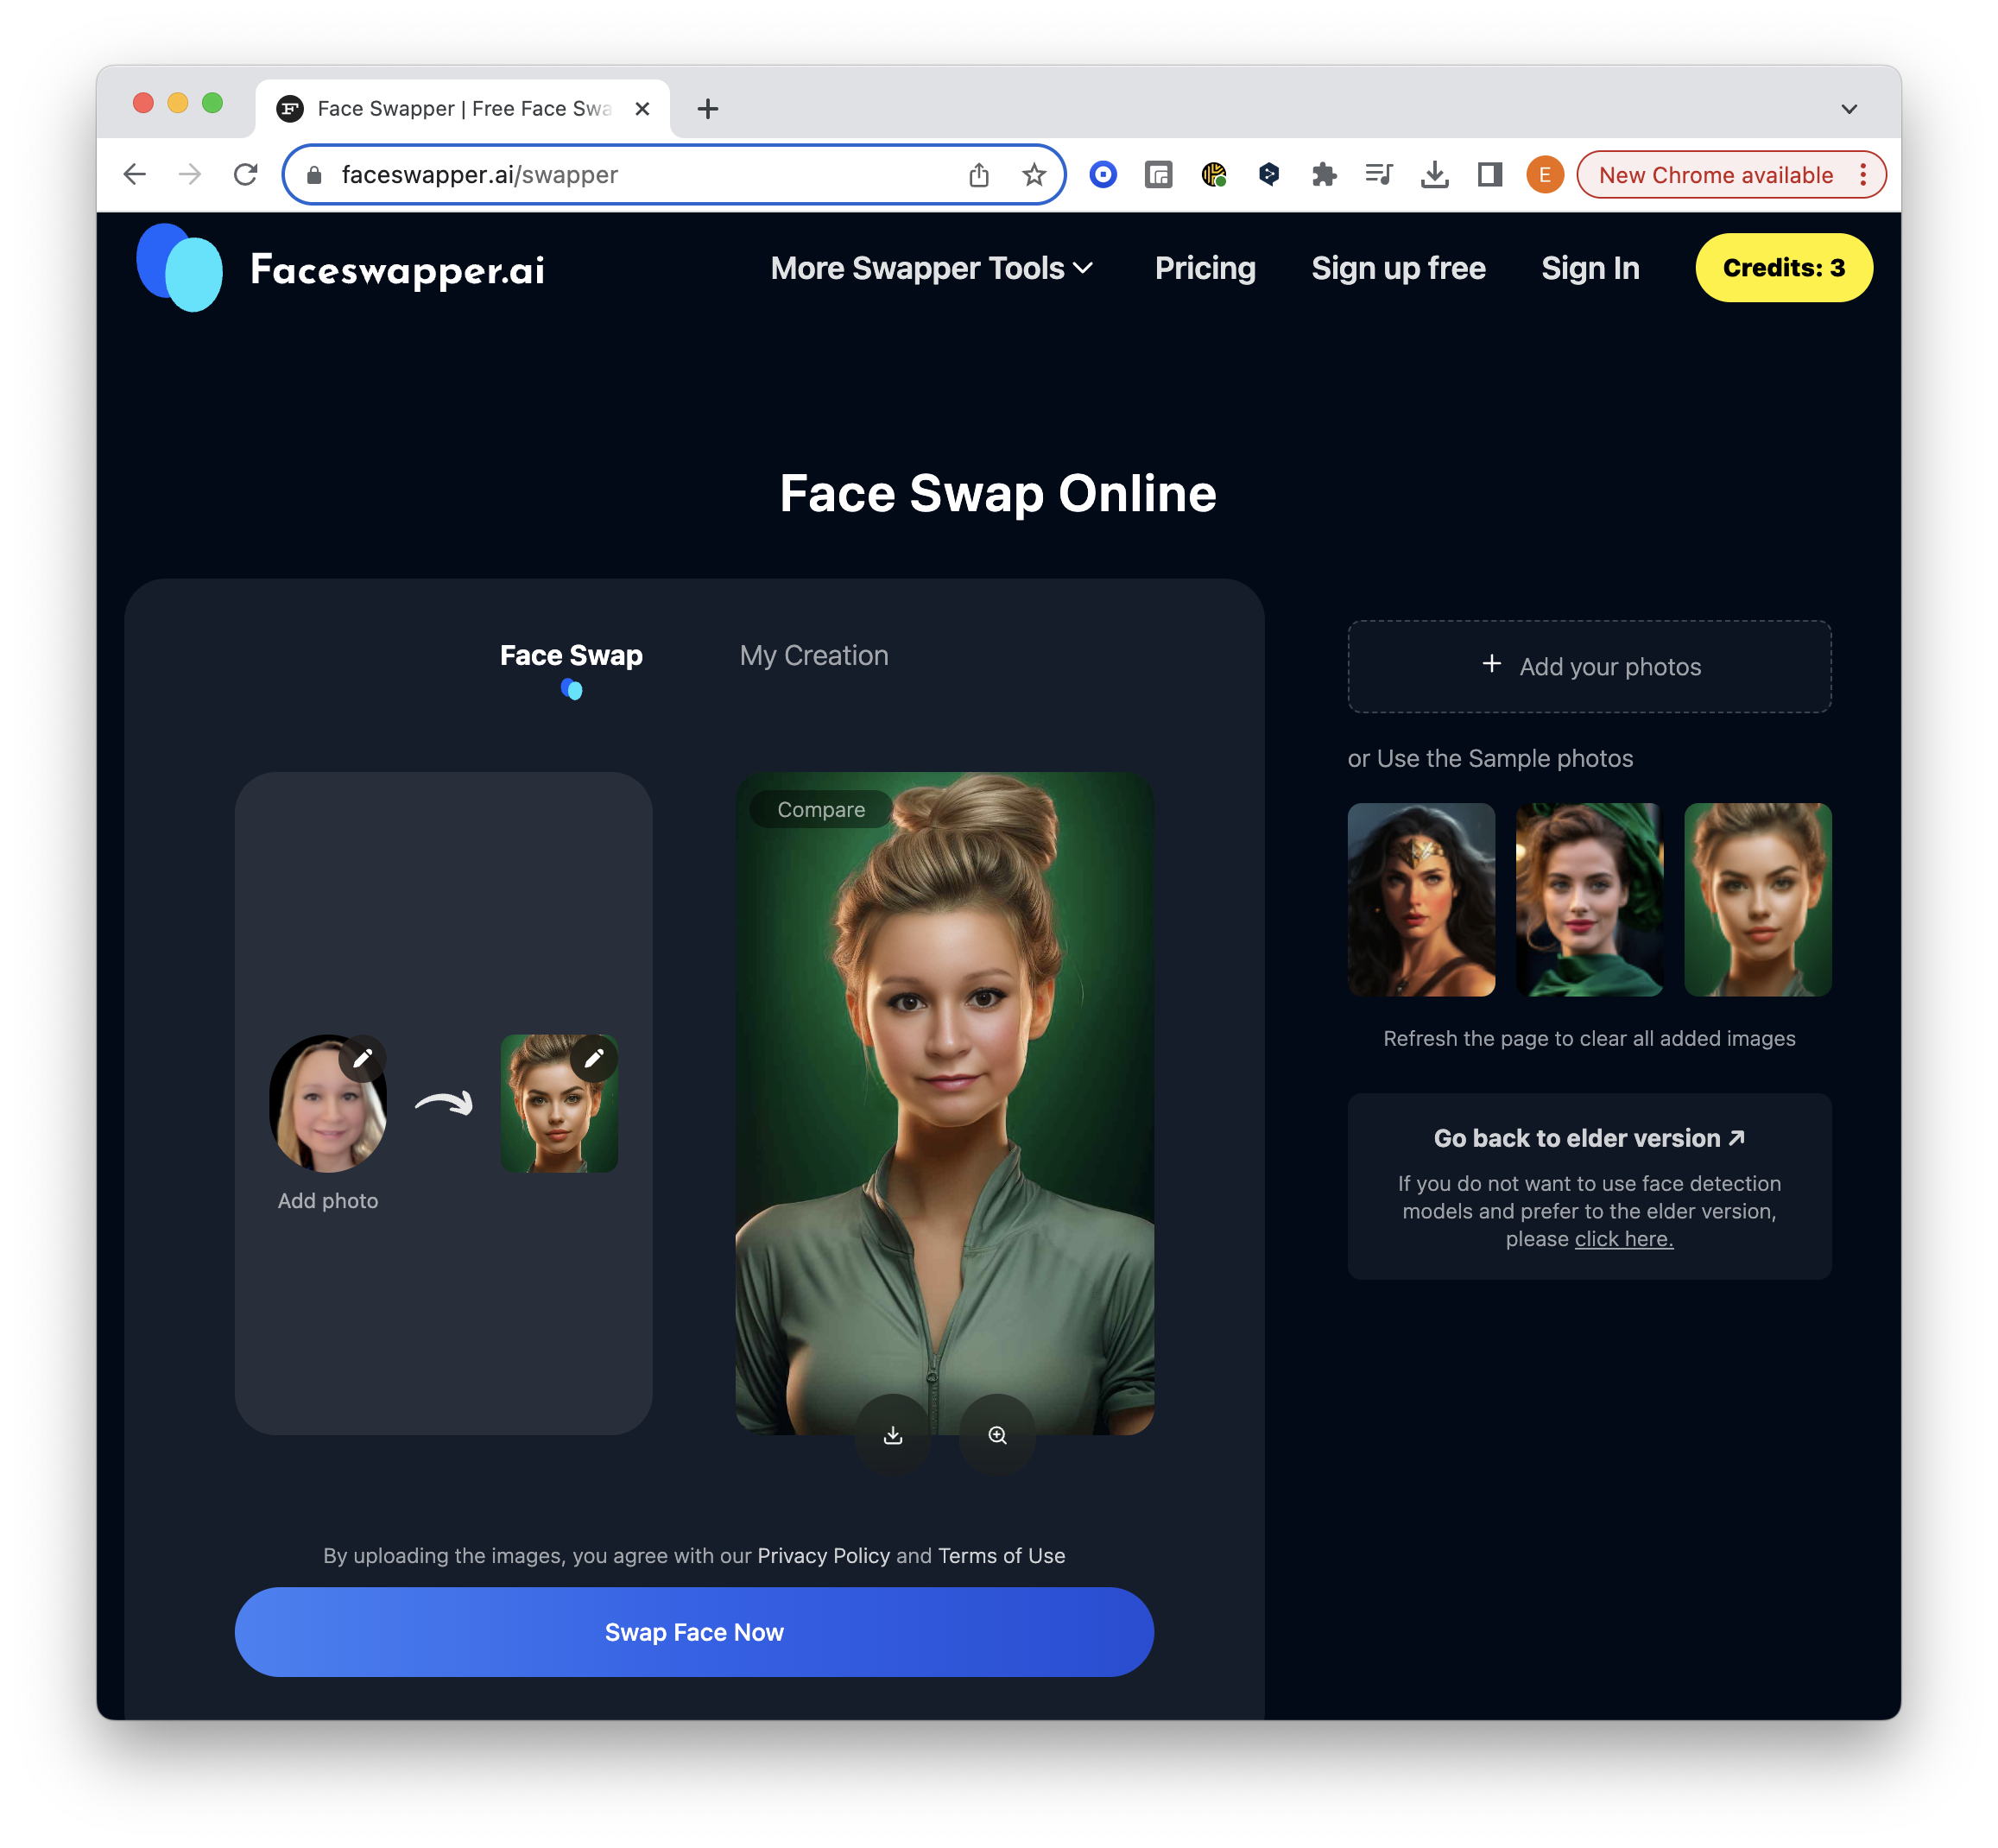
Face Swapper, Web app: Me with an up-do
- Software Programs: Software programs that offer more features and control over face swapping are available for more advanced face swapping.
There are so many applications and online services that I could spend my weekend searching.
Further, I want to try my favourite tools and share my face-swap secrets with you. We will use Midjourney to generate endless scene possibilities and the InsightFaceSwap bot, which works instantly and flawlessly.
Ultimately, we will explore fantastic Python libraries that you can use to develop your face-detection or face-swapping applications.
Face Swapping with Midjourney, Step by Step
We must choose the right tools and use good original photos to create high-quality face swaps.
The face-swapping steps include:
- Selecting good-quality original photos that we want to see in our face-swapping results. Refrain from repeating myself (I like to hard-test these apps sometimes), and avoid using glasses or other challenging details to get the best result.
- Creating or selecting scenery images (they also have one face to be swapped) wherein we want to integrate our original photos.
- Feed these two inputs to an AI app that can do face-swapping or code our algorithm.
Original photos
Here are some things to keep in mind when using face swaps:
-
Photo Quality: your photos’ quality will affect the face swap’s quality. Make sure your images are clear, well-lit, and have good contrast.
-
Pose and Angle: The faces in your photos should be facing in a similar direction and at a similar angle. This will help the software better align the faces.
Vivid imagination and great ideas
There are so many possibilities and ideas we can experiment with in face-swapping! The imagination is limitless. You can use face-swapping for fun or when producing your marketing or video content to save costs for photography and effort for building up scenery and equipment!
What did I want to draw? I wanted to draw myself riding on a robot horse (you can see the result in my previous post from September 2023 Two Years of Elena’s AI Blog, in which I also used Canva to look more appropriate). I also wanted to feel like a superhero and spend time at the Ocean coastline, among many other things. I use face-swapping for this website, as you see on my first page.
Scenes in Midjourney
I use Midjourney to create scenery. I love using “photorealistic” and “HD” in my prompts for better image results. You can also specify a high-resolution camera and get photographic effects.
Reproducible results with –seed
Moreover, since Midjourney generates images randomly, the same prompt can produce different results. Sometimes, we want to make different alterations while preserving the same image. The seed parameter is handy when reproducible results are required.
With the “–-seed [seed_number]” parameter, we can control the algorithm’s randomness and get almost the same image generated the first time.
I recommend playing with the “–-seed” parameter and trying region variations. These are useful for fixing little details, such as hand drawings, which are still challenging for AI.
Look-a-likes in Midjourney
The simplest “face-swaps” can be achieved with the following steps. This approach would produce a “look-a-like” image that captures the main traits of your original photo but is not really what we call “face-swaps.” However, this can also be useful so that I will mention it briefly.
A. Prepare your face image:
- Add your photo by pressing the plus icon at the bottom of the Discord screen. Alternatively, use your or other image from the Web;
- Right-click on the uploaded image and select “Copy Link”;
- Use the /IMAGINE prompt, starting with your image URL and followed by your desired prompt text;
/imagine https_URL Elena is at the ocean, HD
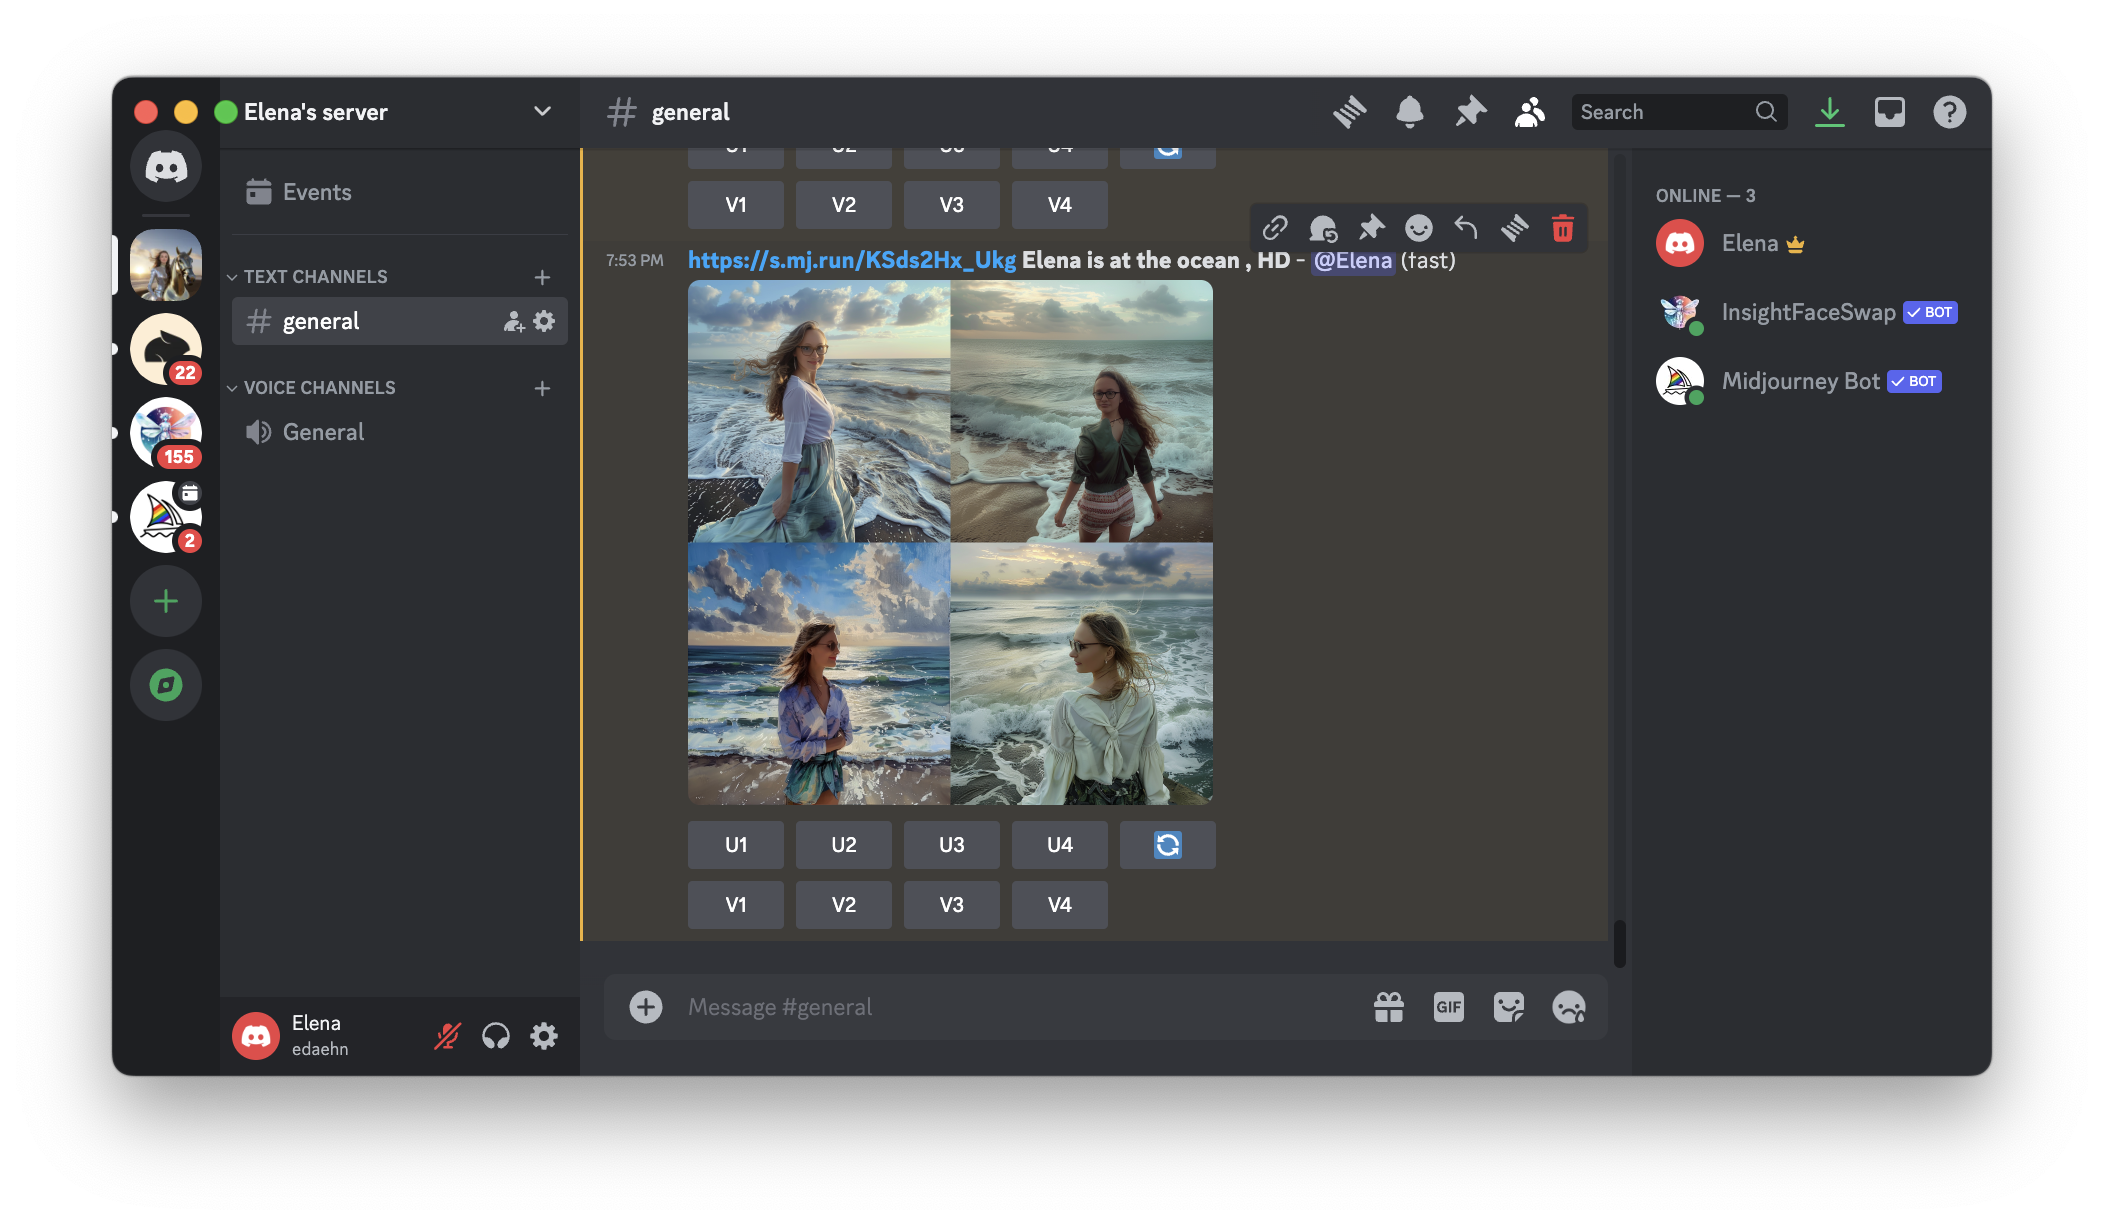
Midjourney: Elena is at the ocean, HD
I liked the first image, which looks quite similar. The first image option is usually the best, but the choice is yours.
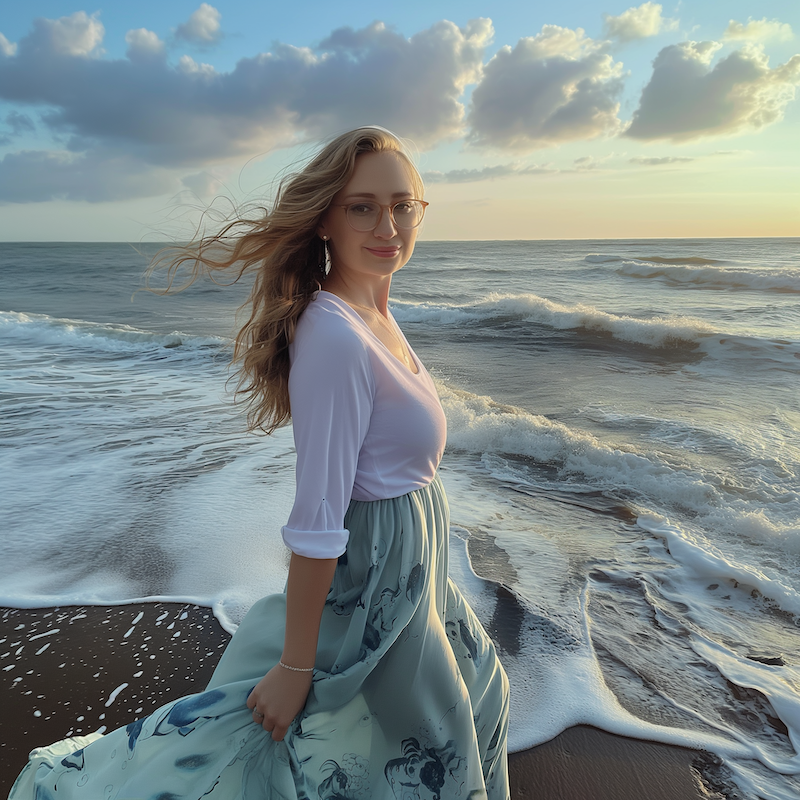
Midjourney: Elena is at the ocean, HD (the first variation)
B. Create a scenery:
- Create a scenery image without your face, using a desired prompt;
- Click the half-moon-plus icon at the upper right of the image where you want to get the seed;
- In the search box, type in :envelope and click on the envelope (3);
- Get the seed number (2622739678), which will appear in your Inbox.
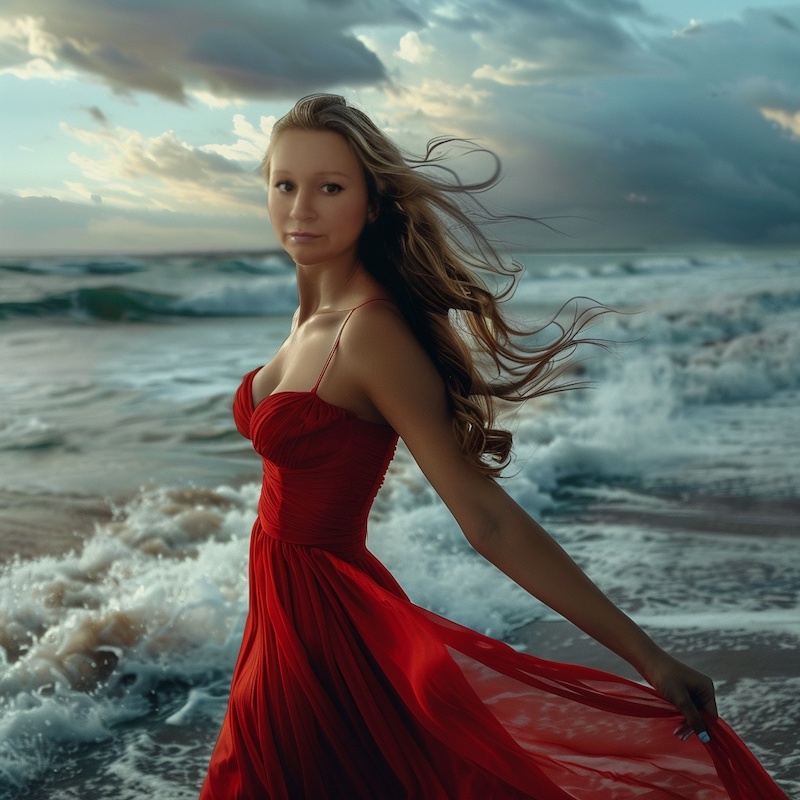
I like red dresses, so I included them in my text prompt.
/imagine Elena in red dress looks into the camera, is at the ocean, stormy weather, HD
I had to do several generations and created this variation:
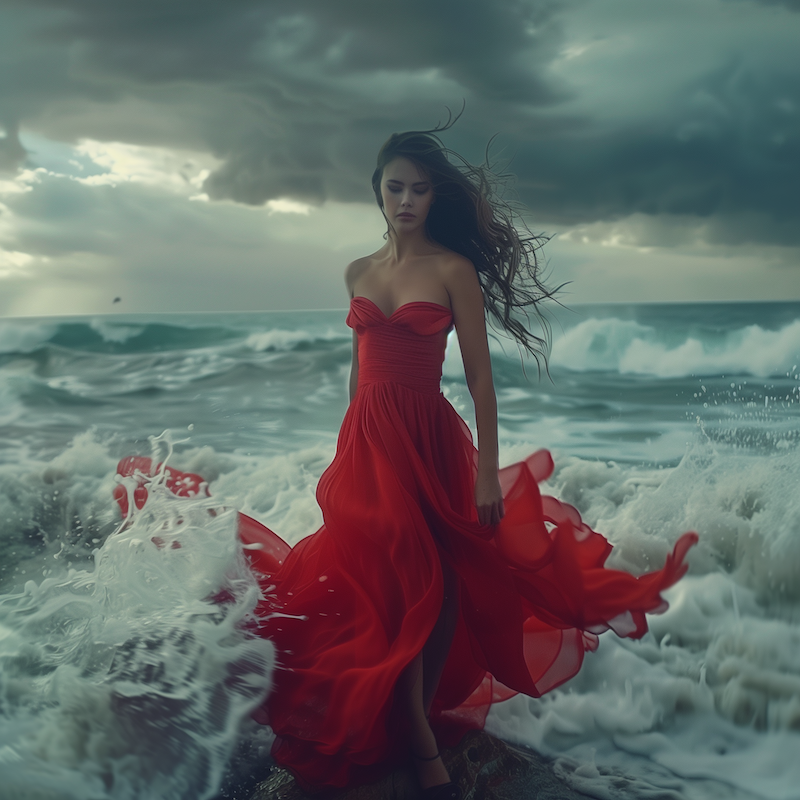
Midjourney: Elena in red dress looks into the camera, is at the ocean, stormy weather, HD
Note that the girl in the image is not looking into the camera. However, the body is positioned well. In other generations, the girl was standing in different directions. This is why adding this detail to your prompts might be a good idea.
C. Combine your face and the scenery image:
- Right-click on your face image from stage A, and get a URL (face_URL);
- Get the seed number (seed_number) from the stage B;
- Try out image generations by combining your face image with the previously retrieved seed value of scenery and a prompt (text_prompt).
/imagine https_URL Elena in red dress looks into the camera, is at the ocean, stormy weather, HD --seed 2622739678
I did some variations and different prompts.
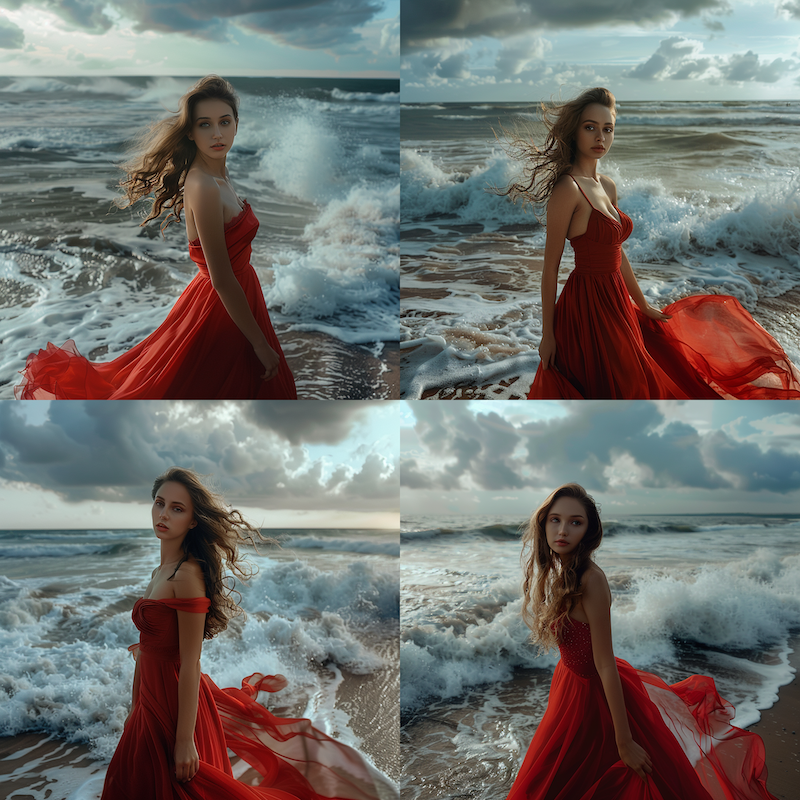
Midjourney: Elena is at the ocean, some variations
However, the result is not yet satisfactory. It looks so different from me!
Insight Face Bot
I love using the InsightFaceSwap bot, which can be invited to your Discord bot.
Indeed, you should install the Discord server to perform face swaps in InsightFace. However, it is so easy!
First, we create a Discord server. Press a big plus button on the left and choose “Create My Own”. You do not need to invite anyone to your server should you like to keep it private.

Discord, adding a server with Create My Own
Next, you invite Insight Face Bot. You can get the Official InsightFace APP, invitation link for the bot. I am not affiliated with them, this is just an invitation link.
To invite the Insight bot, sign up for your Discord server, click on this link, and you will be asked to which server to add this bot. Fill out some fields, and you will be ready to go swapping.
If something is not clear, I suggest you read about installing and creating Discord servers in How to Make, Set Up, and Manage a Discord Server.
You get 50 credits to start using the free version. Each face swap costs three credits. Choose a good photo to start.
The solution for swapping your face in an imaginary scene or any image is as follows:
- Upload your (or your desired) photo and register the identity (your_identity_id) with “/saveid” (high-quality, no glasses, and front-view photos preferred).
- Create your Midjoiurney scene or use any photo/image, but be mindful of copyright and legal issues.
- Use the prompt, in which you will be able to attach your scene image: /swapid your_identity_id your_scene_image
/swapid your_identity_id your_scene_image
Discord bots: Midjourney plus InsightFaceSwap for Elena in red dress at stormy beach
The face is too large; there needs to be a better proportion.
To list all your IDs use:
/listid
To set your default swap ID with the idname already defined in your list:
/setid idname
I always wanted to fly over great falls, and as a super-girl, I can do it quickly:
The super-girl, close up face, flies over great falls on sunny day, high-resolution HD Canon camera
The simplest way to do the instant face-swap is to click the tree dots at an image frame and choose the “INSwapper” in the apps:
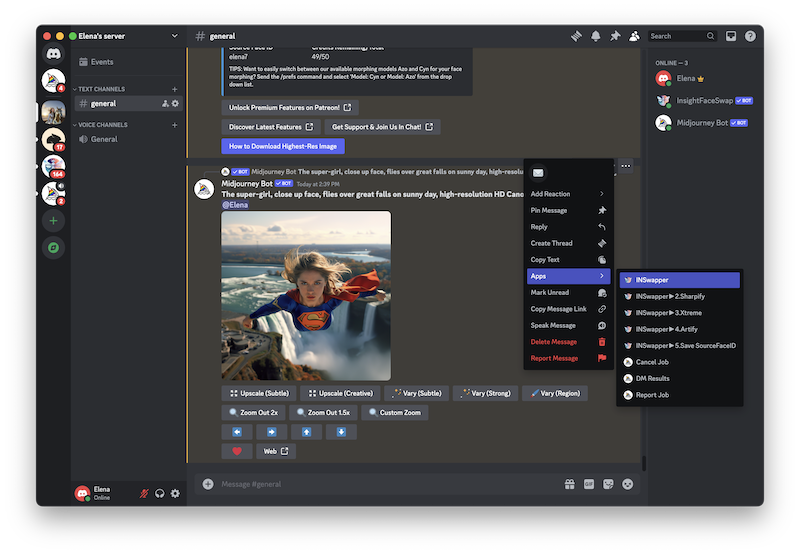
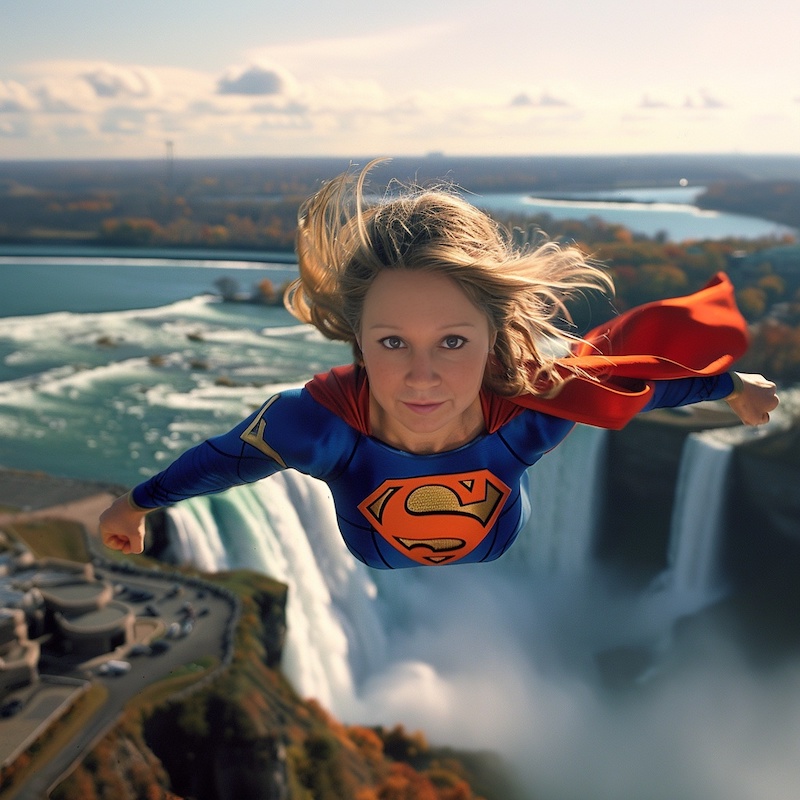
Discord bots: Midjourney plus InsightFaceSwap for Elena as a super-girl that flies over great falls
If you are interested in creating fantastic portraits, you can also read Using Midjourney and the Picsi.AI by InsightFaceSwap Bot to create a personalized portrait.
Coding Face Swaps with Python and OpenCV
While writing Python code with libraries such as OpenCV or TensorFlow (read my previous posts if interested in TensorFlow usage) for face swaps is technically possible, it’s a complex task. Creating a face swap model for production requires expertise in deep learning and computer vision.
Here’s a breakdown of the challenges and potential approaches:
Challenges:
Data Collection: Large dataset of aligned faces needed for training Model Architecture: Knowledge of CNNs and GANs required Fine-tuning: Expertise needed for fine-tuning pre-trained models
Alternative Approaches:
Pre-trained Models and Libraries: consider using existing open-source libraries like DeepFaceLab and DeepFaceLive( see GitHub repositories DeepFaceLab andDeepFaceLive) or FaceSwap (Faceswap) that are built on PyTorch and TensorFlow and have pre-trained models. These libraries might require some configuration but offer a more accessible approach.
I suggest also checking the Ghost repository and the Google Colab demonstrating face-swaps in images and video. The paper GHOST—A New Face Swap Approach for Image and Video Domains by A. Groshev at el. explains the algorithm behind the application.
Cloud platforms like Google Cloud AI Platform or Amazon Rekognition offer pre-built APIs for face manipulation tasks, including face swapping.
Pre-trained models, libraries, or cloud services might be a more realistic approach for beginners.
To start coding face-swaps in Python, I suggest doing the following steps:
- Use libraries such as OpenCV, TensorFlow, Keras for image preprocessing;
- Check dlib (get_frontal_face_detector and shape_predictor) for detecting faces and facial landmarks, or OpenCV’s pre-trained face detection model (CascadeClassifier, see haarcascades);
- Resize the faces to have the same dimensions (cv2.resize);
- Create a mask using the convex hull of the facial landmarks, for instance, with cv2 (convex hull, a nice tutorial on Convex Hull), to blend the source image with the destination image well. The convex hull is a tight wrapper around key points on an object in an image, forming its basic outline. It guides seamless merging and prevents distortions at the edges.
- Create an affine transformation matrix for mapping the source facial landmarks to the destination landmarks. Facial landmarks act as a grid, while an affine transformation matrix warps the source image to align with the destination landmarks. The matrix holds the instructions for this warping, enabling the source image to align with the destination’s face shape.
- Finally, swap face images. To deal with the image edges and blending, you can try playing with masking and cv2.seamlessClone. OpenCV lets you seamlessly copy an object from one image to another using Poisson blending.
OpenCV
Try out the following GPT prompt to create your code draft. However, you will not get a complete solution (I have tried Google Gemini and chatGPT 4.0), at least yet:
Write me a Python code using OpenCV (CascadeClassifier, convex hull, affine transform), a function that swaps face from image1 to the face found in image2.
Please let me know how it goes; I might include a link to your project in this post.
However, GPT-generated code will have to be fixed in many parts.
I used the OpenCV library in a Python environment, specifically tailored for use in Google Colab. It outlines a function named swap_face that automates detecting, extracting, and swapping faces between two given images.
The script starts by importing cv2 for OpenCV functions and numpy for numerical operations.
The cv2_imshow function from google.colab.patches is imported to display images directly in Google Colab notebooks, as Colab does not directly support OpenCV’s imshow.
The swap_face function is defined as swapping faces between two images. It takes three parameters:
scene_image_path: The file path for the background image where the face will be placed.face_image_path: The file path for the image containing the face to be copied onto the background image.paste_source_images: A boolean flag indicating whether to include the original images alongside the final result for demonstration purposes.
The function is called with paths to the input images and the paste_source_images flag set to True.
# Code for the article
from google.colab.patches import cv2_imshow
import cv2
import numpy as np

# Function to swap faces between two images
def swap_face(scene_image_path, face_image_path, paste_source_images=False):
    # Read images
    scene_image = cv2.imread(scene_image_path)
    face_image = cv2.imread(face_image_path)

    # Load pre-trained face detection model
    face_cascade = cv2.CascadeClassifier(cv2.data.haarcascades + 'haarcascade_frontalface_default.xml')

    # Convert images to grayscale for face detection
    gray1 = cv2.cvtColor(scene_image, cv2.COLOR_BGR2GRAY)
    gray2 = cv2.cvtColor(face_image, cv2.COLOR_BGR2GRAY)

    # Detect faces in both images
    scene_faces = face_cascade.detectMultiScale(gray1, 1.3, 5)
    desired_faces = face_cascade.detectMultiScale(gray2, 1.3, 5)

    if len(scene_faces) != 1 or len(desired_faces) != 1:
        raise ValueError("Each image must contain exactly one face.")

    # Extract face coordinates
    x1, y1, w1, h1 = scene_faces[0]
    x2, y2, w2, h2 = desired_faces[0]

    # Resize the second face to fit the dimensions of the first face
    face2_resized = cv2.resize(face_image[y2:y2+h2, x2:x2+w2], (w1, h1))

    # Create an elliptical mask to define the blending region
    mask = np.zeros((h1, w1), dtype=np.uint8)
    center = (w1 // 2, h1 // 2)
    # axes = (w1 // 2, h1 // 2) # This can be adjusted based on the face shape
    axes = (w1 // 3+15, h1 // 3+18) # Here I have adjusted for my own image
    cv2.ellipse(mask, center, axes, 0, 0, 360, 255, -1)

    # Apply Gaussian blurring to the mask edges to smooth the transition
    blurred_mask = cv2.GaussianBlur(mask, (21, 21), 0)

    # Convert the blurred mask to 3 channels
    blurred_mask_3ch = cv2.cvtColor(blurred_mask, cv2.COLOR_GRAY2BGR)

    # Use the blurred mask for blending
    face_area = scene_image[y1:y1+h1, x1:x1+w1]
    blended_face = cv2.seamlessClone(face2_resized, face_area, blurred_mask_3ch, center, cv2.NORMAL_CLONE)

    # Place the blended face back into the original image
    result_image = scene_image.copy()
    result_image[y1:y1+h1, x1:x1+w1] = blended_face

    if paste_source_images:
      # Paste thumbnail copies of the source images into the bottom-right corner
      # IMPORTANT: cv2 image shape[:2] returns (rows, cols) = (height, width),
      # NOT (width, height). Always unpack as img_h, img_w = image.shape[:2].
      img_h, img_w = scene_image.shape[:2]
      # Bottom-right anchor point for thumbnail placement
      x, y = img_w, img_h
      # Thumbnail is 1/3 the size of the scene image
      th, tw = img_h // 3, img_w // 3
      scene_thumb = cv2.resize(scene_image, (tw, th))
      result_image[y - th:y, x - tw:x] = scene_thumb[0:th, 0:tw]

      img_h, img_w = face_image.shape[:2]
      th, tw = img_h // 3, img_w // 3
      face_thumb = cv2.resize(face_image, (tw, th))
      result_image[y - th:y, x - tw*2:x - tw] = face_thumb[0:th, 0:tw]

      # Draw a red arrow between the two thumbnails to indicate the swap direction
      red_color = (0, 0, 255)
      result_image = cv2.arrowedLine(
          result_image,
          (x - tw - 20, y - th // 2),
          (x - tw + 20, y - th // 2),
          red_color, 2, tipLength=0.3)

    return result_image

scene_image_path = '/content/red_dress.png'
face_image_path = '/content/super_girl.png'

swapped_image = swap_face(scene_image_path, face_image_path, paste_source_images=True)

cv2_imshow(swapped_image)
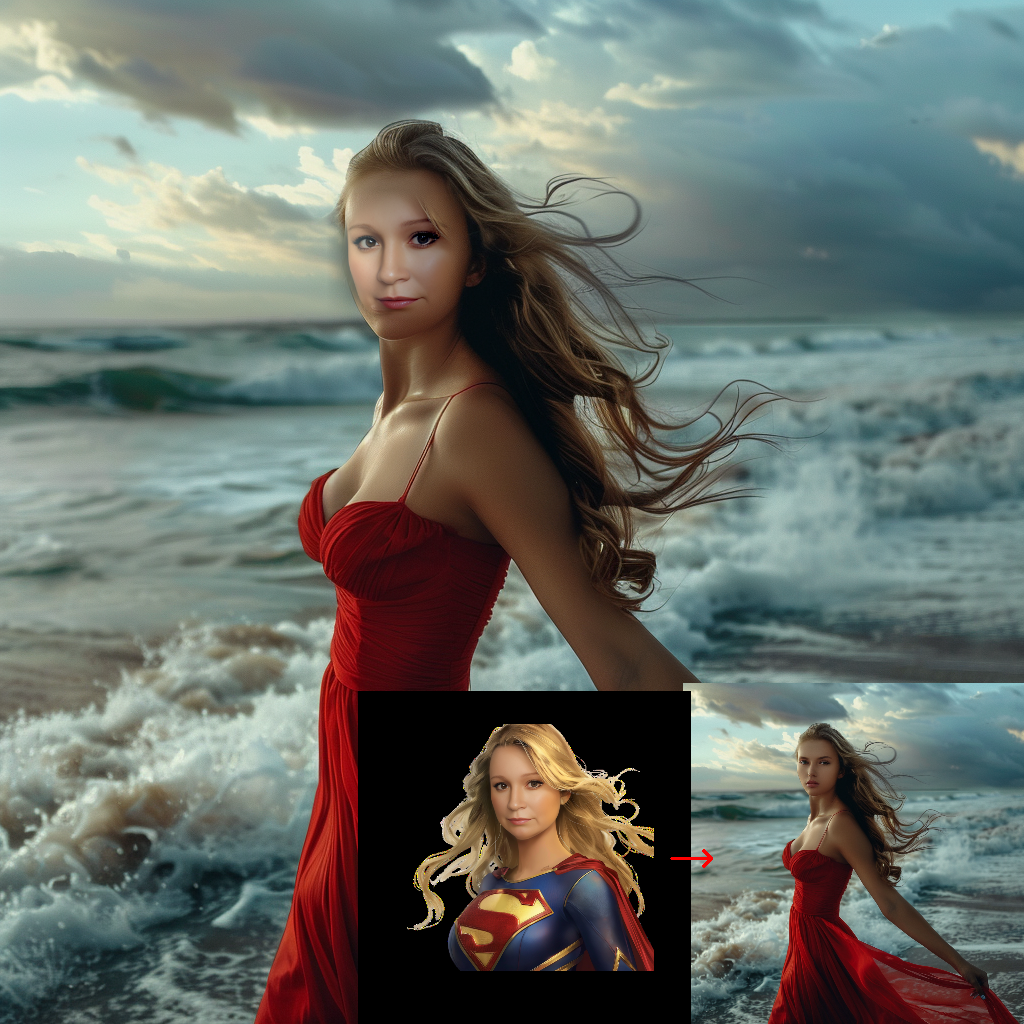
Playing with OpenCV, CascadeClassifier for face detection and simple face-swaps
The function reads both images using OpenCV’s imread method.
It uses a pre-trained Haar Cascade classifier to detect faces by converting the images to grayscale and then applying the detectMultiScale method.
Faces are detected in both images. The script checks to detect exactly one face in each image. If not, it raises a value error.
Coordinates of the detected faces are used to extract the face regions. The face from the second image is resized to match the dimensions of the face in the first image.
We create an elliptical mask to define the region where faces will be combined. Gaussian blurring smooths the edges. This mask is used to blend the resized face with the background image via OpenCV’s seamlessClone method for a natural-looking blend with nearby color and texture.
I have used the Gaussian blur to merge two images. This is not a perfect solution. To create finer face swap, refer to the Kaggle notebook by Hamed Etezadi Face Swap Using Dlib. The code is also in GitHub repository.
If paste_source_images is True, the script pastes the original images onto the final image for comparison. It resizes the source images, places them in designated positions, and draws an arrow between them to indicate the face swap. The modified scene image is returned.
However, you will still have much to do. For instance, you must correct the colour of the swapped faces since two input images have different colour shades.
I asked ChatGPT for improvement ideas. The three most actionable suggestions, in my view:
- Replace Haar cascade with a DNN-based detector (
cv2.dnn.readNetFromCaffewith the ResNet-SSD face model) — far better accuracy at different angles and lighting conditions, and still only a few lines of code to swap in. - Use facial landmarks instead of an ellipse for the mask — the
dlibshape predictor orface_recognitionlibrary gives you 68 key points around the face outline, producing a much cleaner blend boundary than a hardcoded ellipse. - Colour-correct the swapped face — histogram matching between the source and destination face regions eliminates the visible colour shift that this code still produces.
The full list of suggestions (enhanced detection, multi-face support, modular architecture, automated tests) is worth reading if you plan to develop this further. The Kaggle notebook by Hamed Etezadi on Face Swap Using Dlib implements several of these improvements in practice.
InsightFace Library
Luckily, you don’t have to use bots or heavy coding. You can install the InsightFace for Python and enjoy your creativity with AI!
It has an MIT license. You can use the InsightFace Python Library code for academic and commercial purposes, except for the pre-trained models.
To swap faces with InsightFace Library, you must start with face detection and then use their model to swap faces. However, it requires minimal coding.
For all inpatients, you can try Swapseed to use Insightface’s face-swapping on your computer locally.
Benefits, risks, and responsibility
Face-swap technology is genuinely fun — I use it for this website and enjoy it. But the same tools that let me appear as a superhero can be used to put anyone’s face into content they never consented to. That gap matters.
Where it is genuinely useful:
- Film and video production — stunt doubles, de-ageing, archival footage restoration
- Marketing and content creation — visualising a product on different faces
- Creative and artistic projects — exactly what this post is about
- Social commentary and satire — with clearly labelled, consensual use
Where it becomes harmful:
- Deepfakes — fabricated videos of real people saying or doing things they never did. Damaging to reputations, and increasingly used for political disinformation.
- Non-consensual intimate imagery — a serious and growing harm, now explicitly illegal in several countries.
- Identity fraud — synthetic faces used to bypass biometric verification.
- Privacy — most mobile apps and web tools upload your photos to third-party servers. Read the privacy policy before you click.
The legal landscape is shifting fast. The EU AI Act (2024) classifies real-time biometric identification and certain deepfake applications as high-risk or prohibited. Generating synthetic media depicting real people without disclosure is increasingly regulated. In practice: always get consent before using someone else’s face, and label synthetic content clearly.
Defensive research is active too. The paper by N. Ruiz et al. Disrupting Deepfakes: Adversarial Attacks Against Conditional Image Translation Networks and Facial Manipulation Systems demonstrates adversarial perturbations that prevent face-swap models from working on a protected image — the GitHub repository has the code.
Conclusion: Face-Swapping Approaches Compared
The InsightFace Bot + Midjourney combination is the fastest route to genuinely convincing results — I still use it for the images on this site. The OpenCV approach is slower and more imperfect, but it teaches you what is actually happening: face detection, geometric alignment, mask creation, and Poisson blending. That understanding is useful whether you go on to use a polished library or build something custom.
If you want to go further, the InsightFace Python library and the GHOST project (linked in the references) are solid next steps. And if you experiment with the OpenCV code above, try swapping the Haar cascade for a DNN-based detector — the quality difference is immediately visible.
As always: use this responsibly, get consent, and label synthetic content for what it is.
AI Face Swapping FAQ
What is AI face swapping?
Face swapping replaces one person’s face in an image or video with another’s. AI tools detect and align facial landmarks, then blend the replacement face so it matches the target’s lighting and pose.
What are the best no-code face swap tools?
Mobile apps and web tools handle casual face swaps with zero setup. For higher quality, the InsightFace Bot on Discord combined with Midjourney-generated scenes produces convincing results without writing code.
How do I swap faces in Python with OpenCV?
Detect faces with a Haar cascade (or a DNN detector), align the facial landmarks, build a mask around the face region, and merge the source face onto the target with seamless (Poisson) cloning via cv2.seamlessClone. The InsightFace Python library offers a higher-level alternative.
Is face swapping legal and ethical?
Face swapping has legitimate uses in film, marketing, and art, but it can cause harm when used to impersonate people or create non-consensual content. Get consent, respect privacy, and clearly label synthetic media.
Did you like this post? Please let me know if you have any comments or suggestions.
AI-generated art and music/sound posts that might be interesting for youReferences
8. Two Years of Elena’s AI Blog
9. How to Make, Set Up, and Manage a Discord Server.
10. Using Midjourney and the Picsi.AI by InsightFaceSwap Bot to create a personalized portrait
11. InsightFace Python Library
17. GHOST—A New Face Swap Approach for Image and Video Domains
20. dlib, get_frontal_face_detector
25. Midjourney docs: Parameter List
26. Official InsightFace APP, invitation link for the bot
Enjoyed this? Get more like it.
Weekly notes on AI tools, Python, and what I'm actually building — plus a free copy of Fantastic AI: The 2026 Toolkit.
