
Tracking and Optimising Your Blog for AI Search (GA4, robots.txt, AIO)
Recently, I noticed something in my web analytics: ChatGPT and other AI bots are actively reading my blog.
This is good news. Traditional Google ranking is harsh for small, independent bloggers. We are constantly fighting algorithms, domain authority scores, and giant aggregators (like Reddit) just to be seen. But the rise of Generative AI Search presents a new opportunity. If you can get AI engines like ChatGPT, Claude, or Perplexity to read and cite your work, you bypass the traditional SEO rat race entirely.
In this post, we look at how to track AI traffic using Google Analytics 4 (GA4), how to manage bot access using your robots.txt file, and most importantly, how to optimise your content so that Large Language Models (LLMs) want to cite you.
What is Google Analytics 4 (GA4)?
Skip this section if you are already using GA4 and have it set up for your project. Otherwise, you can also read my previous post Moving to GA4 about GA4 usage, its features and alternatives.
Google Analytics 4 (GA4) is the latest version of Google’s analytics platform, offering enhanced privacy controls, cross-platform tracking capabilities, and improved performance. It is designed to provide detailed insights into user behaviour, including which pages or features users interact with while browsing your website or using third-party applications.
Why Web Analytics is vital for SEO? Knowing web user behaviour patterns is critical for optimising our websites. With GA4, you can track various aspects of user engagement, including:
- Usage patterns: How long users spend on specific pages or features
- Behavioral data: Which links are clicked or forms are submitted by users
- Performance metrics: Page load times and error rates
Worry about me tracking your clicks? Don't worry, you can easily disable it in my Cookie form in the Performance and Analytics section :)
Setting Up Google Analytics 4 for AI Tracking
Firstly, ensure your project is configured with GA4 installed and operational. To verify the setup, visit Google Analytics 4 Documentation.
1. Create a GA4 Property
The first step in setting up GA4 is creating a new property. You can do this in the Google Analytics. You can read my previous post Moving to GA4 for the complete setup and the GA4 usage patterns. I will repeat the basic GA4 setup here for completeness.
- Go to Google Cloud Console and log in with your preferred Google credentials.
- Once you have signed in with your Google account, click the [Start measuring] button.
- Next, choose a name for your Google Analytics account. Then, you will see different options for sharing data. Make sure to set these options before clicking Next.
- You will then be guided to create a new Property. Otherwise, the Property menu appears when pressing the “Admin” gear icon on the left bottom side of the screen.
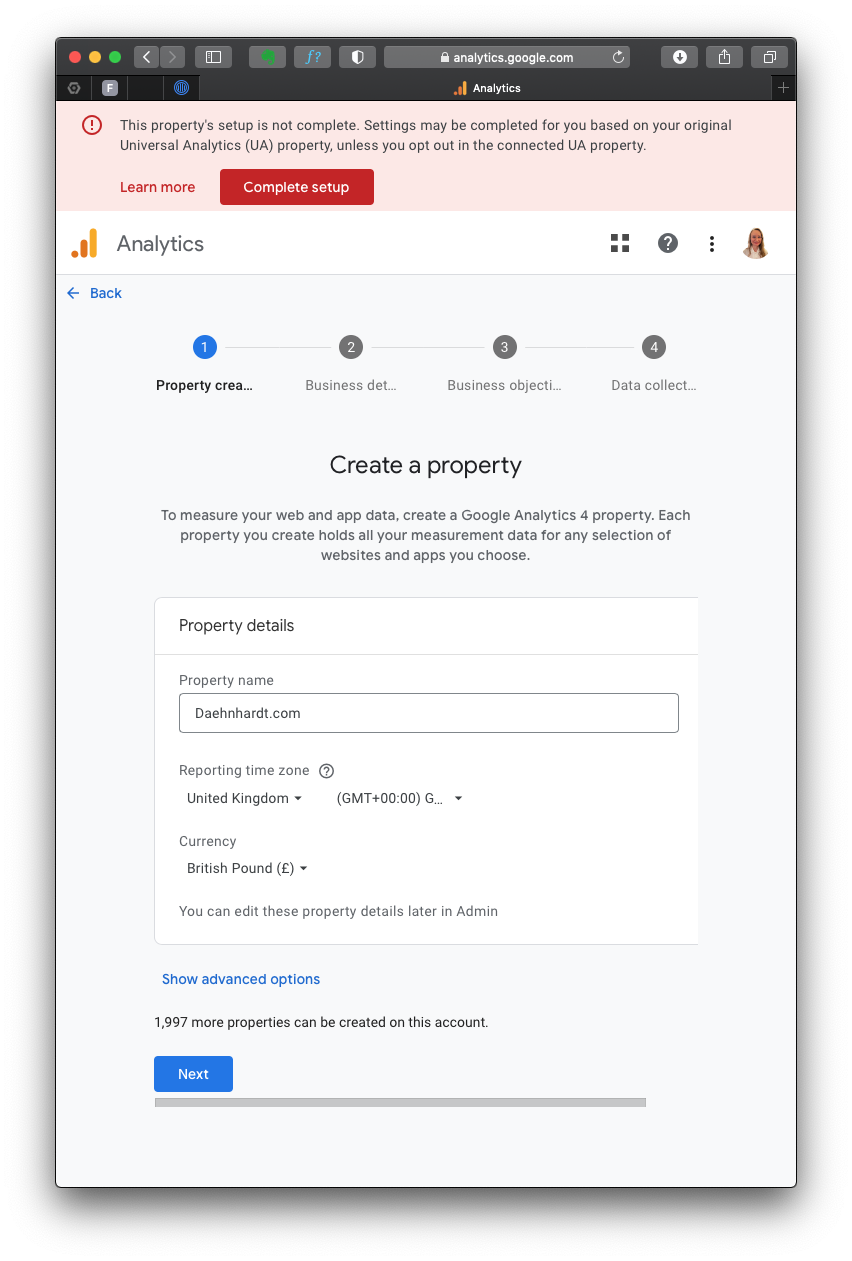
Fill in the required details:
- Property name: Enter your website’s GA4 name;
- Reporting Time Zone: Select your time zone;
- Currency displayed: Choose your currency.
After you press “Next,” you must provide your business details, such as Industry category and Business size. When selecting your business goals, choose the objectives that best fit your needs.
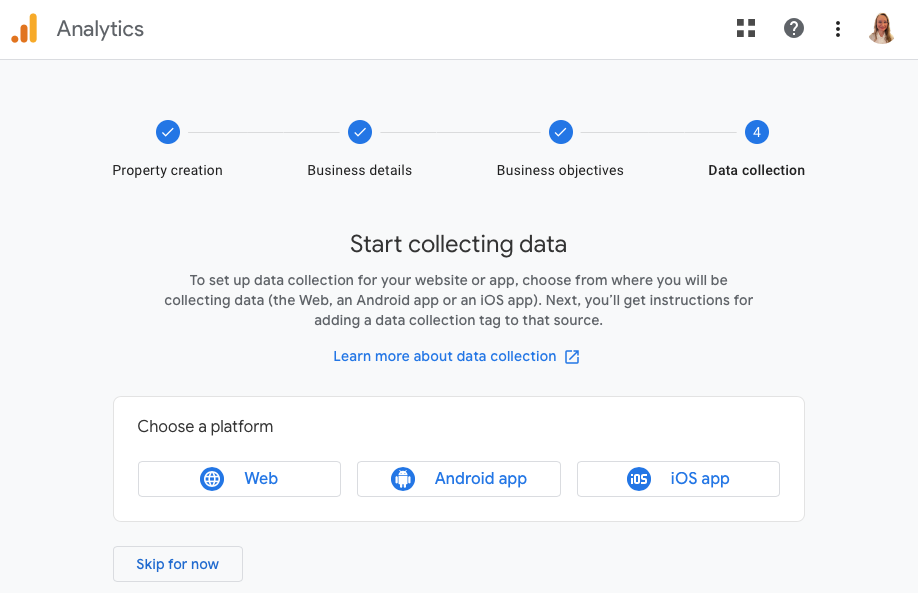
Since I use the GA4 property for my website analytics, I choose “Web” platform.
Now, we will set up a data stream wherein we enter our website’s URL and other required information.
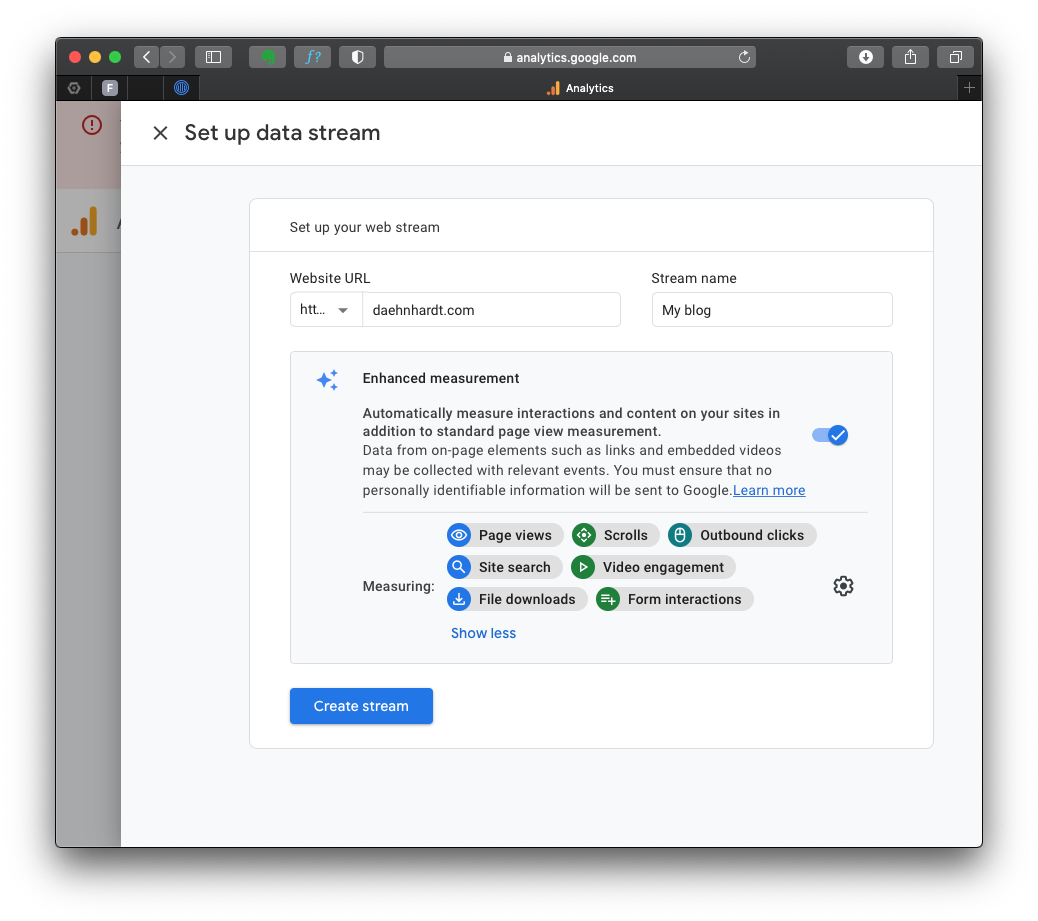
By default, the events with these names will be tracked:
- page_view: page views;
- scroll: page scrolls;
- click: outbound link clicks;
- view_search_results: site searches;
- video_start, video_progress, video_complete: video Engagement;
- file_download: file downloads;
- form_start and form_submit: form submissions;
You can enable or disable these events in the “Enhanced Measurement.”
Install the GA4 Tracking Code
After creating the GA4 property, you’ll see a page with the Measurement ID (starts with “G-“). Copy this ID, as you’ll need it later.

If you lose your tag ID, you can always return to this page, which is in the “Admin” area, in the “Data Streams” section.
The complete GA4 code is in the “Stream details”, “Google Tag” section “View tag instructions”. Notice the green mark “Data Flowing”? That’s because I already have my tag on the HTML page, and it’s receiving data from you just now!

After you click on that section, you can choose the appropriate method to install the GA4 tracking code, depending on your website platform. For instance, if your website is built with HTML, open your website’s HTML page in a text editor. Locate the <head> section of your HTML code.
To start collection data, you should include the following code snippet immediately before the closing </head> tag:
<!-- Global site tag (gtag.js) - Google Analytics -->
<script async src="https://www.googletagmanager.com/gtag/js?id=GA_MEASUREMENT_ID"></script>
<script>
  window.dataLayer = window.dataLayer || [];
  function gtag(){dataLayer.push(arguments);}
  gtag('js', new Date());

  gtag('config', 'GA_MEASUREMENT_ID');
</script>
You must alter the GA_MEASUREMENT_ID with the Measurement ID you copied before, and of course, save the HTML file and upload it to your website’s server.
When required, complete instructions for website builders at GA4: Set up Analytics for a website and/or app.
2. Tracking ChatGPT Usage
To track ChatGPT traffic, you must ensure that your website pages include a Google Analytics tracking code. This allows GA4 to capture user interactions within the AI framework.
Tracking AI traffic with GA4
Traffic acquisition
In the left menu, under “Life Cycle,” locate the “Acquisition” section. Click “Acquisition” and choose “Traffic acquisition” from the dropdown list.
The Traffic Acquisition report displays session data by primary channel group, such as Organic Search, Direct, Referral, etc.
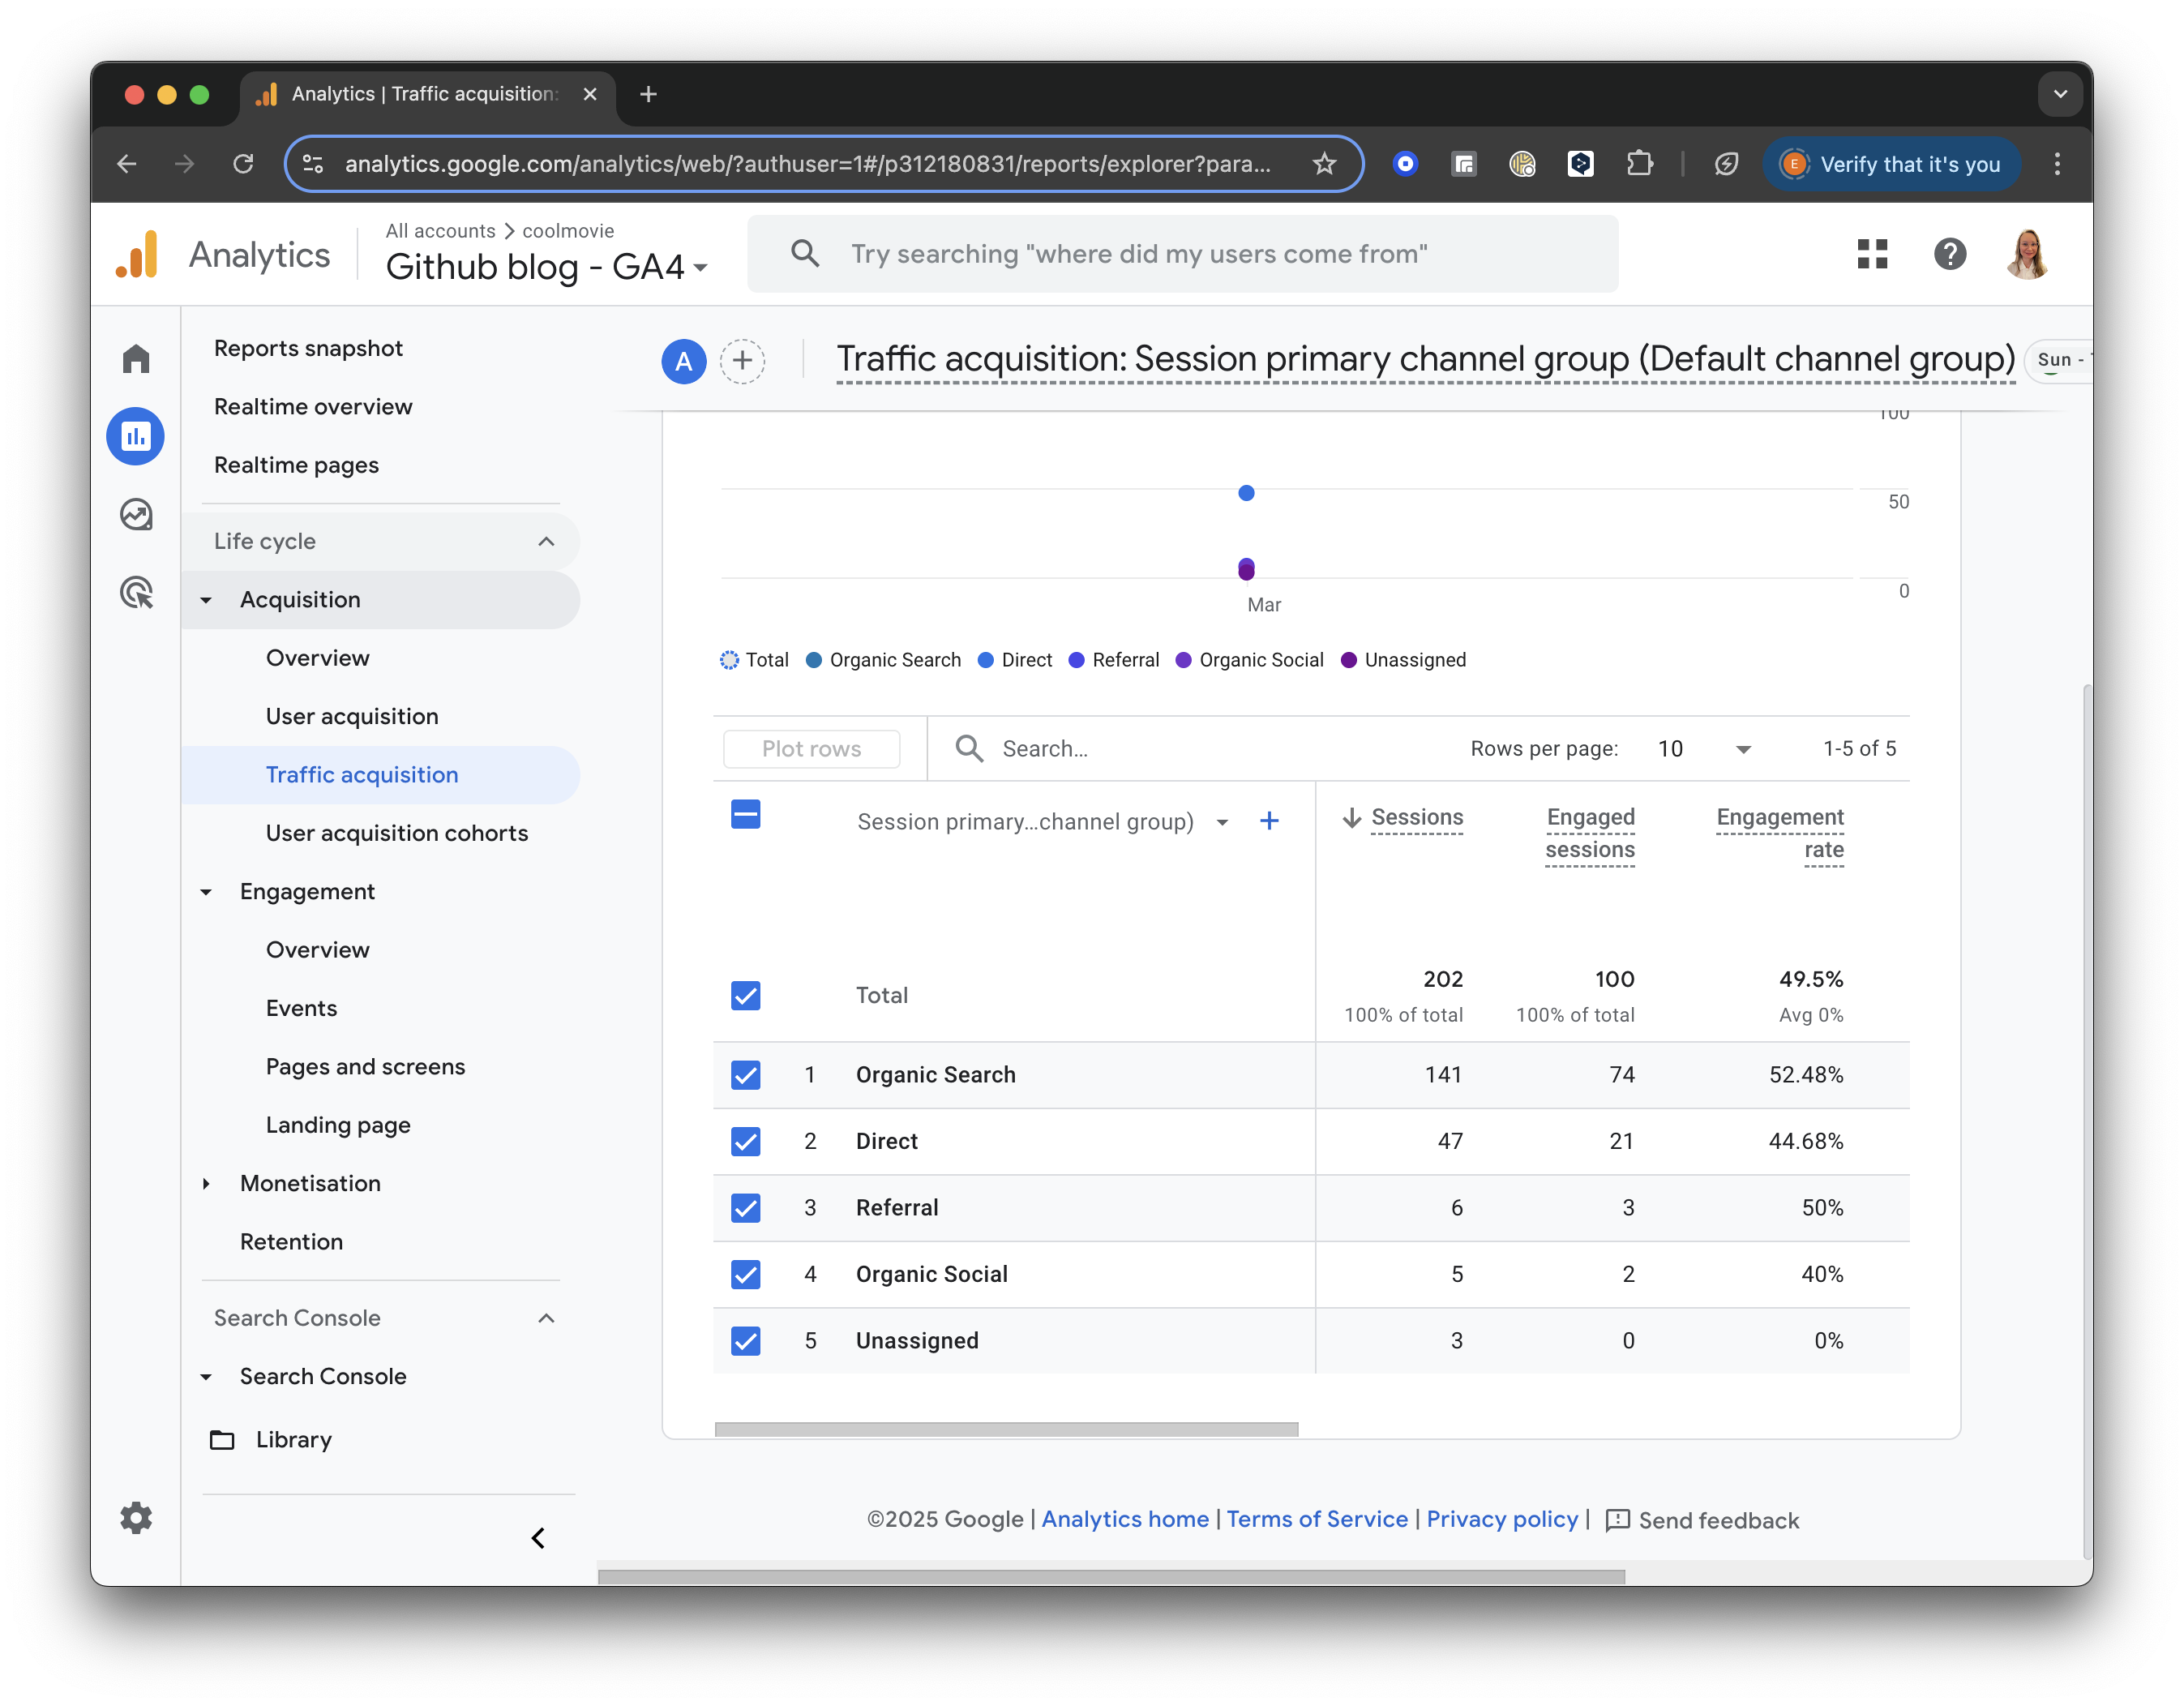
GA4 screenshot: Traffic Acquisition
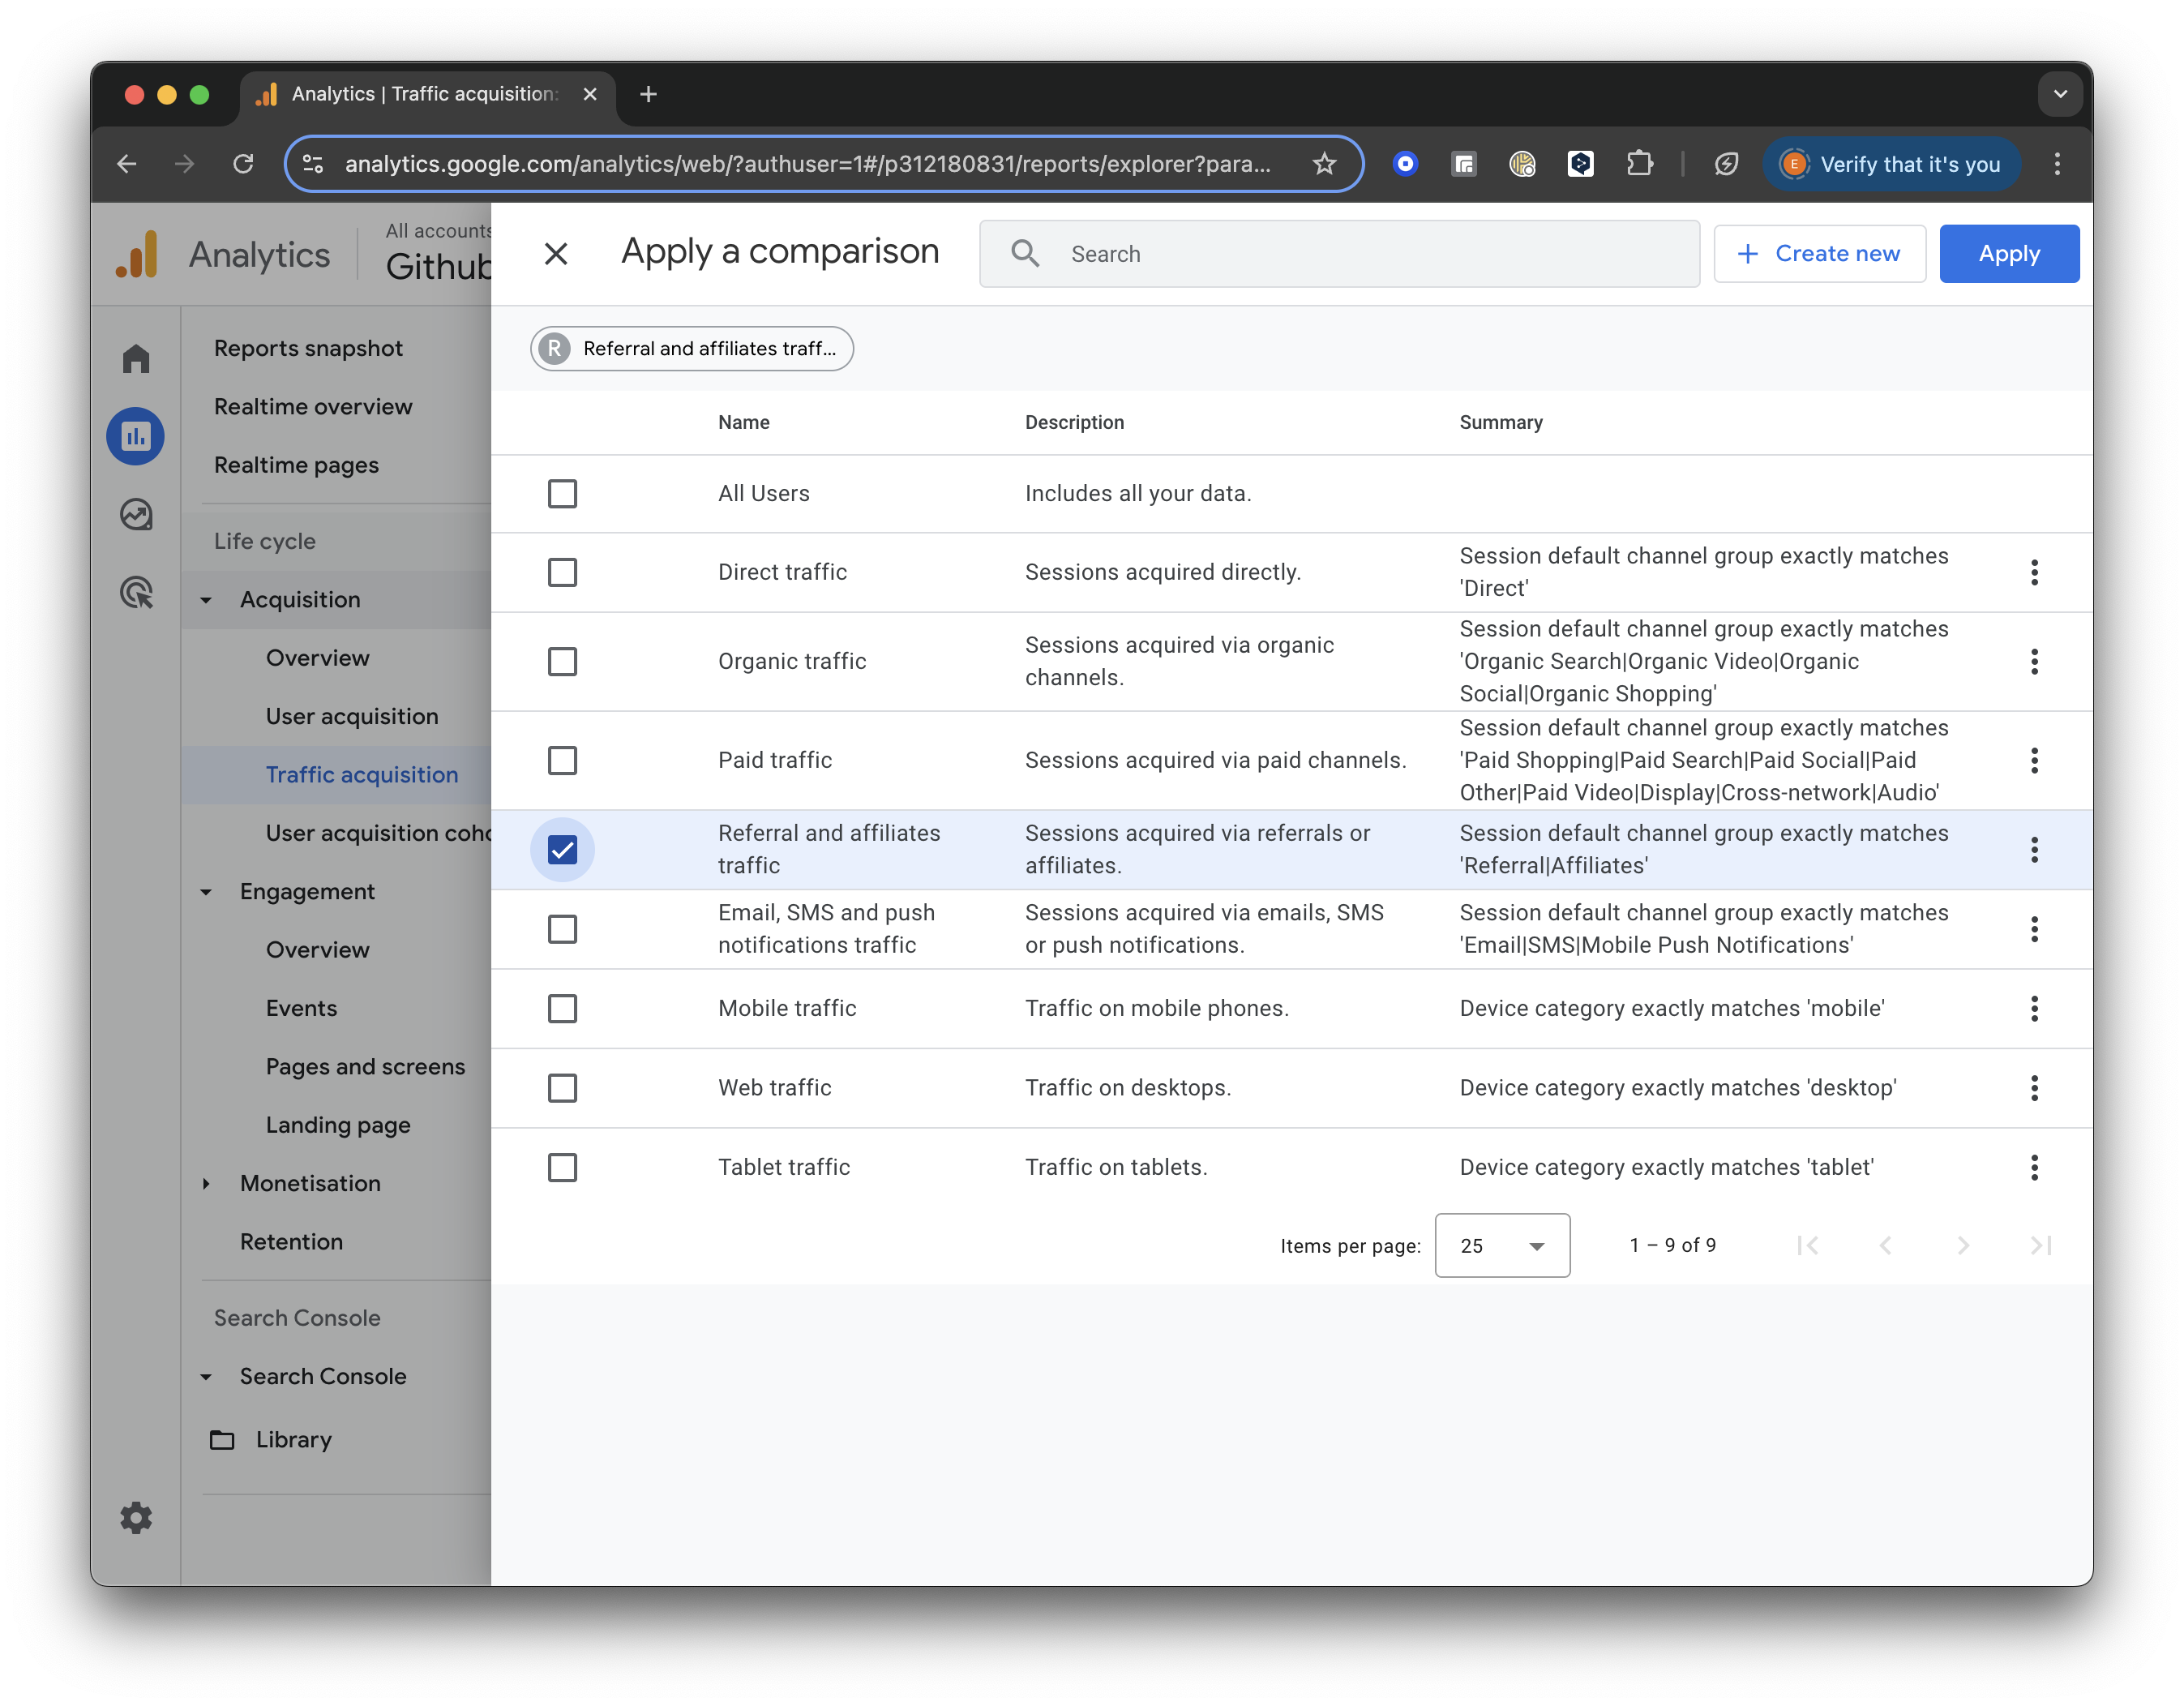
Add Comparison
Click the “Add Comparison” button at the top of the screen. Uncheck the box for “All Users” and scroll down to check the box for “Referral & Affiliates Traffic” to focus only on traffic from referrals.
GA4 screenshot: Select Referral Traffic
Once selected, click “Apply” to save and view the updated report.
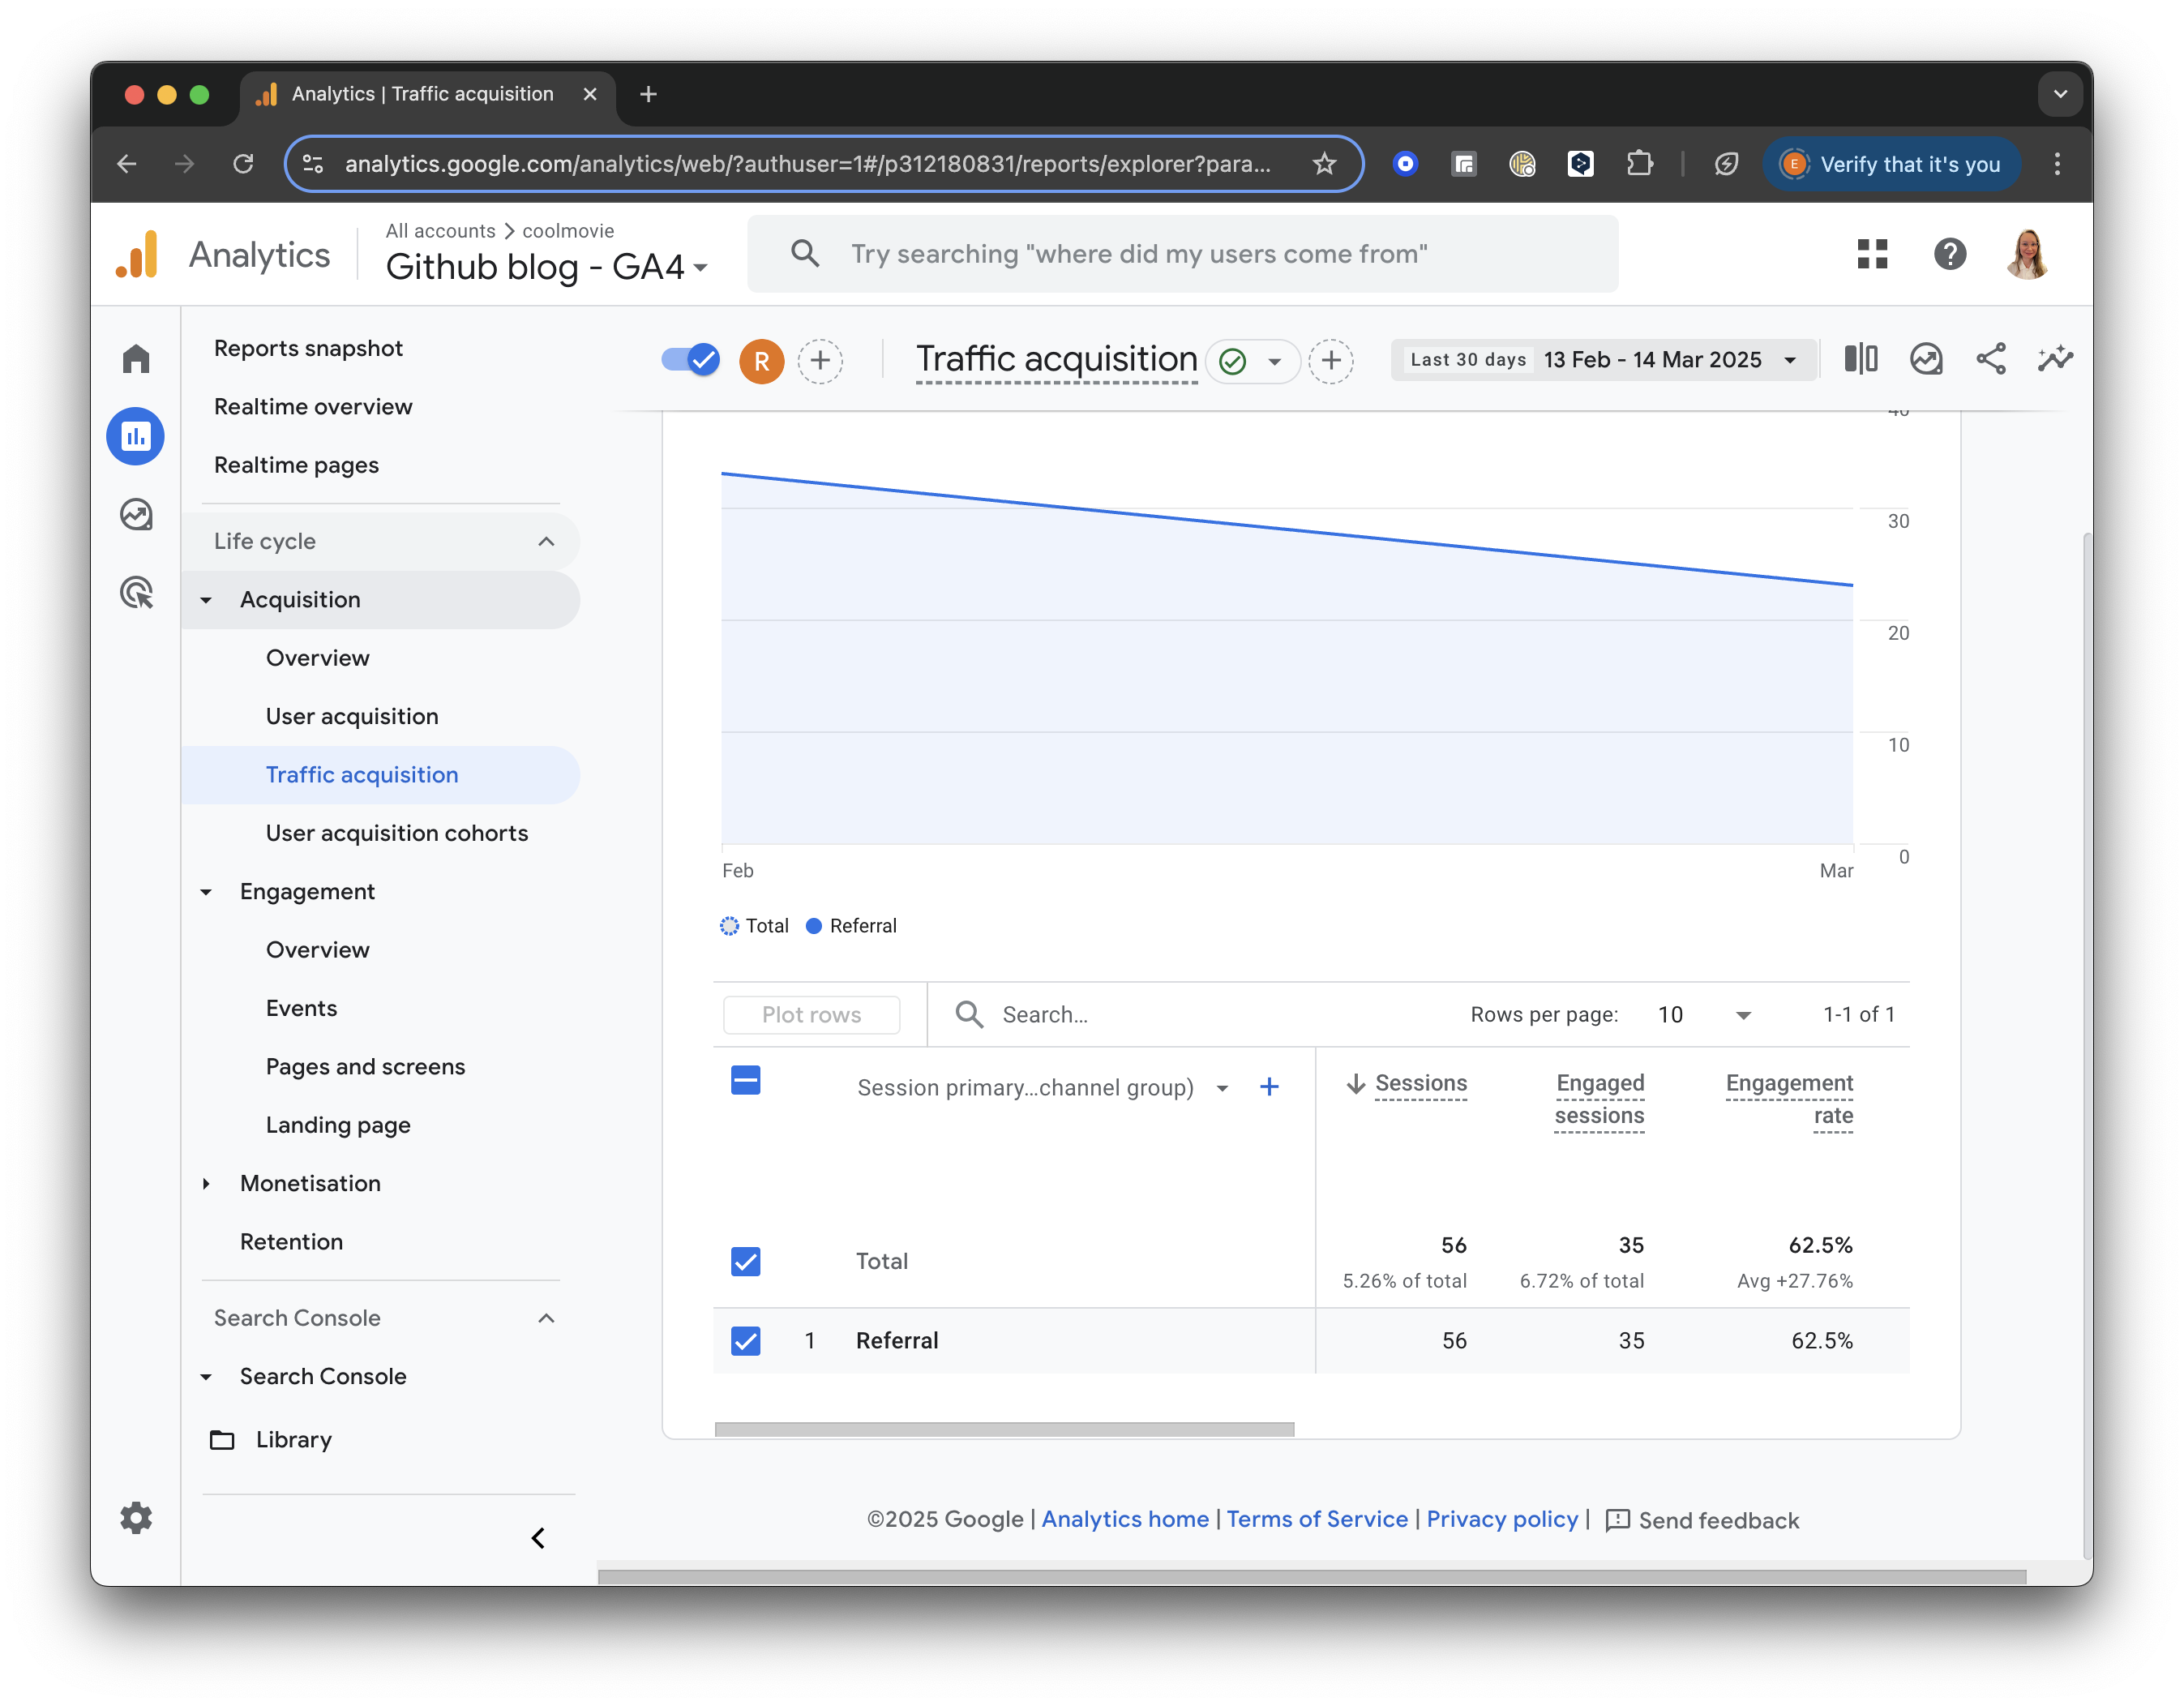
For all referral traffic, you will receive a detailed breakdown of sessions and engagement metrics (such as engaged sessions, engagement rate, and average engagement time).
GA4 screenshot: Referral Traffic
Add a Secondary Dimension
Next, let’s add a secondary dimension to analyse our traffic sources better.
Click the “+” icon next to “Session primary channel group” at the top of the table. Then, select Session Source/Medium from the list to add it as a secondary dimension.
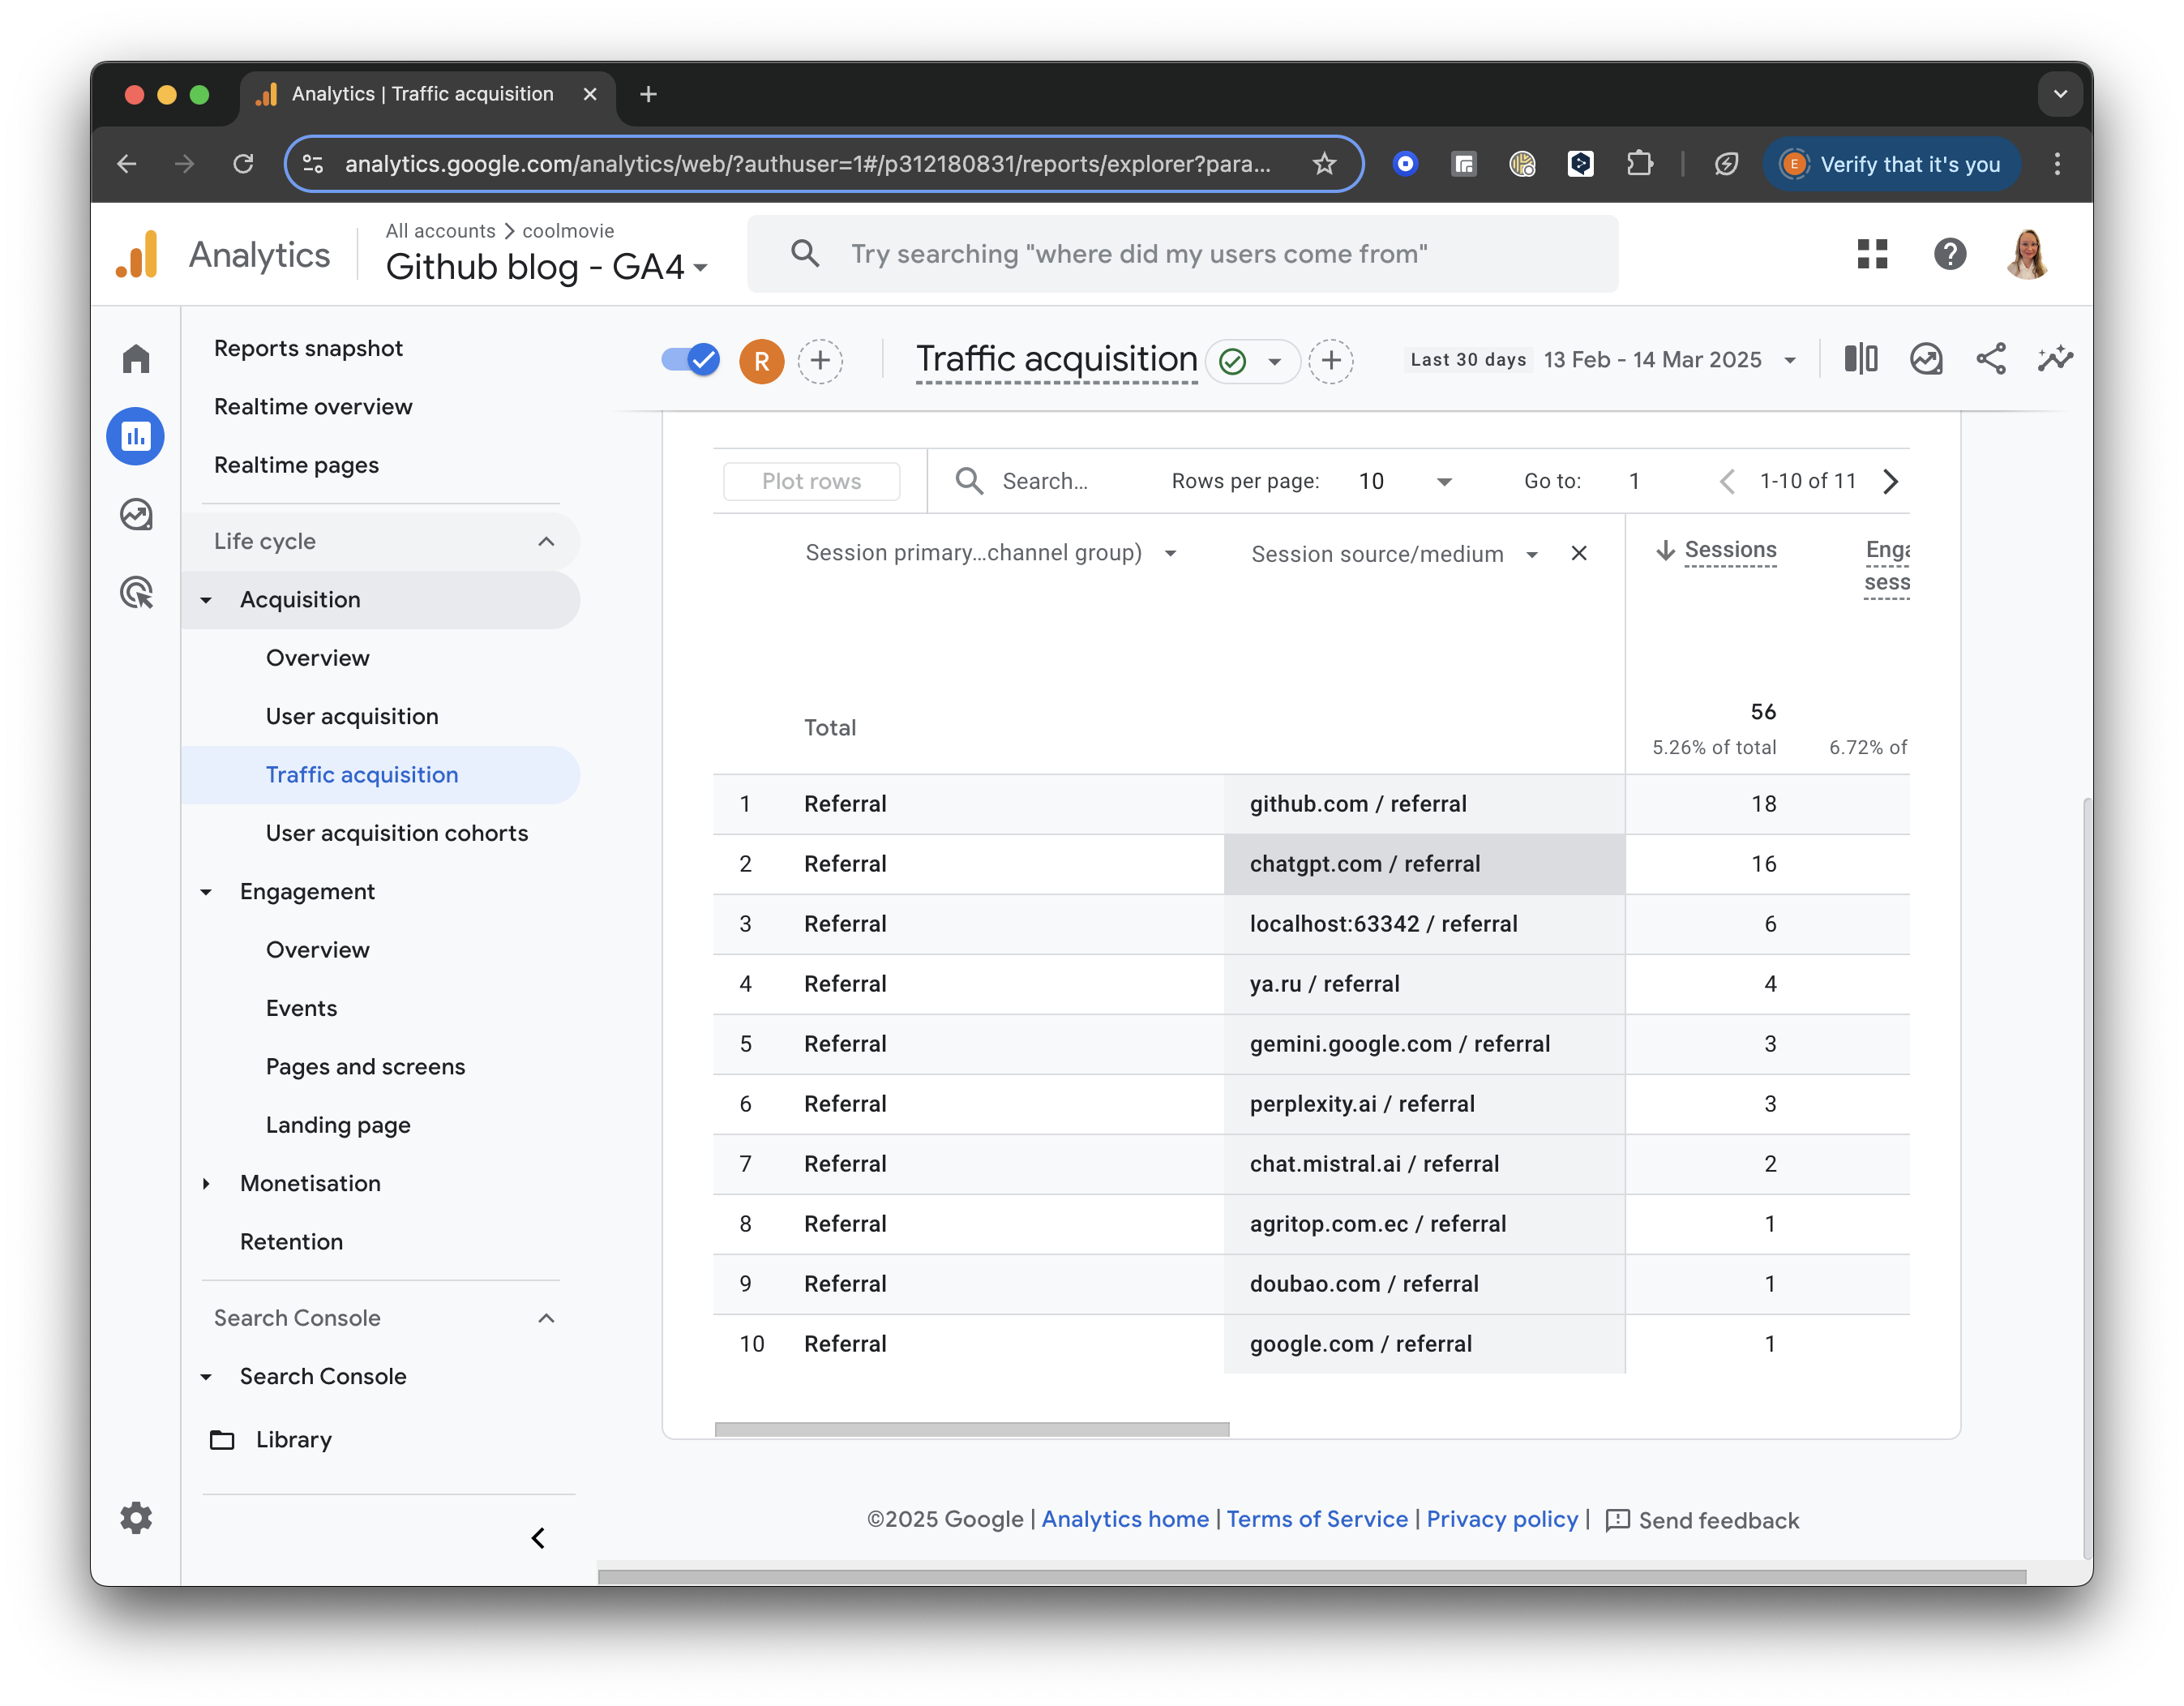
GA4 screenshot: Session Source Medium
Build a filter
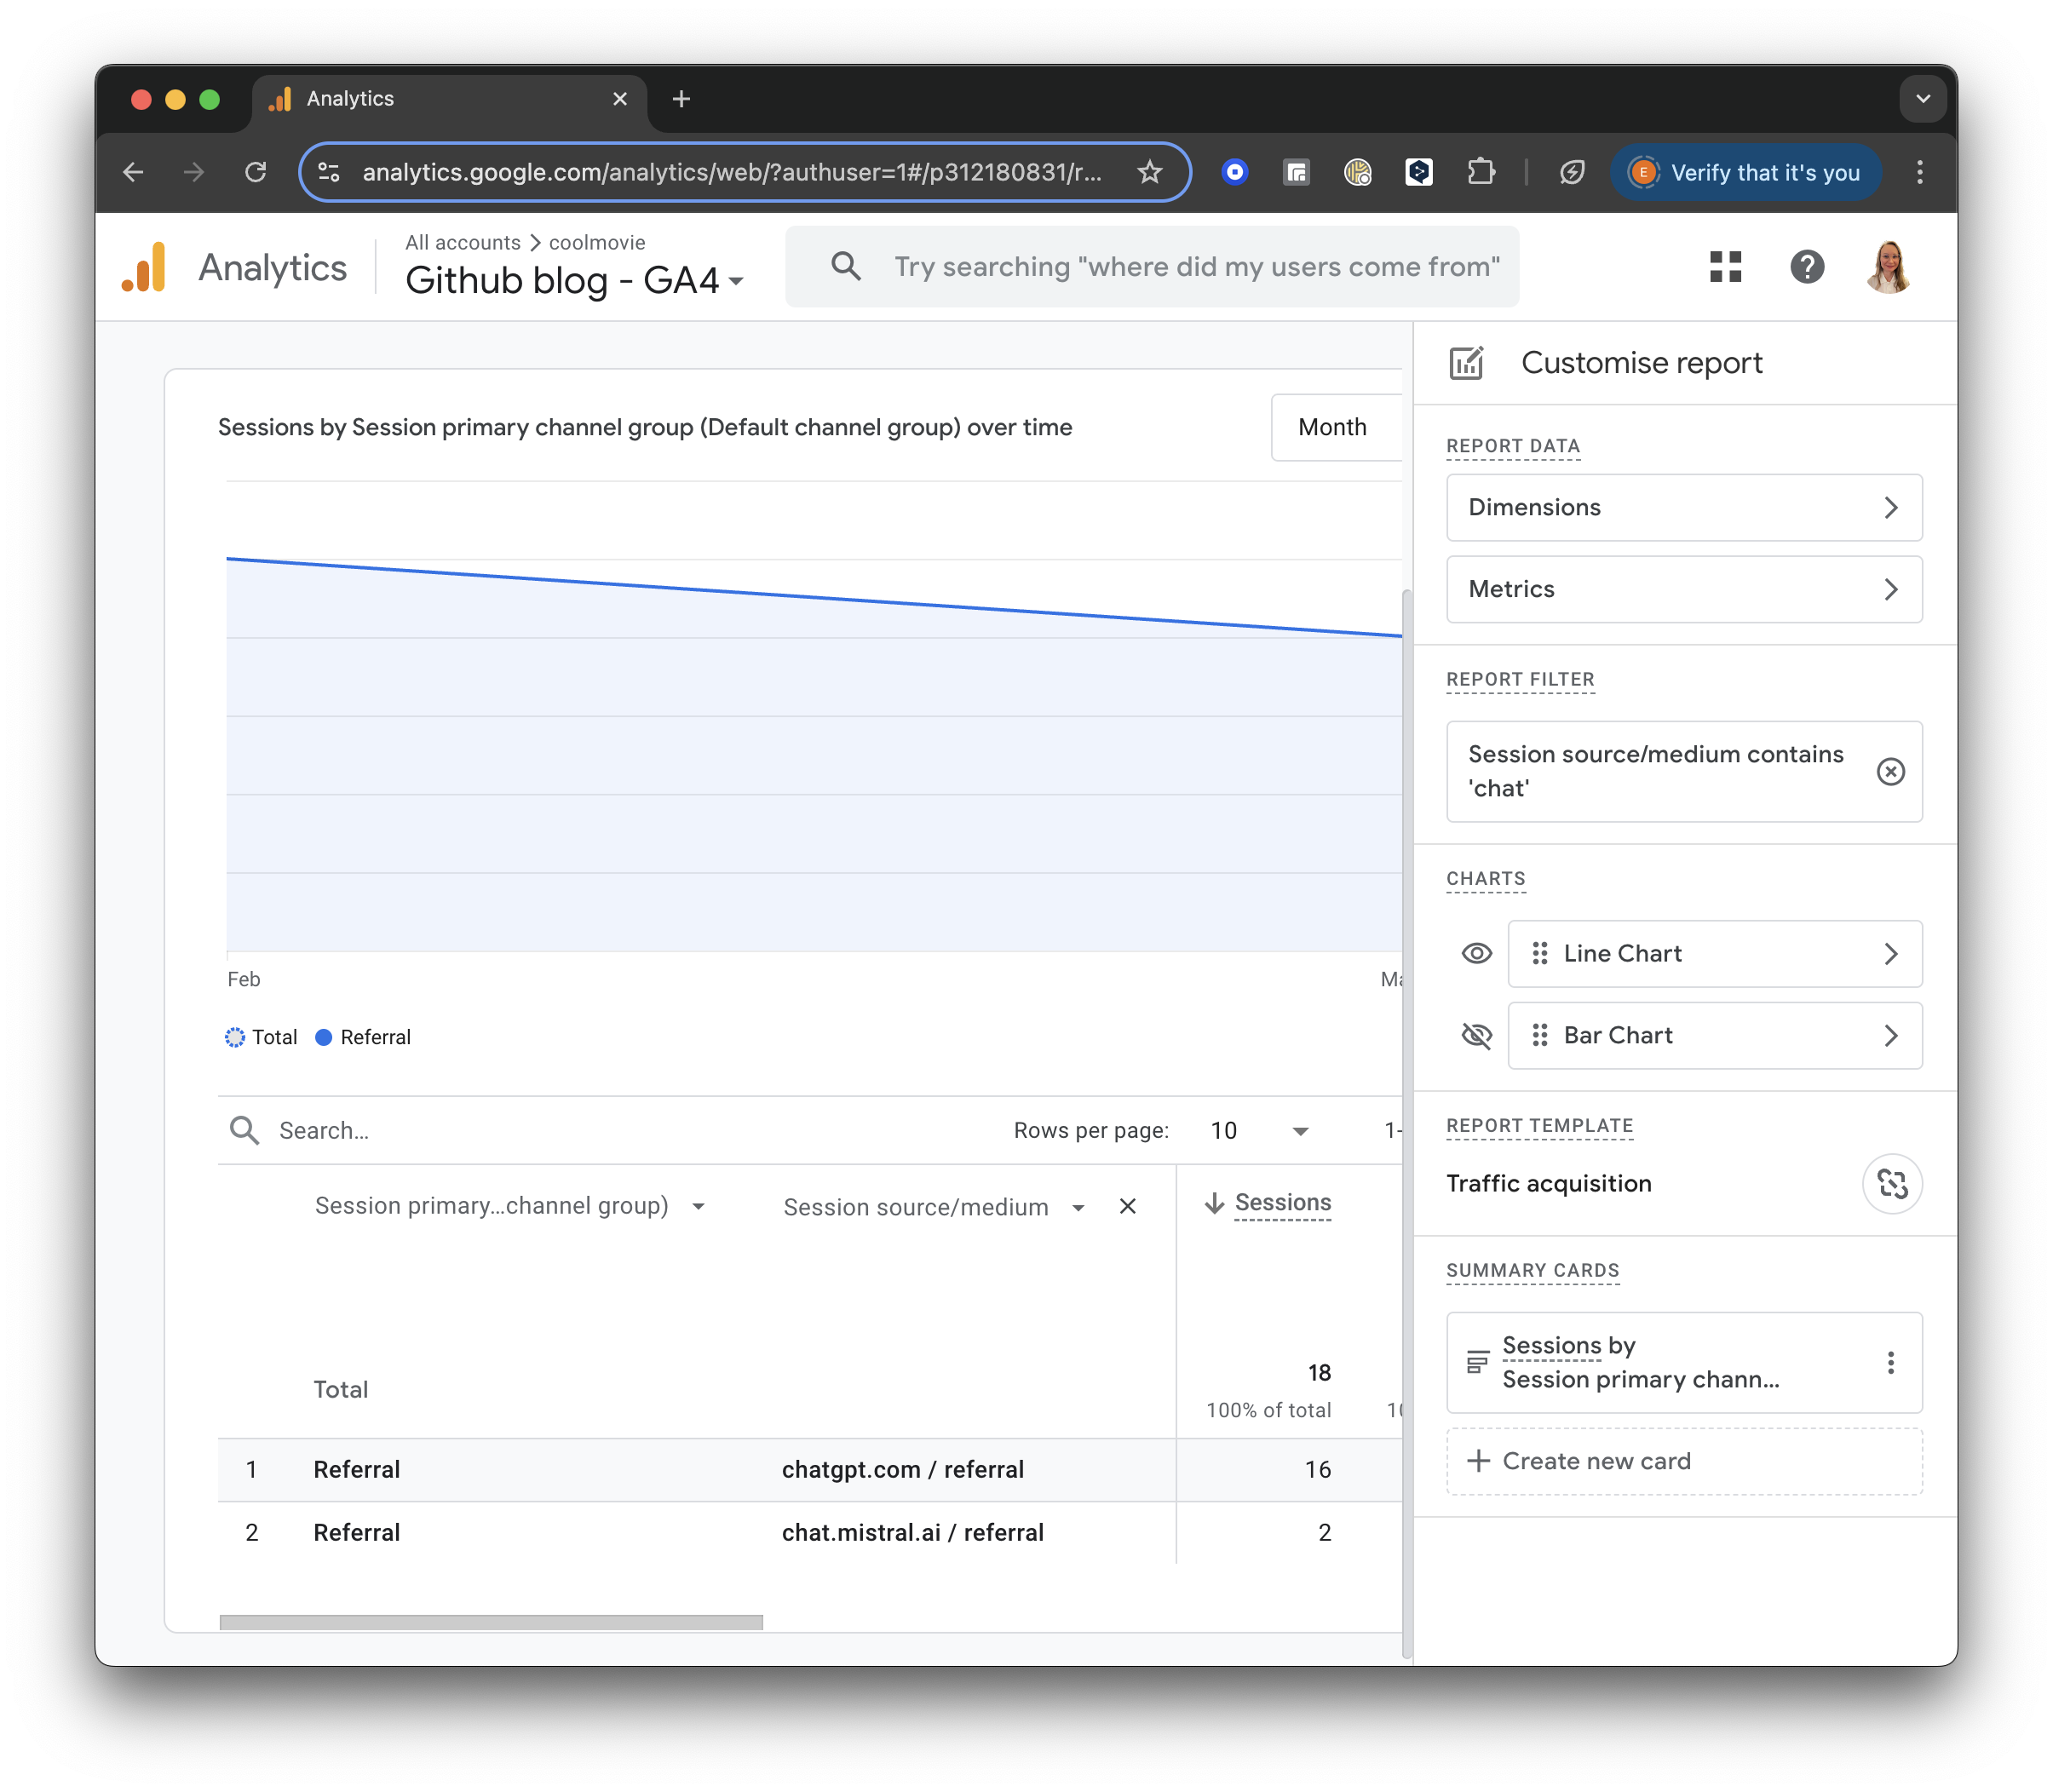
On the right side of the report, you will see a little pencil to “Customise the report.”
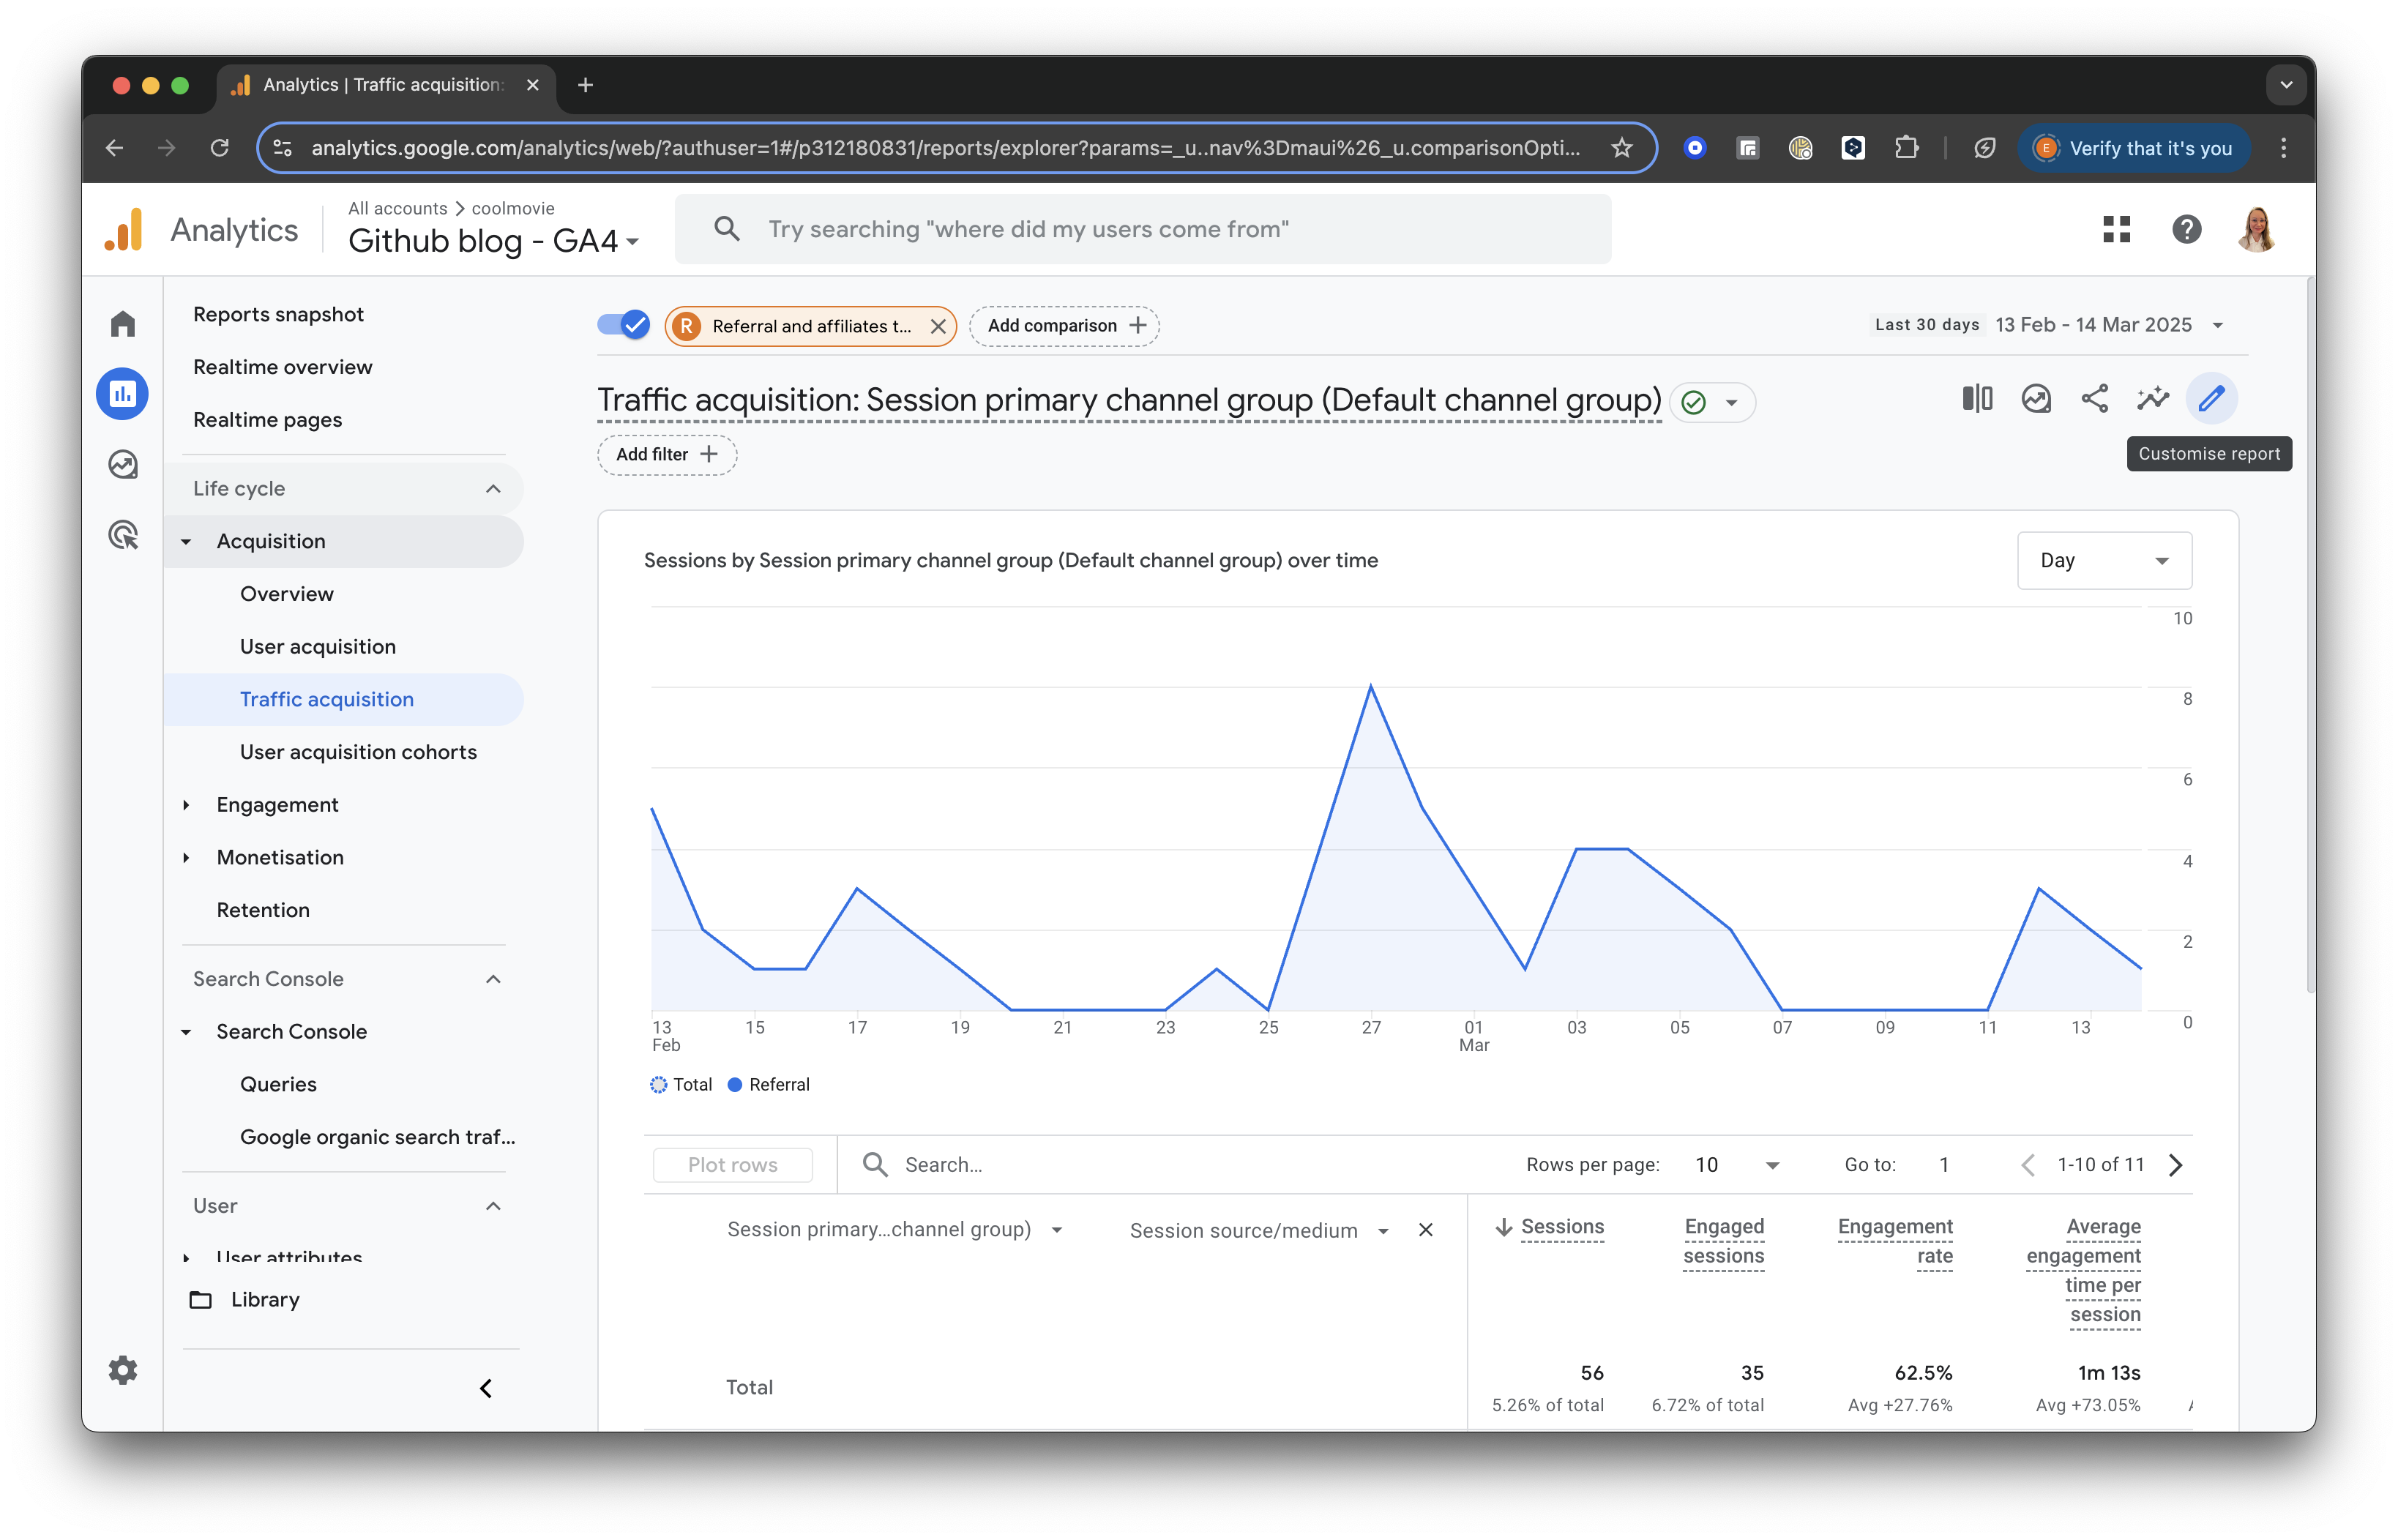
GA4 screenshot: Customise the Report
Press “+Add filter.” Then, find the Traffic Source section. Choose “Session source/medium” and set the Match Type to “contains.”
In the Value field, enter “chat” or another relevant keyword to filter for sessions from ChatGPT or similar sources.
GA4 screenshot: Chat Filter
Further, you can see which pages were visited by AI. In the table header, add “Page and screen class”, select “Page / Screen”, and then “Page path and screen class”.
In a result, you will see the pages visited by AI in the selected period:
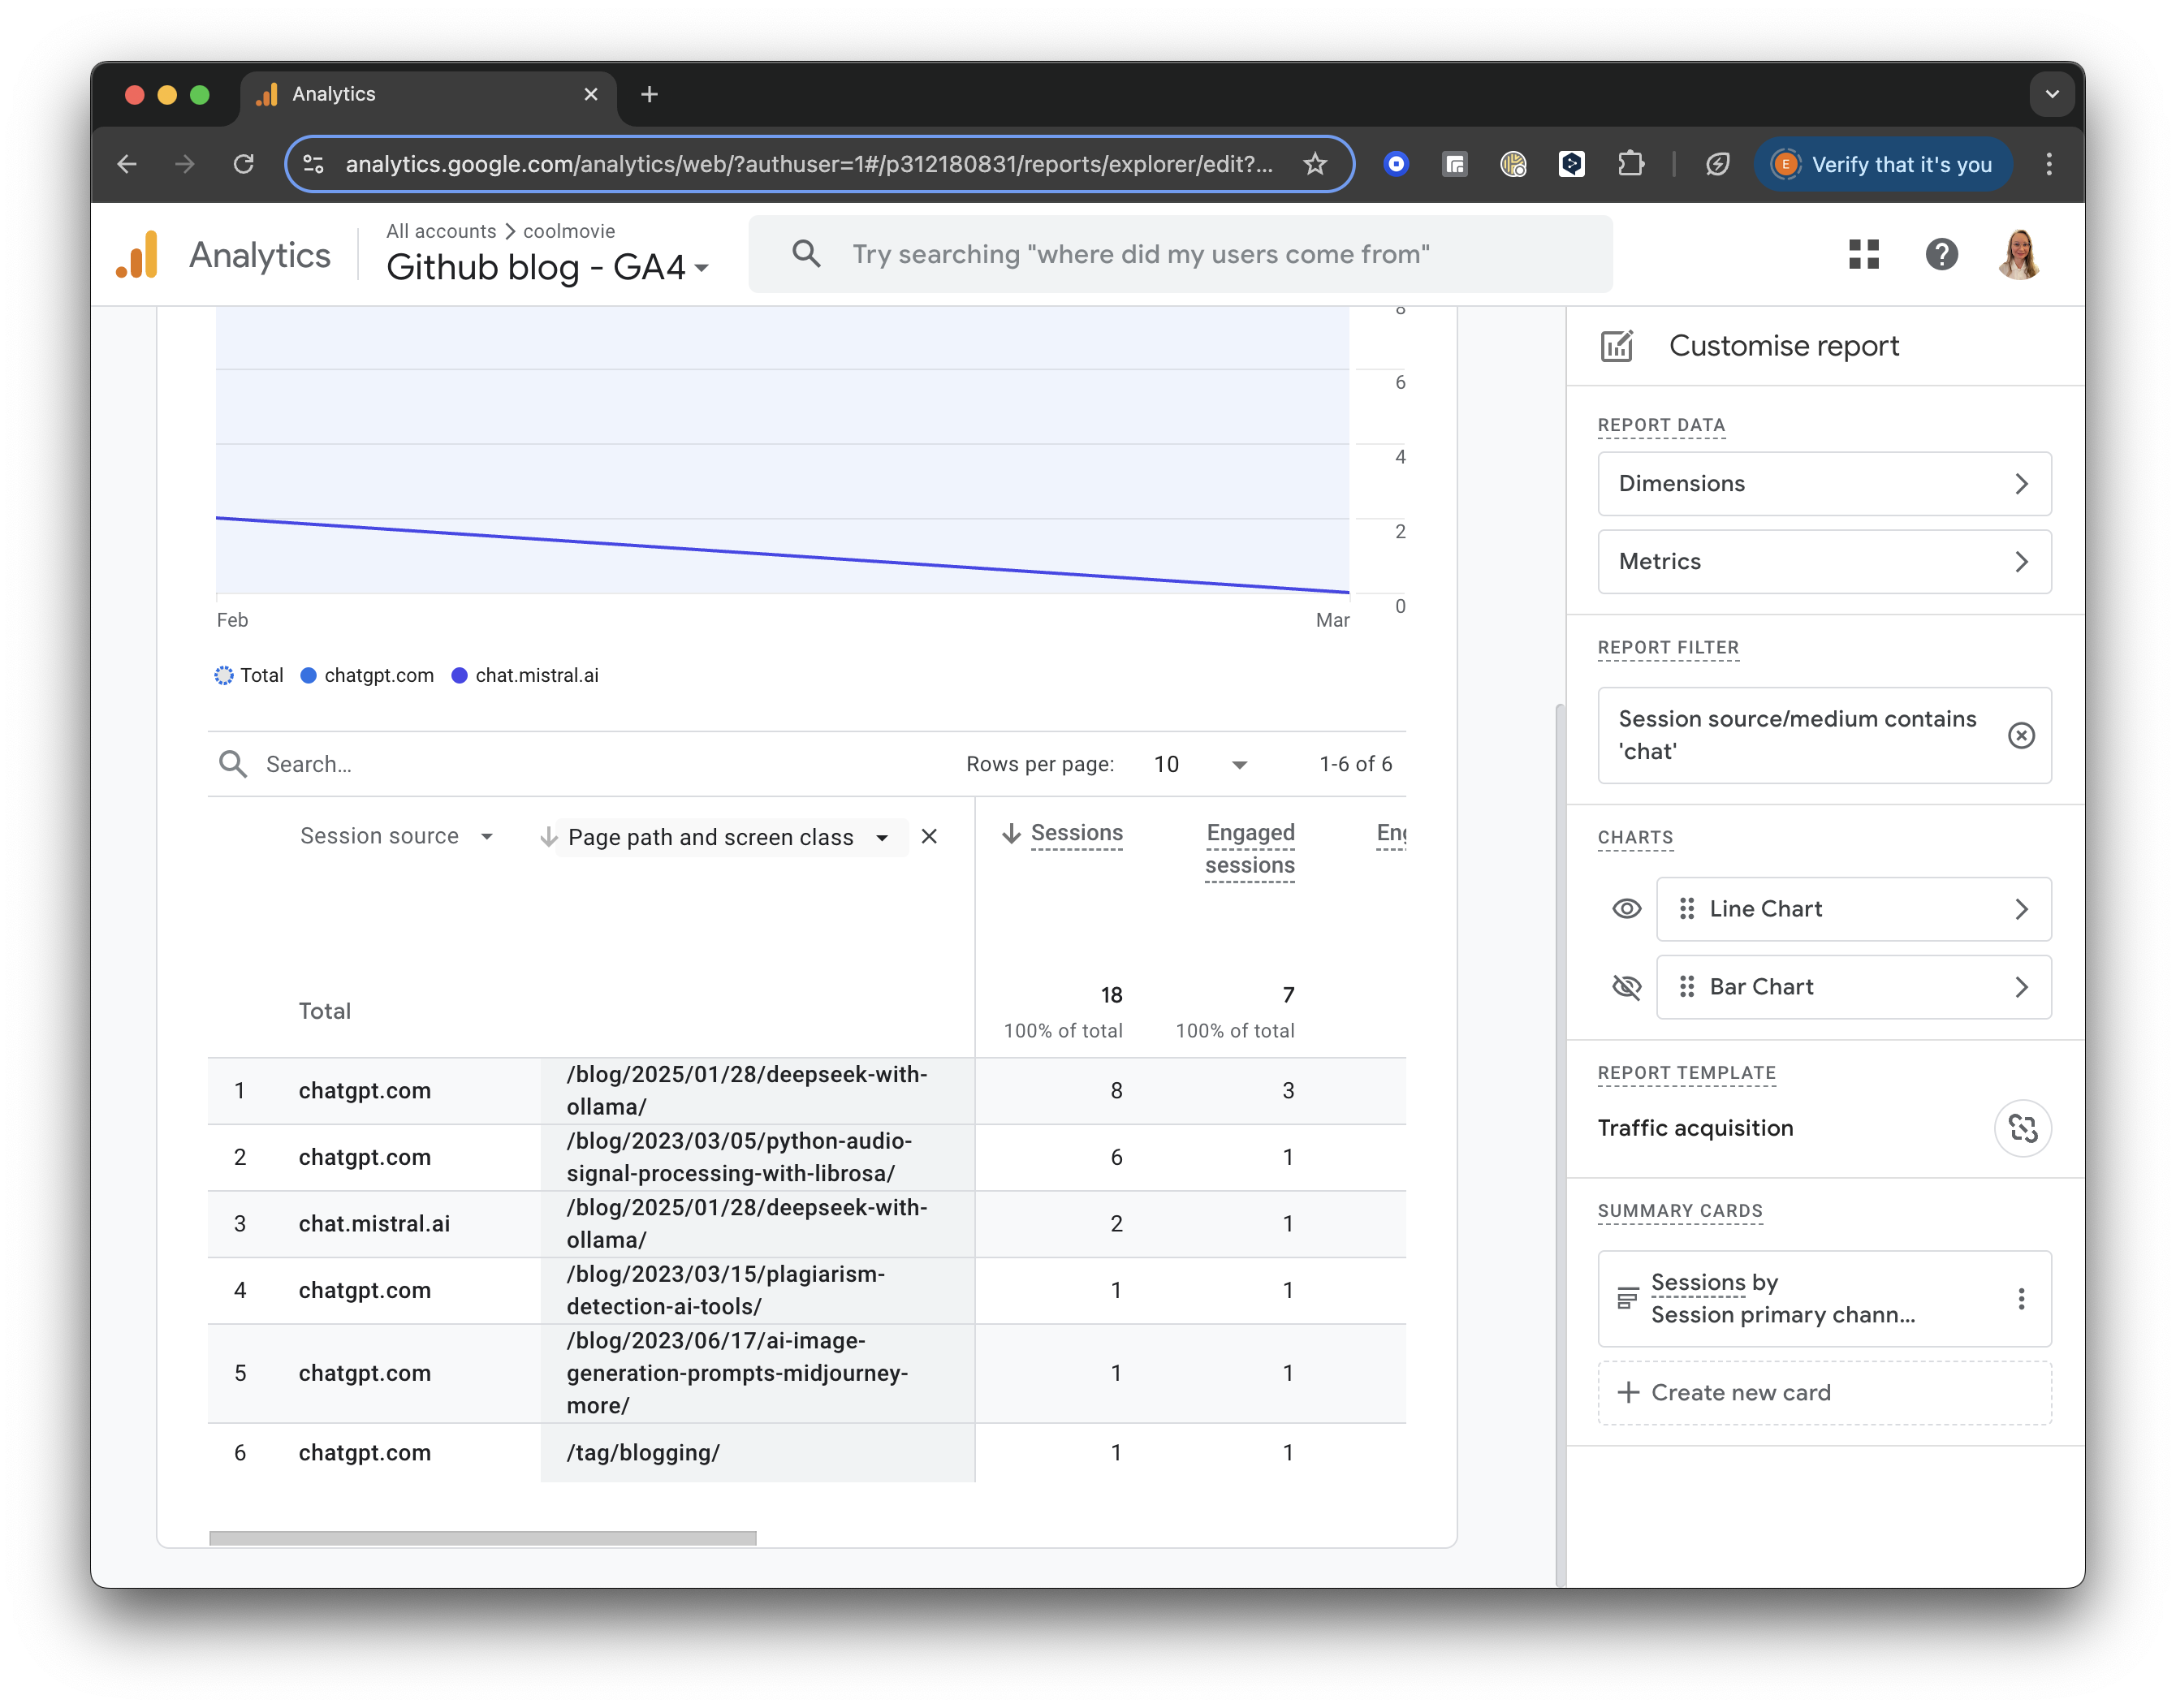
GA4 screenshot: AI Visited Pages
Implications of AI Scraping for Independent Bloggers
Is it good or bad that AI bots are reading my blog?
Personally, I am thrilled. I want my content to be part of the data that AI systems analyse. If my ideas, knowledge, and unique writing style can influence the next generation of AI responses, that is a win.
With AI agents fetching answers directly for users, I can reach a wider audience without having to worship at the altar of Google’s search algorithms. The major downside, of course, is attribution. Often, an LLM will regurgitate an idea without linking back to the original source. Copyright in the AI era is an unresolved mess, and once your content is out there, it is basically impossible to extract it from an LLM’s weights. For me, the tradeoff is worth it.
Crafting robots.txt for AI
robots.txt is a simple text file located in the root directory of your website (e.g., www.example.com/robots.txt). It tells web robots which pages they are allowed to crawl.
When it comes to AI, it is critical to understand that companies like OpenAI operate two entirely different types of bots. You need to decide how you want to handle each:
- The Training Scrapers (e.g.,
GPTBot,ClaudeBot): These bots crawl the web purely to hoard data and train future models (like GPT-5 or Claude 4). If they scrape you, your text gets baked into their model weights. - The Live Search Bots (e.g.,
ChatGPT-User): These bots browse the web in real-time when a user asks a specific question. If a user asks ChatGPT “What did Elena write about virtual environments?”, ChatGPT sends theChatGPT-Userbot to read my blog right now and generate an answer with a clickable citation.
If you block ChatGPT-User, you are actively preventing ChatGPT from answering questions about your brand or citing your website in real-time.
Here is how you would block the training bots, while allowing the live search bots to cite you:
# Block OpenAI from using your data to train models
User-agent: GPTBot
Disallow: /

# Block Anthropic from using your data to train models
User-agent: ClaudeBot
Disallow: /

# ALLOW ChatGPT to read your site to answer user questions
User-agent: ChatGPT-User
Allow: /
Optimising for AI Search (AIO)
Artificial Intelligence Optimisation (AIO) is a content strategy that structures information so large language models can extract and cite factual answers directly, rather than ranking a page through backlinks. It is also called Large Language Model Optimisation (LLMO). LLMs don’t care about keyword density or backlinks; they care about extracting factual answers quickly.
Here is how to optimise your content so that an AI engine actually cites you:
- Information Density: AI prefers dense, factual content over fluffy narrative. State your thesis clearly at the beginning of the article.
- Markdown Structure: LLMs parse HTML headers (
<h1>,<h2>) and lists effortlessly. Use clear, descriptive headers that frame the questions users are asking. - Be the Primary Source: AI engines don’t need you to summarize Wikipedia. They want unique data, personal opinions, novel code snippets, or original research. If you provide a unique perspective, the AI has to cite you because it can’t find that data anywhere else.
- Provide a TL;DR: I include a
tldrfield in all my post front-matter. This gives an immediate, concise summary of the page that an AI scraper can ingest instantly.
Conclusion: Positioning Your Blog for Generative AI Search
The web is changing. While traditional search engine traffic is being squeezed by zero-click AI summaries, this shift presents an opportunity. By using GA4 to track AI bots, configuring your robots.txt to allow live-search citations, and formatting your content for machine readability, you can position your blog to thrive in the era of Generative AI.
AI Search Optimisation is a discipline that treats large language models as a distinct traffic channel—one governed by information density and machine-readable structure rather than backlinks and keyword density. Blogs that publish original data, clear definitions, and structured markup become primary sources that AI engines cite by default.
AI Search Tracking: Frequently Asked Questions
What is the difference between GPTBot and ChatGPT-User?
GPTBot is OpenAI’s training crawler—it harvests pages to train future models, so anything it reads is baked into model weights. ChatGPT-User is the live search bot that fetches a page in real time when a user asks a question, then cites it with a clickable link. Blocking GPTBot stops training use; blocking ChatGPT-User stops real-time citations.
Does blocking ClaudeBot stop ChatGPT from citing my site?
No. ClaudeBot is Anthropic’s training crawler and is unrelated to OpenAI. Blocking it only affects Anthropic model training. ChatGPT citations depend on the ChatGPT-User agent, which you control separately in robots.txt.
How do I see which pages AI bots visited in GA4?
In Google Analytics 4, open Acquisition → Traffic acquisition, add a filter on Session source/medium set to contains chat, then add the Page path and screen class dimension. The resulting table lists the pages AI referrers landed on for the selected date range.
Will AI search traffic show up as Organic Search in GA4?
Not reliably. Referrals from ChatGPT and similar assistants usually appear under Referral or Direct rather than Organic Search, which is why a source/medium filter containing chat is more accurate than reading the default channel groups.
Related tools you may want to try next.
Pictory.ai creates professional quality videos from your script with realistic AI voices, matching footage and music in a few clicks. Pictory.AI can also convert blog posts into captivating videos and extract highlights from your recordings to create branded video snippets for social media, and much more.
SEMrush SEMRUSH provides marketing platform for SEO insights and tools such as writing assistant.
References
Enjoyed this? Get more like it.
Weekly notes on AI tools, Python, and what I'm actually building — plus two free gifts: the 15-page Fantastic AI: The 2026 Toolkit and a Git Commands & Contribution Workflow Cheatsheet.
