
Introduction: Beyond the Chatbox
“Will AI make me a lazy programmer?”
It is the most common question I receive. My answer is always the same: AI will not make you a magical coder overnight. If you do not understand software architecture, an LLM will simply help you write bad code much faster.
However, the way we interact with AI is evolving. I previously reviewed web-based chatbots like Claude and Gemini. They are excellent, but manually copy-pasting code between a browser tab and your IDE is inefficient.
Cursor AI solves this. It is a fork of Visual Studio Code that integrates AI directly into the editing environment. It is not just another chatbot—it is an IDE built entirely around contextual AI agents. In this post, I will break down the technical architecture of how Cursor “understands” your code (via RAG and vector embeddings) and review its practical utility for Python development.
What is Cursor AI? The Technical Foundation
Cursor AI looks and feels identical to Visual Studio Code, but its core differentiator is how it achieves “codebase awareness.”
When you open a project in Cursor and use the @codebase command, it doesn’t just blindly send all your files to an LLM (which would exceed context windows and cost a fortune). Instead, it relies on Retrieval-Augmented Generation (RAG) and Vector Embeddings.
Similar to the embedding processes I explored in my post on Recommender System Approaches, Cursor mathematically maps your entire codebase locally. When you ask a question, it queries this local vector database to retrieve only the most semantically relevant files and functions, injecting them into the LLM’s prompt. You can learn more about this general architecture in my deep dive into Retrieval-Augmented Generation (RAG).
This architecture allows you to:
- Generate code with full awareness of your custom utility functions and classes.
- Refactor and optimize logic intelligently across multiple files.
- Debug issues by asking the AI to trace execution paths across your repository.
Getting Started
Setting up Cursor AI is straightforward, especially if you already use VS Code. Do not worry if you are new to this - we will go step by step.
Installation
- Download: Go to cursor.sh and download for your system
- Install: On macOS, just drag to the Applications folder. That is it!
- Launch: Open Cursor AI - you will see a familiar VS Code interface
During the first launch, Cursor asks about using your code to improve AI. You can disable this in Settings → Privacy if you prefer (I keep it enabled because I like contributing to AI improvement, but choose what feels right for you).
To install the command-line tool, open Command Palette (Cmd+Shift+P), search “Shell Command: Install ‘cursor’ command”. Now you can open projects from the terminal with cursor . - very handy!
Basic Configuration
I suggest keeping the default VS Code shortcuts unless you are a Vim person. For AI conversations, English works best, though other languages are supported.
Creating Project Structure
Start clean:
mkdir my-python-project
cd my-python-project
Open this folder in Cursor AI. Here is where the magic begins - instead of manually creating files, press Cmd+L to open the Chat Panel and ask:
“Create a standard Python project structure with app, tests, requirements.txt, README, and gitignore”
Boom! You get a complete structure, and Cursor starts coding for you :
python-project/
├── app/                    # Main application code
│   ├── __init__.py        # Package initialization with version info
│   ├── main.py            # CLI application entry point
│   └── utils/             # Utility functions
│       ├── __init__.py
│       └── helpers.py     # Common utility functions
├── tests/                 # Test files
│   ├── __init__.py
│   ├── conftest.py        # pytest configuration and fixtures
│   ├── test_main.py       # Tests for main application
│   └── test_utils.py      # Tests for utility functions
├── requirements.txt       # Production dependencies
├── requirements-dev.txt   # Development dependencies
├── setup.py              # Package setup and installation
├── pyproject.toml        # Modern Python project configuration
├── .gitignore           # Comprehensive Git ignore rules
├── .dockerignore        # Docker ignore rules
├── Dockerfile           # Docker container configuration
├── Makefile             # Development task automation
├── config.example.json  # Example configuration file
└── README.md            # Comprehensive documentation
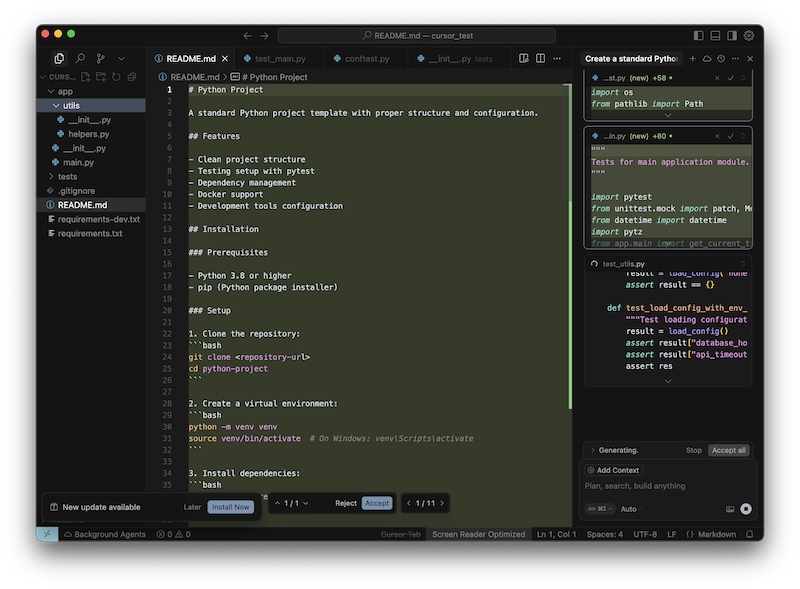
Cursor creates a Python scaffold project
This is not cheating - this is working smarter, not harder.
Virtual Environment (Always Use One!)
Create your virtual environment:
python -m venv venv
source venv/bin/activate  # Windows folks: venv\Scripts\activate
Configure Python interpreter in Cursor, read at Python: Set up Python development with extensions and linting tools:
- Command Palette (
Cmd+Shift+P) - “Python: Select Interpreter”
- Choose your virtual environment
Cursor AI detects this automatically - pretty clever, right?
Essential Tools
Remember my philosophy: you do not need to know every tool. Focus on the essential ones.
Core Extensions
Python Extension Pack: Get this first. It includes Python support, a debugger, and a Pylance language server.
Pylance: Microsoft’s fast Python language server. Works beautifully with Cursor AI’s autocomplete.
Code Quality Tools (These Matter!)
Ruff: Modern, fast Python linter:
pip install ruff
Configure it:
{
  "ruff.args": ["--line-length", "88"],
  "[python]": {
    "editor.defaultFormatter": "charliermarsh.ruff"
  }
}
Black: For consistent formatting:
pip install black
MyPy: For type checking:
pip install mypy
The beautiful thing? Cursor AI learns your style preferences and suggests code that follows your formatting rules. It is like having a coding buddy who remembers how you like things done.
Cursor AI Features I like
Chat Panel (Cmd+L)
This is where conversations happen. Let me show you real examples from my work:
Code Generation:
Instead of writing boilerplate (boring!), describe what you need:
Create a function that fetches data from a REST API, handles common HTTP errors, and returns parsed JSON with proper error handling
I'll create a robust function that fetches data from a REST API with comprehensive error handling. Let me add this to the utils module.
Next, Cursor AI generates the whole code to be included in the utils.py. You will just have to accept it.
Not bad, right? But always review the code - do not just copy-paste blindly!
Codebase Questions:
This feature is fantastic. Ask questions about your code:
Find all functions in my codebase that make database connections and show me how they handle connection pooling
Cursor AI searches your files and explains what it finds. It is like having documentation that writes itself.
Inline Prompting (Cmd+K)
The Inline Prompting is excellent for quick fixes.
Place the cursor in your function, press Cmd+K, and ask:
Add input validation and docstring to this function
You get a diff showing proposed changes. Accept, reject, or modify - you stay in control.
Intelligent Autocomplete
As you type, Cursor suggests complete functions. Not just variable names - entire implementations! For example, start typing:
def calculate_fibonacci(n):
    # Cursor suggests the complete function
    if n <= 1:
        return n
    return calculate_fibonacci(n-1) + calculate_fibonacci(n-2)
It considers your project context, imported libraries, and coding patterns. Sometimes it feels like mind-reading!
Composer (Cmd+I)
Need to build entire features? Use Composer for big changes:
Create a Flask web application with user authentication, database models using SQLAlchemy, and RESTful API endpoints for user management
Cursor AI generates multiple files, such as:
app.pywith Flask setupmodels.pywith SQLAlchemy modelsauth.pywith authentication logicapi.pywith RESTful endpointsrequirements.txtwith dependencies
Again - review everything before using it!
How to Prompt Effectively
Bad prompting gives bad results. Good prompting gives excellent results. Here is what I learned:
Be Specific, Not Vague
❌ Bad: “Make this better”
✅ Good: “Optimise this function for performance, add type hints, and include error handling for empty input lists”
Provide Context
Instead of just asking for code, explain your situation:
Create a data validation function for my Django blog application. It should validate email formats, check password strength (minimum eight characters, at least one uppercase, one lowercase, one number), and ensure usernames are alphanumeric. Follow Django's validation patterns.
Break Down Complex Tasks
Do not ask for a complete application in one prompt. Break it down:
- “Create database models for a blog”
- “Add CRUD operations for these models”
- “Create API endpoints with serialisation”
- “Add authentication and permissions”
Use Version Control
Never experiment with AI-generated code on your main branch:
git checkout -b feature/ai-experiment
# Let AI generate code
git add .
git commit -m "Add AI-generated feature"
# Review, test, then merge if good
This saved me many times when AI suggestions were not quite right. You can ask Cursor to roll back to a commit with your number, and it will happily update your remote branch as well.
MCP Tools
MCP (Model Context Protocol) tools connect Cursor AI to external systems. Think databases, APIs, and logging systems.
The MCP server usage and creation are explained in Model Context Protocol (MCP), referring to the fantastic list of available MCP tools at MCP Servers page with my favourite GitHub, Notion and HuggingFace MCP servers!
An MCP server exposes a set of “tools” that the language model can invoke automatically based on your prompts. Cursor supports several transport methods for these servers, including stdio (for local command-line servers) and Streamable HTTP/SSE (for remote servers) [3].
You configure an MCP server by adding a JSON configuration to a file, either globally (~/.cursor/mcp.json) or for a specific project (.cursor/mcp.json) [3]. This configuration specifies the server’s name, command/URL, and any necessary authentication, like API keys.
For security, the protocol is designed to keep a “human in the loop,” meaning Cursor should provide visual indicators when a tool is invoked and may require user confirmation for sensitive operations.
Cursor AI vs Amazon Kiro AI
As the AI IDE market expands, tools are specializing. While I use Cursor daily, Amazon’s upcoming Kiro AI targets a different segment. Here is a high-level comparison of their philosophical approaches:
| Feature/Target | Cursor AI | Amazon Kiro AI |
|---|---|---|
| Primary Audience | Solo developers, startups, rapid prototypers. | Enterprise teams, regulated industries, AWS infrastructures. |
| Development Style | Conversational, chat-first, rapid iteration. | Spec-driven, strictly adhering to predefined architectural patterns. |
| Core Strength | Immediacy and massive productivity boosts for MVPs. | Compliance, team workflows, and complex enterprise documentation. |
| My Recommendation | Essential for daily coding, learning libraries, and debugging. | Highly anticipated for large, structured, team-based cloud projects. |
I recommend trying both depending on your context. Use Cursor for agility, and explore Kiro when strict enterprise compliance is the priority.
Real Development Workflow
Let me show you my typical Cursor workflow:
1. Project Start
cursor new-project
Use the Chat Panel for project structure, configure the virtual environment, and install dependencies.
2. Feature Development
Start with comments describing what you want:
# TODO: Create user authentication with JWT tokens and bcrypt password hashing
Let Cursor AI generate an initial implementation, then refine with Cmd+K.
3. Testing and Debugging
When tests fail, paste the error:
This test fails with KeyError: 'user_id'. Here is the error log: [paste log]. Fix the issue and explain what went wrong.
4. Code Review
Before committing:
Review this authentication module for security issues, performance problems, and code quality improvements
5. Documentation
Generate docs:
Create detailed docstrings for all functions in this module with examples and type hints
Common AI Workflow Mistakes
Transitioning to an AI-native IDE requires new mental models. Here are the most common pitfalls and their solutions:
| The Pitfall | The Symptom | The Architectural Solution |
|---|---|---|
| Blind Reliance | Accepting large, complex Composer diffs without reviewing the logic, leading to subtle bugs. | Always review code. Use AI to generate the boilerplate, but you must validate the business logic. |
| Context Degradation | The AI “forgets” earlier instructions in a long chat session and starts hallucinating. | Limit context pollution. Start a fresh Cmd+L chat session for each distinct new feature or bug. |
| Generic Architecture | The AI generates standard, “tutorial-style” code that ignores your custom project patterns. | Use .cursorrules files in your project root to force the AI to adhere to your specific tech stack and architectural conventions. |
Handling Large Projects
As explained in the official Guide: How to Handle Big Projects With Cursor, AI struggles with massive, undefined scope. To mitigate this:
- Write PRDs: Document your application’s goals and design patterns in markdown.
- Establish Rules: Define coding standards in
.cursorrules. - Generate RFCs: Create detailed RFC documents for individual features.
- Iterative Composer: Ask the Cursor Composer (
Cmd+I) to implement one specific RFC at a time, rather than asking it to “build the app.”
Dealing with Frustration
Sometimes AI suggestions are wrong. Sometimes they do not work. Sometimes you feel like traditional coding was easier.
This is normal! Remember:
- You are still learning: AI coding is a new skill, be patient with yourself
- AI is not perfect: It makes mistakes, just like humans
- Keep perspective: Focus on what AI helps you achieve, not its limitations
- Take breaks: If frustrated, step away and come back fresh
It is not possible to become an excellent coder overnight. You will have some challenges, but they will help you grow and respect the craft.
My opinion and recommendations
After months of using Cursor AI for Python development, here is what I think:
The Good:
- Dramatically speeds up boilerplate code writing
- Excellent for learning new libraries and patterns
- Great debugging assistant when you are stuck
- Makes documentation less painful
- Chat interface feels natural and conversational
The Challenging:
- Can generate code you do not understand (dangerous!)
- Sometimes suggests outdated or inefficient approaches
- Requires good prompting skills to get good results
- Can make you lazy if you are not careful
Use Cursor AI, but use it wisely. It is an excellent tool for accelerating development and learning, but you still need to understand fundamentals, review code carefully, and maintain critical thinking skills.
Begin with straightforward tasks, such as generating utility functions or writing tests. As you get comfortable, gradually use it for more complex features. Constantly version control experiments, and never deploy AI-generated code without thorough review and testing.
Do not limit yourself to one particular tool; use Cursor AI or any other tool in combination with other assisted coding tools. You might benefit from using several AI bots working on your project at once.
Try out using several coding bots with your Git repository (use with caution and let them work on their designated branch for a start :) You will be able to see which bot is the best for your tasks.
And, the most important thing to remember - the goal is not to replace your thinking, but to augment it. AI should make you a more productive developer, not a passive consumer of generated code.
Conclusion
Coding is for everyone, and AI tools like Cursor AI can make programming more accessible and enjoyable. Do not let anyone tell you that using AI makes you a “fake” programmer - that is nonsense. We use compilers, IDEs, frameworks, and libraries to be more productive. AI is just another tool in our toolkit.
Use AI to learn, explore, and accelerate your work, but do not let it replace your curiosity and critical thinking.
Happy coding, my friends! And remember to eat well, exercise, and go outside sometimes :)
Did you like this post? Please let me know if you have any comments or suggestions about your experience with AI-powered development tools. I am always happy to learn from your experiences, too!
References
Enjoyed this? Get more like it.
Weekly notes on AI tools, Python, and what I'm actually building — plus a free copy of Fantastic AI: The 2026 Toolkit.
